
Skip to content
FlowerDrawings.orgFlowerDrawings.org

Peony Drawing Easy Step-by-Step Guide for Beginners

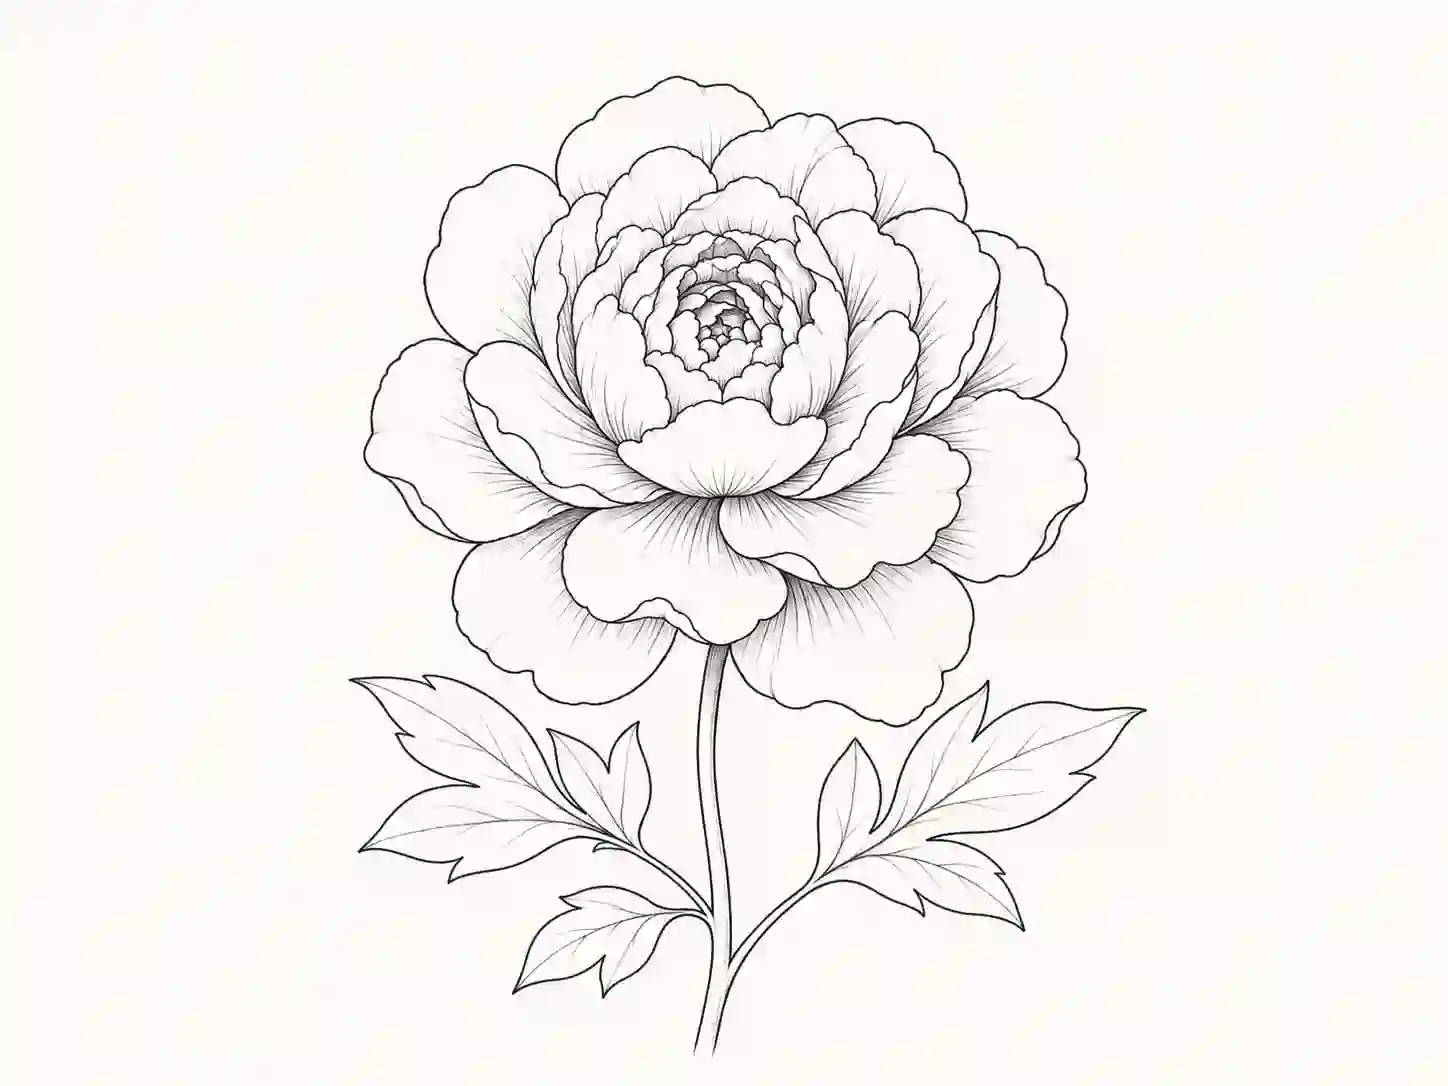
A peony is made from many overlapping petals, which can make it look difficult to sketch at first. The easiest way to create a peony drawing is not to draw every petal separately from the beginning. Instead, start with the compact centre and gradually build larger layers around it.

This tutorial breaks the peony flower into eight manageable stages. You will create a small central bud shape, surround it with curled inner petals, develop the wide outer bloom, and then finish the drawing with a stem and characteristic peony leaves.

For more flower drawing Guides visit the link to learn how to draw flowers. Also visit the Easy Flower Drawing Tutorials page for similar tutorials.

The method is suitable for beginners because it focuses on simple curved shapes rather than perfect botanical detail. You can leave your finished artwork as a clean pencil outline, add light graphite shadows for depth, or use it as a base for colour.

peony drawing

Before You Start Drawing the Peony

Peonies look different from flowers with clearly separated petals. Their petals overlap closely and often fold inward around the centre.

For this tutorial, remember three simple ideas:

  • Inner petals should be smaller and closer together.
  • Petals become wider as you move toward the outside.
  • The outer edges should be irregular rather than perfectly circular.

You do not need to count individual petals. The goal is to create the impression of a full, layered flower.

Tutorial Details

Difficulty

Beginner

Time required

Around 15 minutes

Steps

8

Style

Pencil outline with optional shading

Main subject

Open peony with stem and leaves

Suitable for

Beginners, students, children, parents, and teachers

Materials for an Easy Peony Drawing

You can complete this tutorial using supplies you probably already have:

  • HB or number 2 pencil
  • Plain drawing paper
  • Soft eraser
  • Pencil sharpener
  • Black fineliner, optional
  • Coloured pencils or crayons, optional
  • Printable worksheet for extra practice, when available

A sharp pencil works well for small inner petals, while slightly lighter pressure makes the larger outside petals easier to adjust.

How to Draw a Peony Step by Step

This peony drawing step by step tutorial builds the flower from the inside outward.

Do not make your first lines too dark. Some shapes will eventually overlap, and light pencil marks are much easier to erase when you refine the flower.

drawing of a peony
1

Step 1: Sketch the Centre of the Peony

Begin with a small loose circle or oval near the upper-middle part of your paper.

Inside it, add two or three short curved shapes. These will become the tightly folded petals in the centre of the bloom.

The centre does not need to look perfectly round. A slightly uneven shape will make the final flower feel more natural.

Leave generous room around it because the peony will become much larger in later steps.
peony flower drawing
2

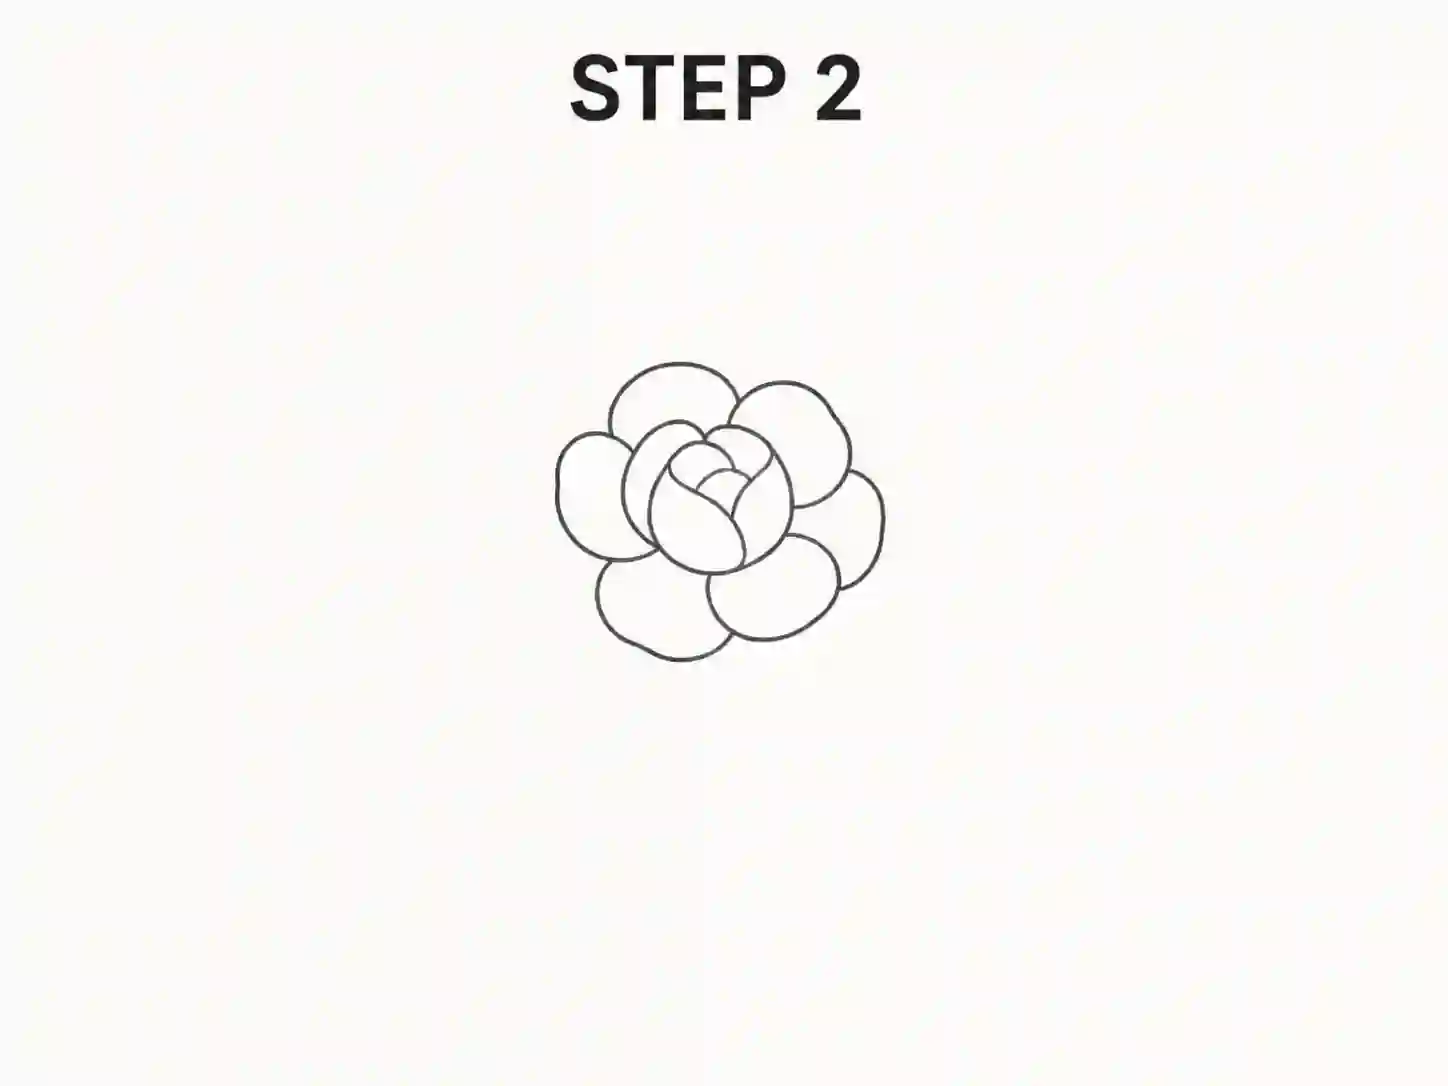
Step 2: Build the First Petal Layer

Draw several small curved petals around the centre.

Let some petals overlap each other. A few can curl inward, while others may open slightly toward the sides.

Keep these first petals compact. If they become too large now, you will not have enough visual difference between the centre and outer flower.

At this stage, the peony flower drawing should begin to resemble a small rose-like bud.

peony drawing easy
3

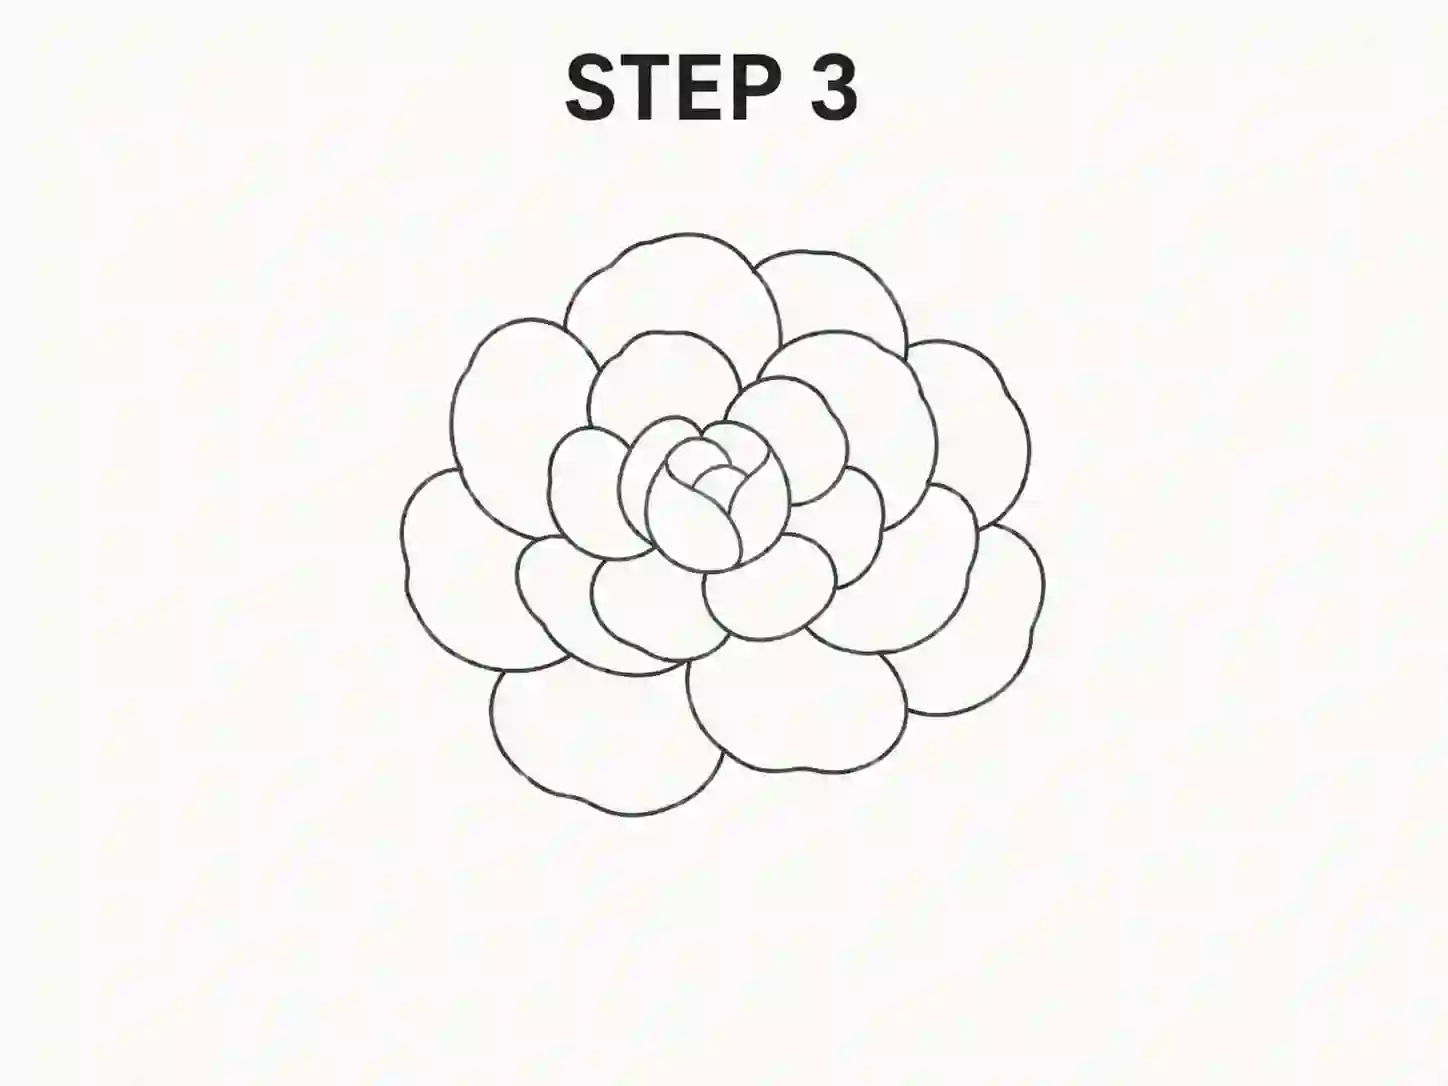
Step 3: Add Medium-Sized Petals

Create another layer around the first group.

These petals should be wider and more open than the centre petals. Use smooth curved lines and allow one edge to disappear behind another petal occasionally.

Avoid making a perfect ring.

Instead, vary:

  • Petal width
  • Petal height
  • Direction
  • Amount of overlap

This irregular layering is an important part of a convincing peony.

peonies drawing
4

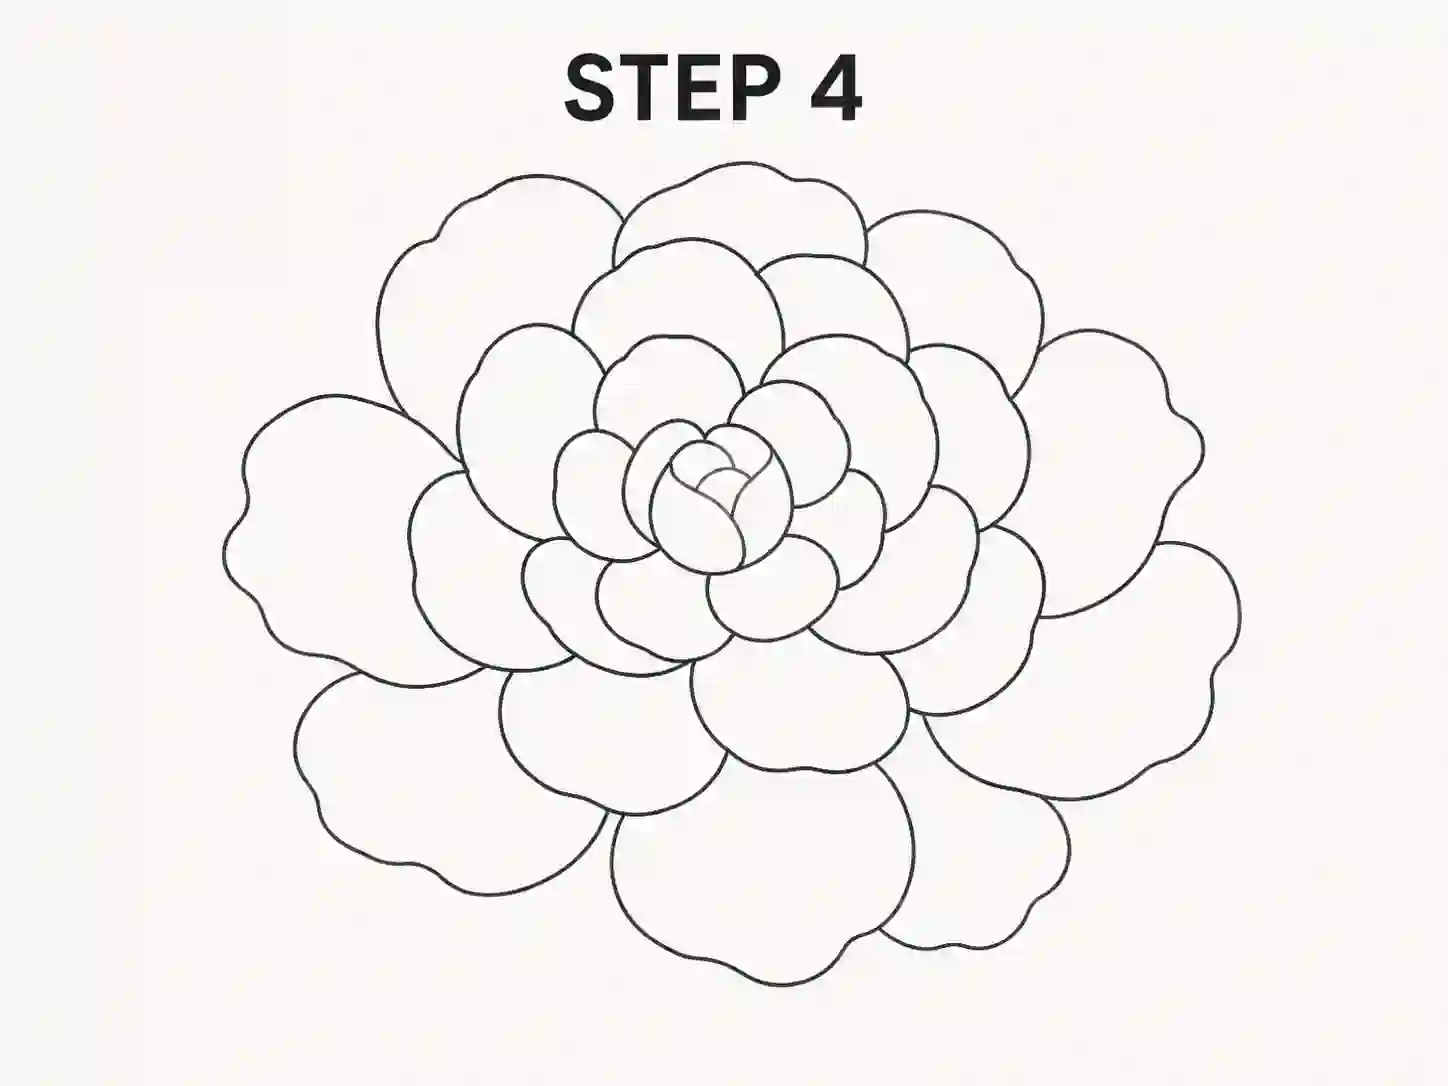
Step 4: Form the Large Outer Bloom

Add the largest petals around the outside of the flower.

Some can bend upward, while others should open toward the left and right. Allow a few outer petals to droop slightly downward.

The overall silhouette should now look full and rounded without becoming a perfect circle.

peony pencil drawing
5

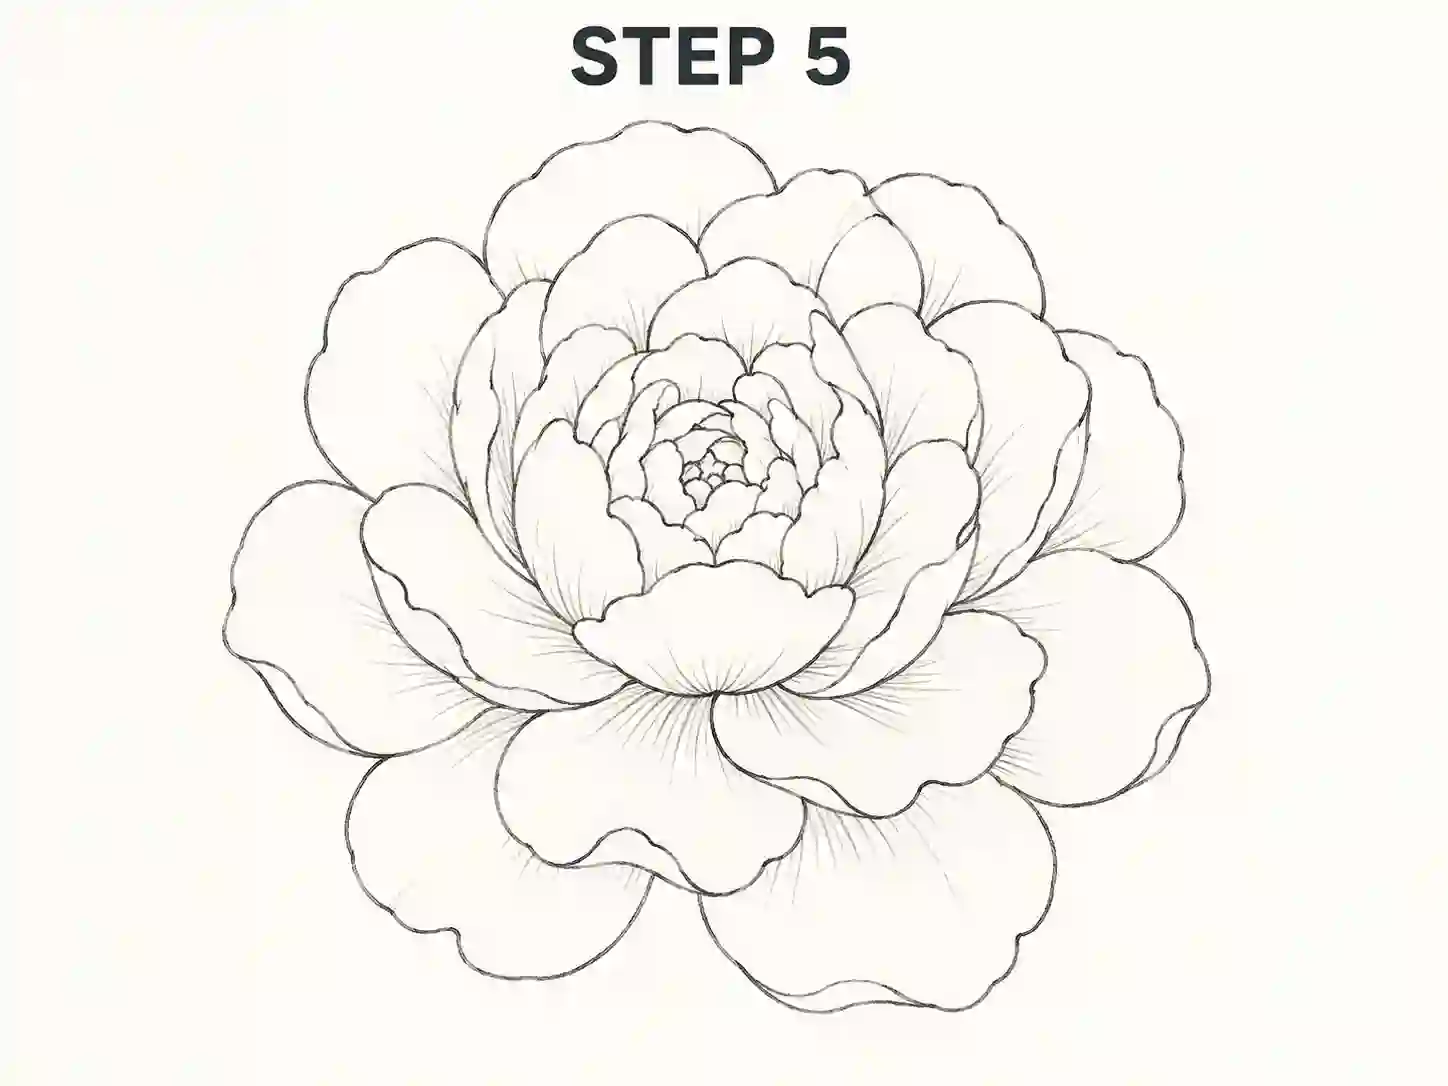
Step 5: Refine the Petal Folds

Add a small number of interior lines to show where petals fold or curl.

Follow the direction of each petal with your marks. Do not draw straight veins across the flower.

Useful places for short fold lines include:

  • Near the base of large petals
  • Along a curled edge
  • Where two petals overlap
  • Inside the dense flower centre

Keep these lines lighter than the main outline. This step can turn a basic simple peony drawing into something that looks much more dimensional.

drawing peony
6

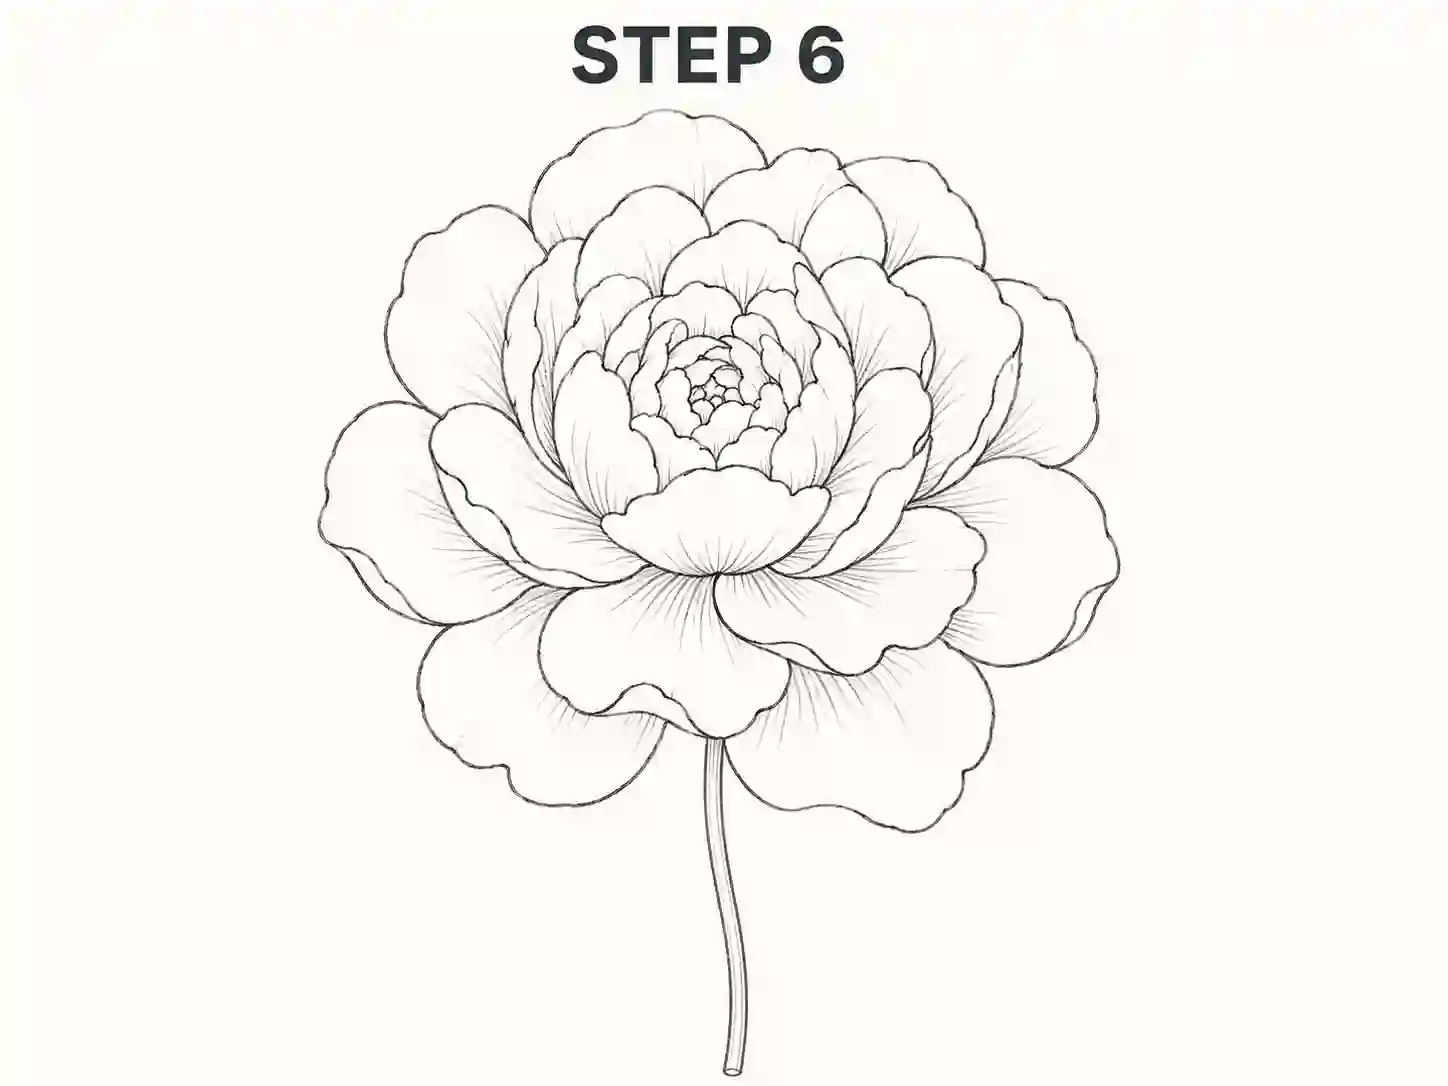
Step 6: Draw the Stem

From underneath the flower, draw two gently curved parallel lines downward.

Keep the stem relatively narrow compared with the bloom.

A slight curve usually looks better than a perfectly straight vertical stem because the large flower head has visual weight.

Connect the stem behind the lower petals so it appears to support the bloom naturally.

peony leaves drawing
7

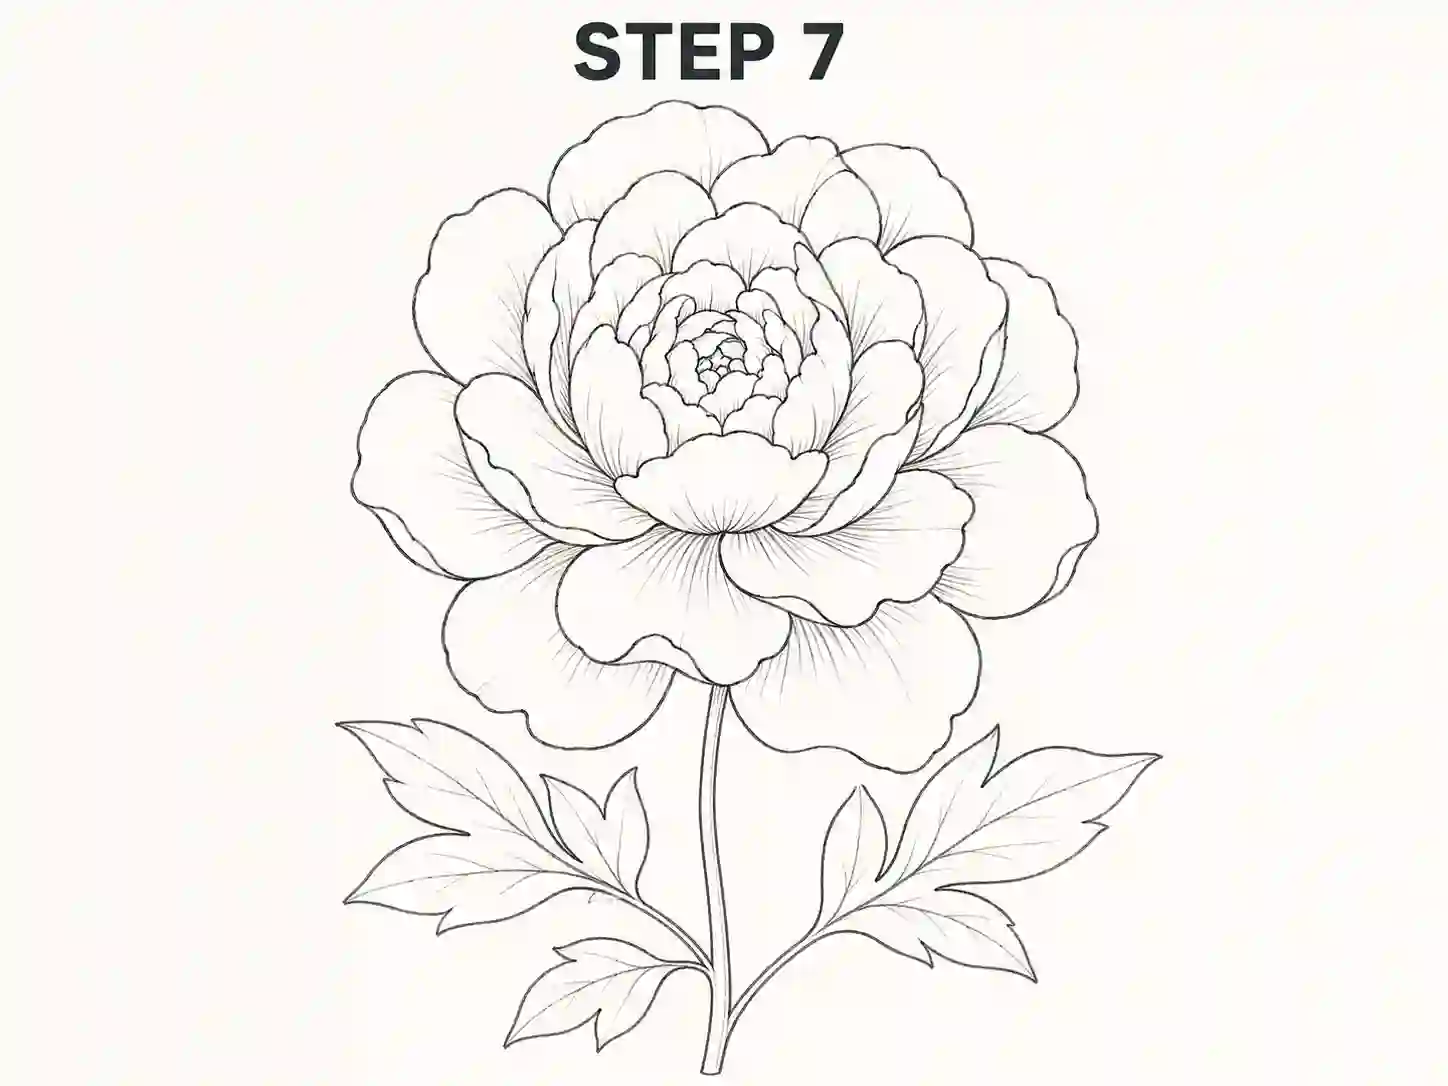
Step 7: Add Peony Leaves

Draw several leaves branching from the stem.

Peony leaves are usually divided into pointed sections rather than appearing as one plain oval leaf. For a beginner version, draw each leaf as a simple cluster of two or three pointed lobes.

Place one leaf group toward the left and another toward the right.

You can also add a smaller group lower on the stem if the composition has enough space.

A good peony leaves drawing does not require every botanical detail. The pointed grouped shapes are enough to suggest the plant.

easy step by step peony drawing
8

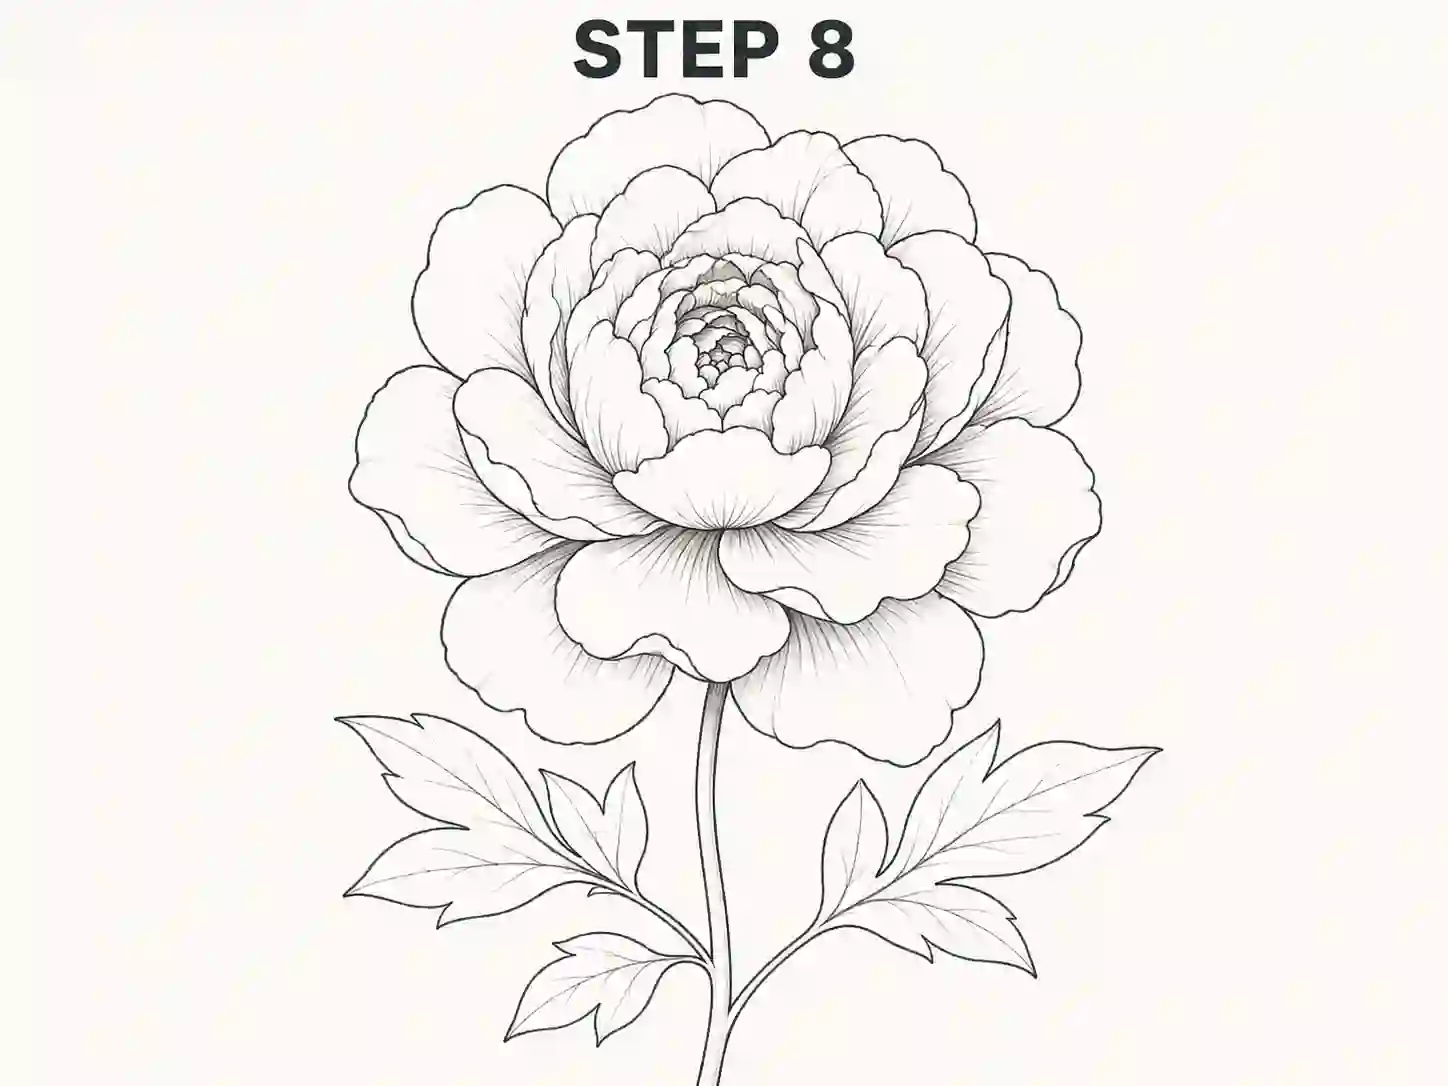
Step 8: Clean and Finish the Peony

Erase any construction lines that are still visible.

Strengthen the important outer edges while leaving most interior marks slightly lighter.

Check the complete drawing for:

  • A dense centre
  • Several layers of petals
  • Larger open outer petals
  • Natural overlap
  • A curved stem
  • Pointed leaf groups

At this stage, your finished drawing of a peony can remain as a simple outline or be developed with shading and colour.

How to Make a Peony Look More Realistic

A realistic peony drawing depends largely on depth.

The centre should usually contain the darkest values because many small petals overlap closely there. As the petals move outward, the flower becomes more open and receives more light.

Use a soft pencil to shade:

  • Between overlapping inner petals
  • Under curled petal edges
  • Near the flower centre
  • Behind petals that sit farther back
  • One side of the stem
  • The bases of overlapping leaves

Do not shade every petal equally.

Leave broad areas of clean paper visible. These highlights help the flower maintain its soft appearance.

You can also vary line weight. A front petal may have a slightly darker lower edge, while a petal behind it can be drawn more lightly.

Simple Drawing vs Detailed Drawing

There is no need to make every peony highly detailed.

Easy Drawing

For an easy drawing, use:

  • Fewer inner petals
  • Six to eight clear outer petals
  • Minimal fold lines
  • One stem
  • Two simple leaf groups

This version is easier for children and first-time artists.

Detailed Drawing

For a more advanced flower:

  • Add several small curled centre petals
  • Use more overlapping layers
  • Vary individual petal edges
  • Add subtle graphite shading
  • Include more complex leaves

Both versions can still follow the same basic construction.

Peony Line Drawing and Outline Styles

A line drawing works well when you want a clean design without shading.

After completing the basic shape:

  1. Remove construction marks.
  2. Trace only the important outlines.
  3. Keep interior lines limited.
  4. Leave the petals mostly open and white.
  5. Simplify the leaves.

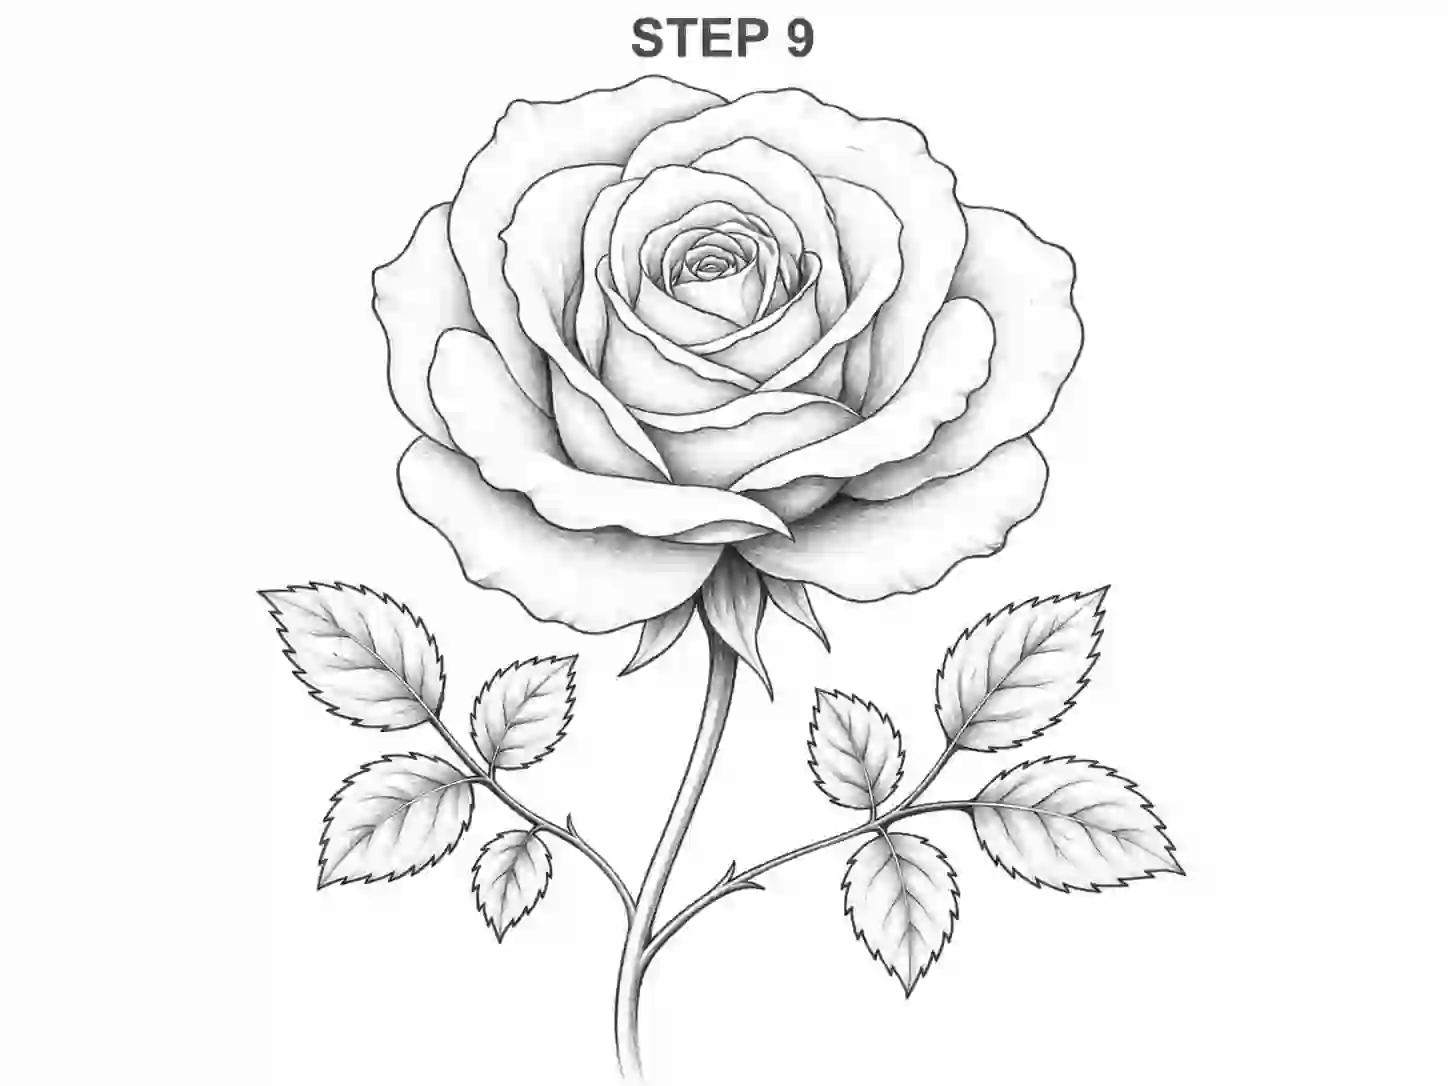
For a more expressive peony outline drawing, vary the line weight slightly around overlapping petals. If you want to know how to draw rose visit the rose drawing link

Drawing Techniques

A peony pencil drawing can look soft and detailed without requiring colour.

Try using three levels of pencil pressure:

  • Light pressure: construction lines and petal folds.
  • Medium pressure: main petal edges and leaves.
  • Darker pressure: deep overlaps and centre shadows.

Keep the shading direction consistent with the petal curves.

Small curved graphite strokes often look more natural than filling large areas with flat grey.

How to Draw Peony Petals Without Making Them Messy

One common challenge when learning how to draw a peony is deciding where every petal should go.

A simple solution is to think in layers.

  • The centre uses small petals.
  • The middle uses medium petals.
  • The outside uses large petals.

Do not add random petals to empty spaces once the structure is already balanced. Too many extra shapes can make the centre difficult to read.

It is also helpful to stop periodically and look at the whole flower rather than concentrating on one petal.

Common Problems

The Flower Looks Like a Rose

Peonies and roses can appear similar in simplified sketches. To make the peony more distinctive, use a fuller outer shape with wider, softer petals and a less spiral-like centre.

The Centre Is Too Large

Keep the first cluster compact. The outer petals should eventually occupy most of the finished bloom.

Every Petal Is the Same Shape

Mix rounded, folded, narrow, and wide petals. Natural variation makes the flower more believable.

There Are Too Many Lines

A beginner peony easy drawing does not need every crease. Remove unnecessary marks when the image starts to feel crowded.

The Flower Looks Flat

Increase overlap and add small shadows where petals meet.

The Leaves Look Unrelated to the Flower

Use grouped pointed leaves rather than wide single leaves.

Simple Peony Flower Drawing for Colouring

A peony flower drawing can be turned into a colouring page by removing most shading and leaving large open petal areas.

Popular colour choices include:

  • Pale pink
  • Deep pink
  • White
  • Coral
  • Red
  • Burgundy
  • Soft yellow

Begin with light colour near the outer edges and add slightly darker tones toward overlapping folds.

White peonies can be shaded with very pale grey, cream, lavender, or blue rather than leaving every area completely blank.

Practising Multiple Peonies

After drawing one flower, try a small cluster of peonies drawing together.

You can vary:

  • Flower size
  • Direction
  • Amount of opening
  • Stem length
  • Leaf arrangement

Place the largest bloom first and add smaller flowers around it.

This creates a more complete botanical composition without needing a completely different technique.

Creative Ways to Use Your Drawing

Once finished, your artwork can become more than a practice sketch.

Try using it for:

  • Handmade cards
  • Floral posters
  • Journal pages
  • Colouring sheets
  • Printable worksheets
  • School projects
  • Botanical sketchbooks
  • Wall decorations
  • Digital illustrations
  • Tattoo concept art

A clean drawing can also be scanned and coloured digitally.

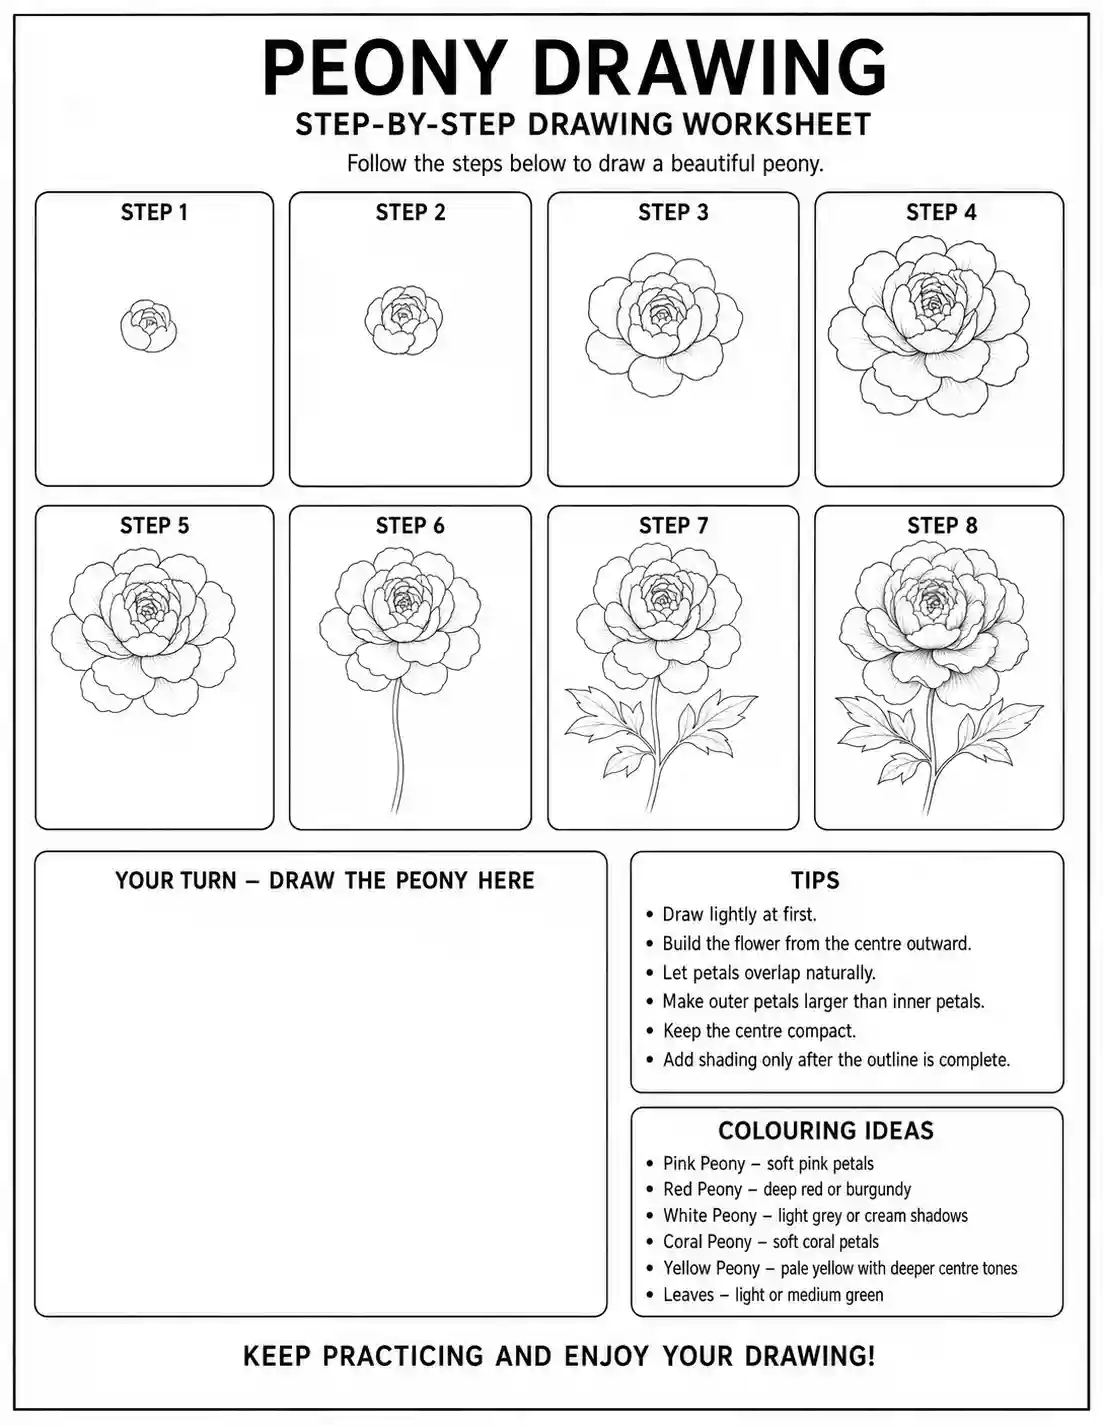
peony drawing worksheet

Printable Drawing Worksheet

A printable worksheet can help beginners practise each stage independently.

Complete the worksheet with a pencil first so mistakes remain easy to erase.

Frequently Asked Questions

Yes. The flower becomes much easier when you build it in layers, starting with small centre petals and gradually adding larger outer petals.

There is no fixed number required for a beginner illustration. Use enough overlapping petals to create a dense centre and several clear outer layers.

Vary the petal shapes, add natural overlap, keep the centre compact, and use soft shadows beneath folded or overlapping petals.

An HB pencil works well for the full tutorial. A softer pencil such as 2B can be useful later for deeper shadows.

Remove shading and unnecessary fold lines. Keep the main petal edges, flower centre, stem, and leaf shapes clearly defined.

Yes. Peonies work well in line-based and decorative tattoo concepts. A professional tattoo artist should adapt the final design for actual use.

Pink, red, coral, white, burgundy, cream, and pale yellow are all suitable choices.

A simple eight-step version can usually be completed in around 15 minutes, while a detailed realistic drawing may take considerably longer.

Final Thoughts

A peony becomes much easier to draw when you think of it as a series of expanding petal layers rather than dozens of individual shapes.

Start with a compact centre, surround it with medium petals, then use broad outer petals to create the full bloom. Add a curved stem and grouped leaves only after the flower itself feels balanced.

Keep early lines light and allow natural variation between petals. Once you understand this layered construction, you can adapt the same method for simple outlines, realistic pencil sketches, floral arrangements, or decorative linework.