
Skip to content
FlowerDrawings.orgFlowerDrawings.org

Orchid Drawing Easy Step-by-Step Guide for Beginners

An orchid drawing can look complicated at first because its petals have unusual curves and the centre has more detail than many common flowers. However, drawing becomes much easier when you build it gradually from a few simple shapes.

This beginner-friendly tutorial shows how to draw an orchid in eight clear stages. You will begin with a small guide for the centre, add the main petals and sepals, shape the distinctive middle lip, and then complete the drawing with a stem and leaves.

You only need a pencil, eraser, and sheet of paper to begin. Once the basic outline is complete, you can leave it as a clean pencil sketch, add light graphite shading, or finish it with colour.

The steps are designed for children, students, parents, teachers, and anyone practising flower drawing guides.

orchid drawing

Tutorial Information

Difficulty

Beginner

Estimated time

7 to 9 minutes

Number of steps

8

Drawing style

Pencil outline with optional shading

Best for

Beginners, children, students

Optional finish

Coloured pencils, crayons, markers or watercolour

Materials You Need

You do not need professional art supplies for this tutorial. A few basic materials are enough:

  • HB or number 2 pencil
  • Drawing paper
  • Soft eraser
  • Pencil sharpener
  • Black fineliner, optional
  • Coloured pencils or crayons, optional
  • Printable orchid worksheet, when available

Keep your first lines light. Construction marks are much easier to adjust before the final outline is darkened.

How to Draw an Orchid Step by Step

This orchids drawing step by step tutorial uses eight stages. Try to complete one stage at a time instead of drawing the entire flower immediately.

Orchid flowers are naturally asymmetrical, so your petals do not need to match perfectly. Slight differences in curves and angles can actually make your artwork look more natural.

orchid centre drawing
1

Step 1: Draw the Orchid Centre Guide

Begin with a small oval near the upper-middle area of your paper.

Add a short vertical guideline through the oval. This will help you position the petals around the centre and keep the flower reasonably balanced.

Keep these first marks very light because parts of the guide will later be erased.

Leave plenty of blank space around the oval for the large orchid petals.
orchid flower drawing
2

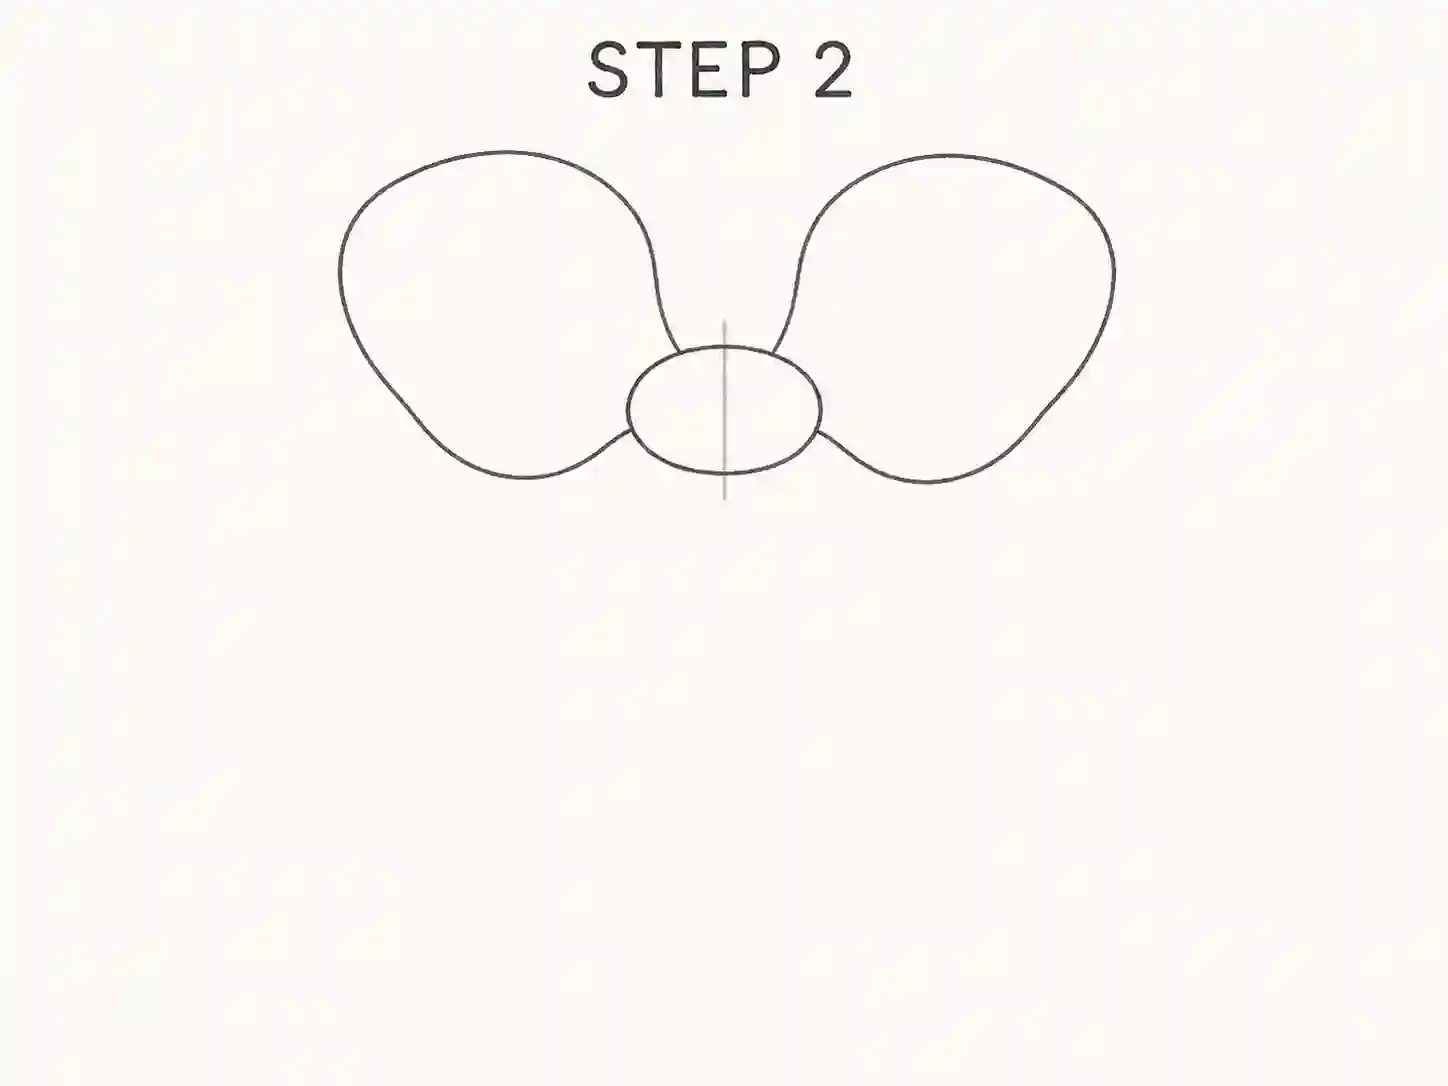
Step 2: Add the Two Side Petals

From each side of the centre, draw one broad curved petal.

The petals should spread outward and slightly upward. Make them wider through the middle and narrower where they connect to the centre.

Orchid petals usually have soft flowing edges, so avoid sharp geometric shapes.

At this stage, the drawing should contain only the centre and two main side petals.

orchid drawing easy
3

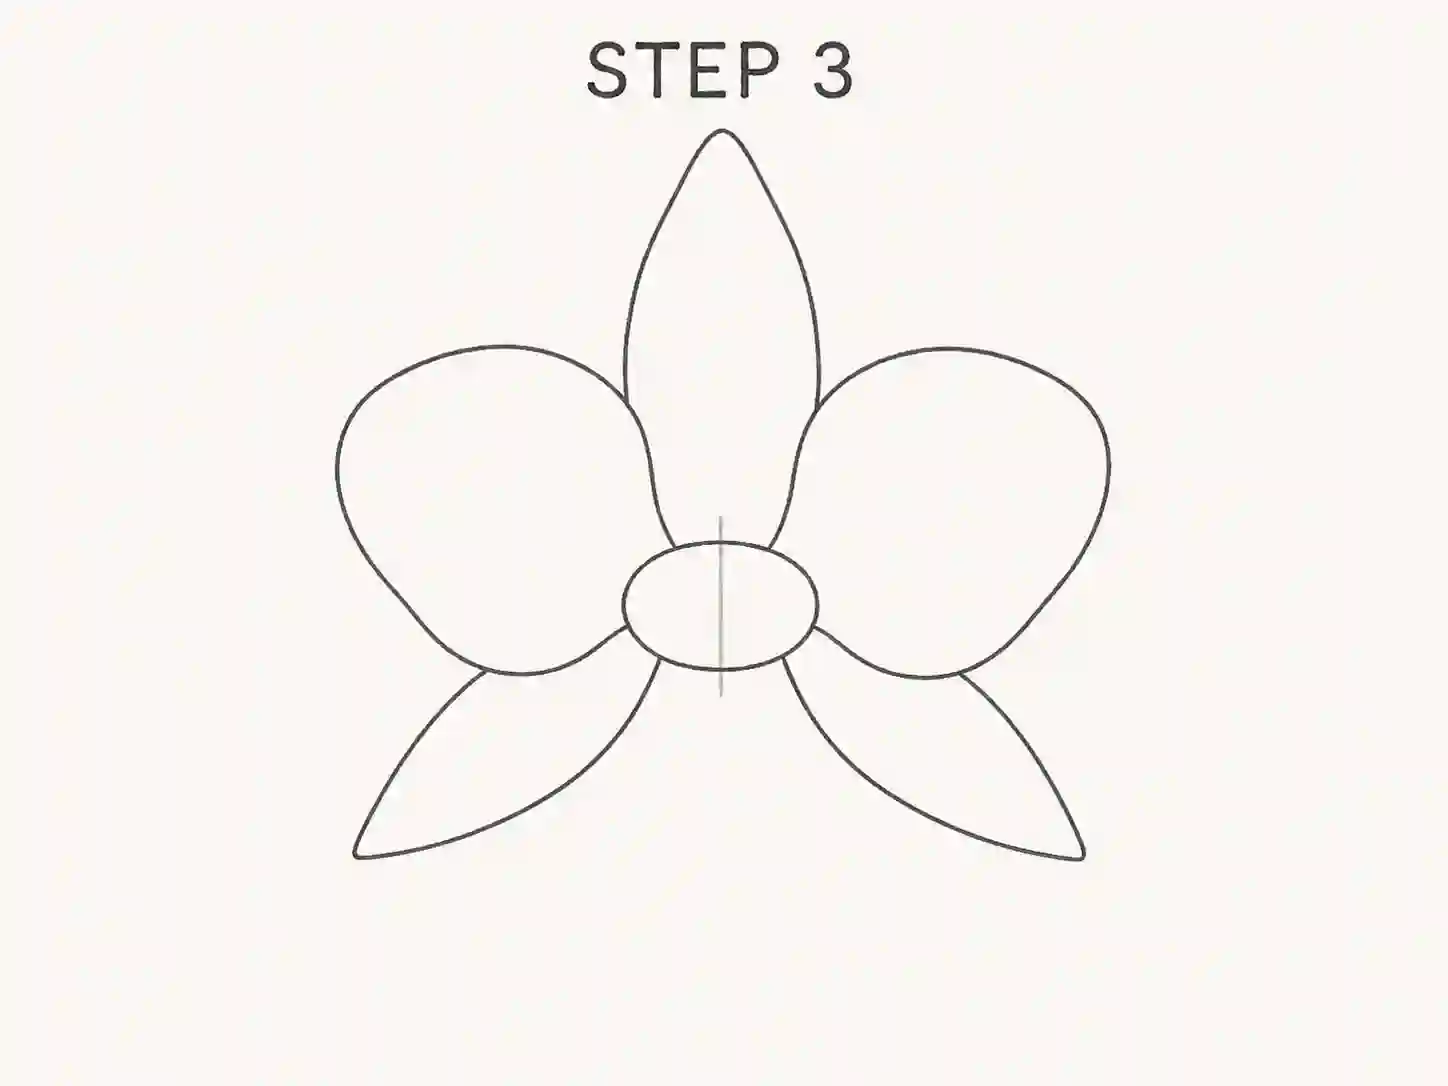
Step 3: Draw the Upper and Lower Sepals

Add one long shape extending upward from behind the centre.

Then draw two additional narrow curved shapes extending diagonally downward on either side.

These parts help give the flower its recognisable orchid structure.

Allow some of the shapes to overlap naturally. The overlap creates depth and prevents the drawing from looking completely flat.

orchid lip drawing
4

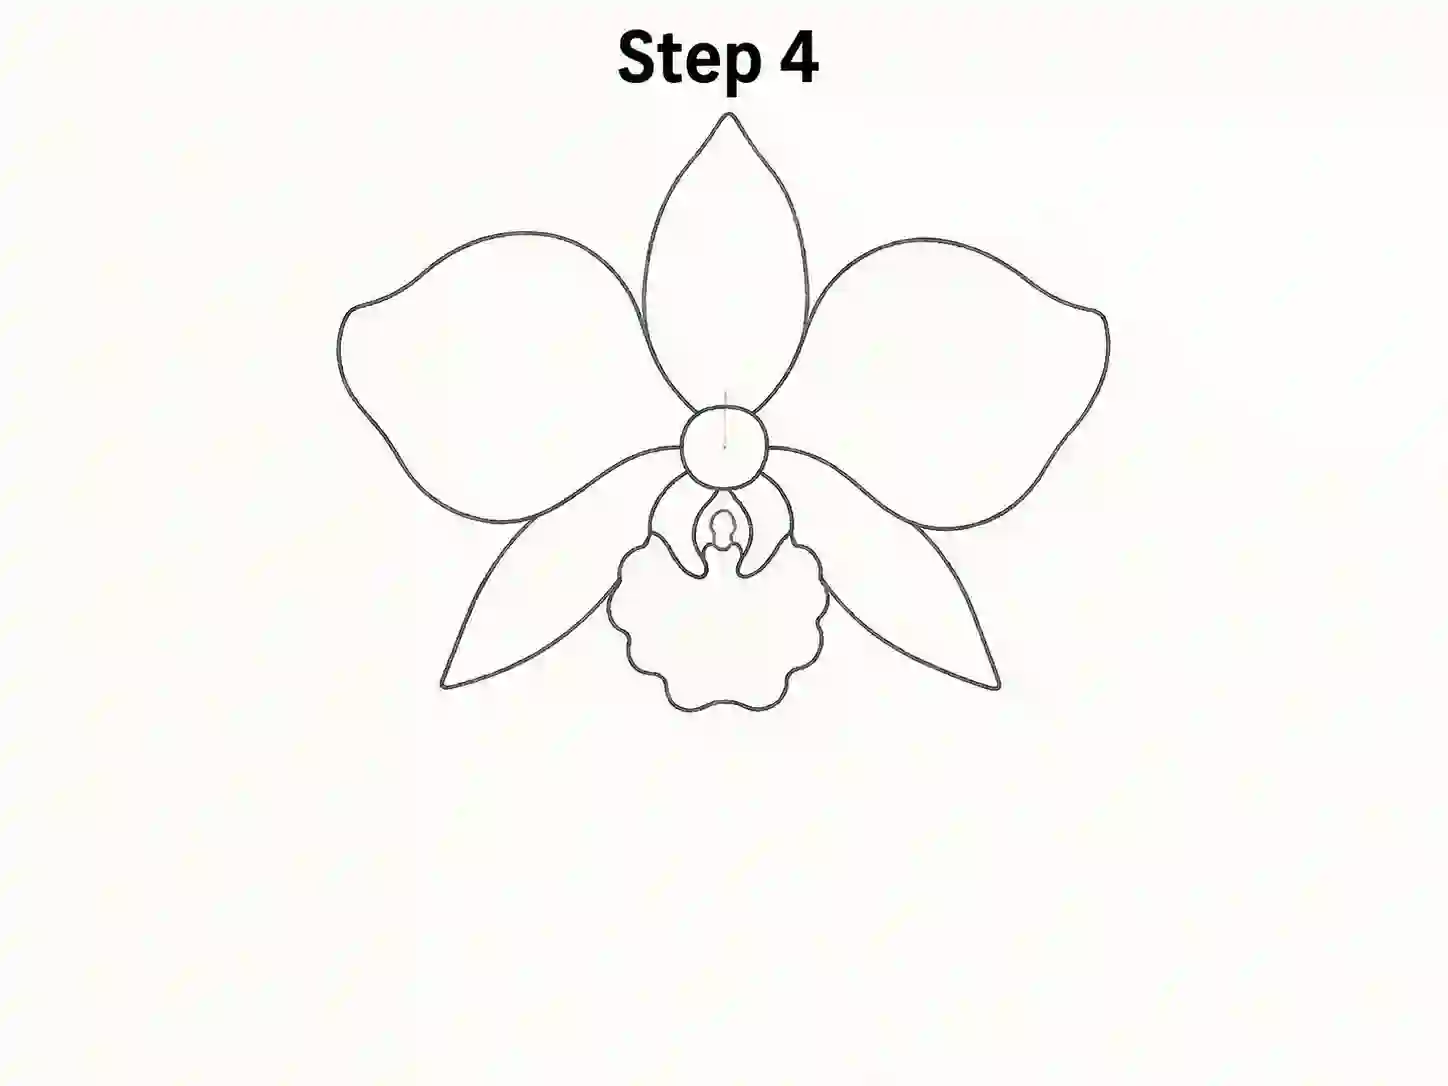
Step 4: Create the Orchid Lip

Now add the distinctive central lip, also called the labellum.

Begin beneath the centre and draw a rounded, slightly ruffled shape that curves forward. It can be broader near the bottom and narrower where it connects to the flower.

Add a small inner shape or curve to suggest the detailed centre of the bloom.

This is one of the most important stages because the central lip helps distinguish an orchid from a simple five-petal flower.

orchid pencil drawing
5

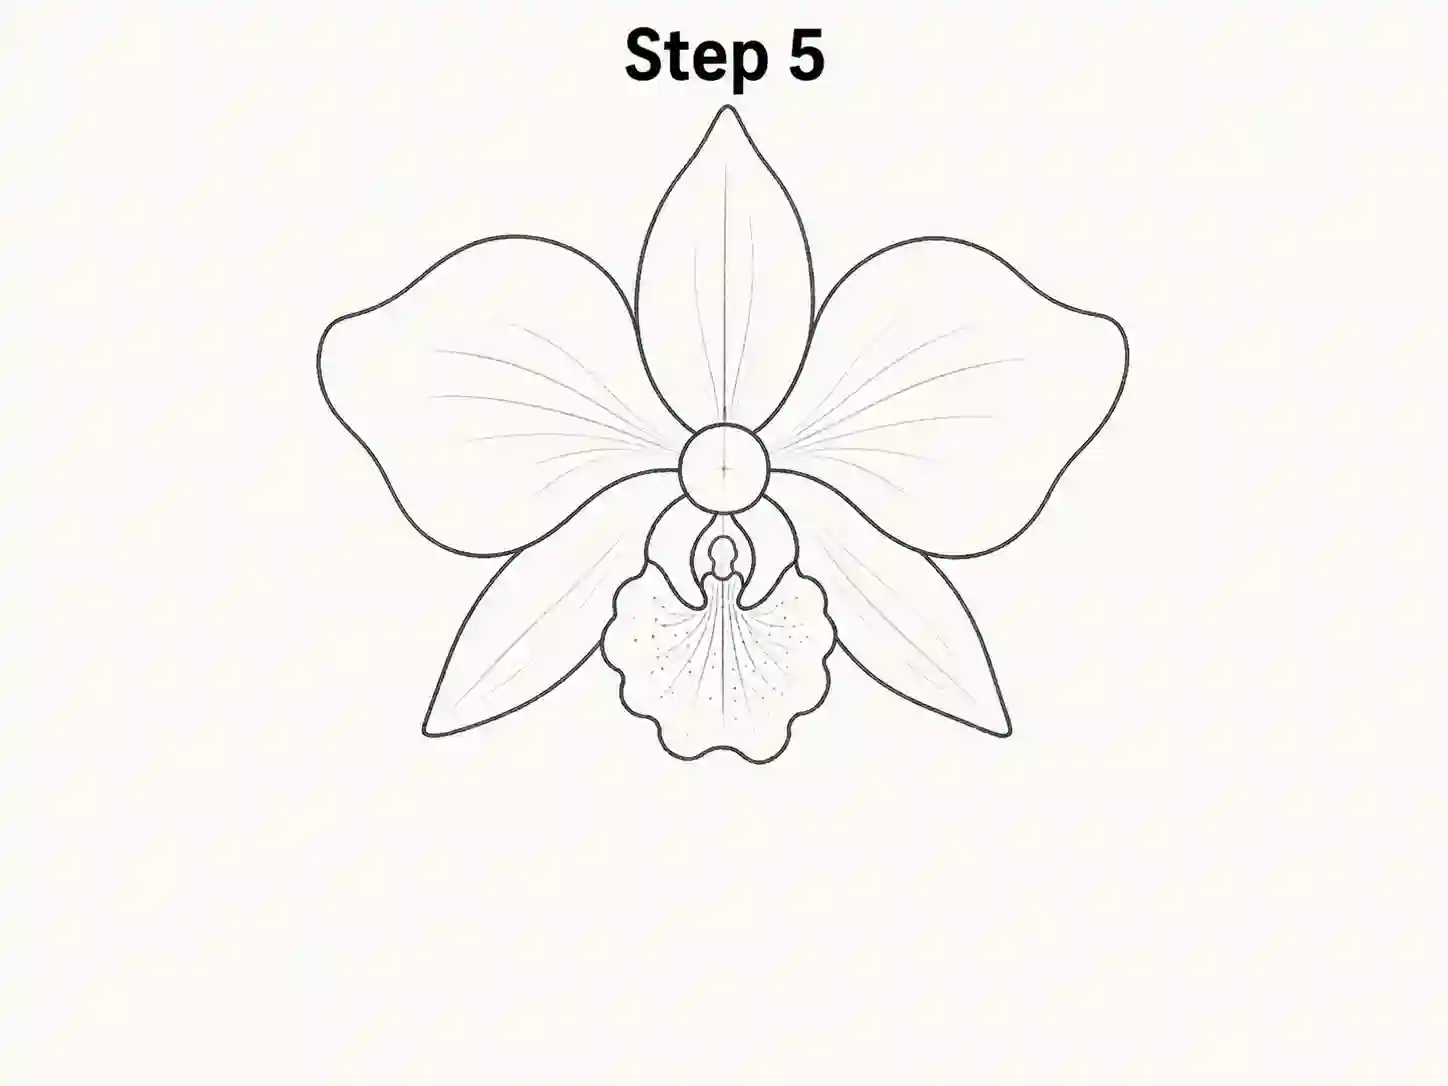
Step 5: Add Petal Folds and Centre Details

Add a few light curved lines inside the petals.

These lines should follow the direction of each petal rather than crossing randomly. Use only a small number of marks so the drawing remains clean.

Add a few subtle details around the central lip. Small dots, short curved marks, or gentle folds can make the drawing look more interesting.

Do not use heavy shading yet.

Your line drawing should still have plenty of open white space.

drawing orchid
6

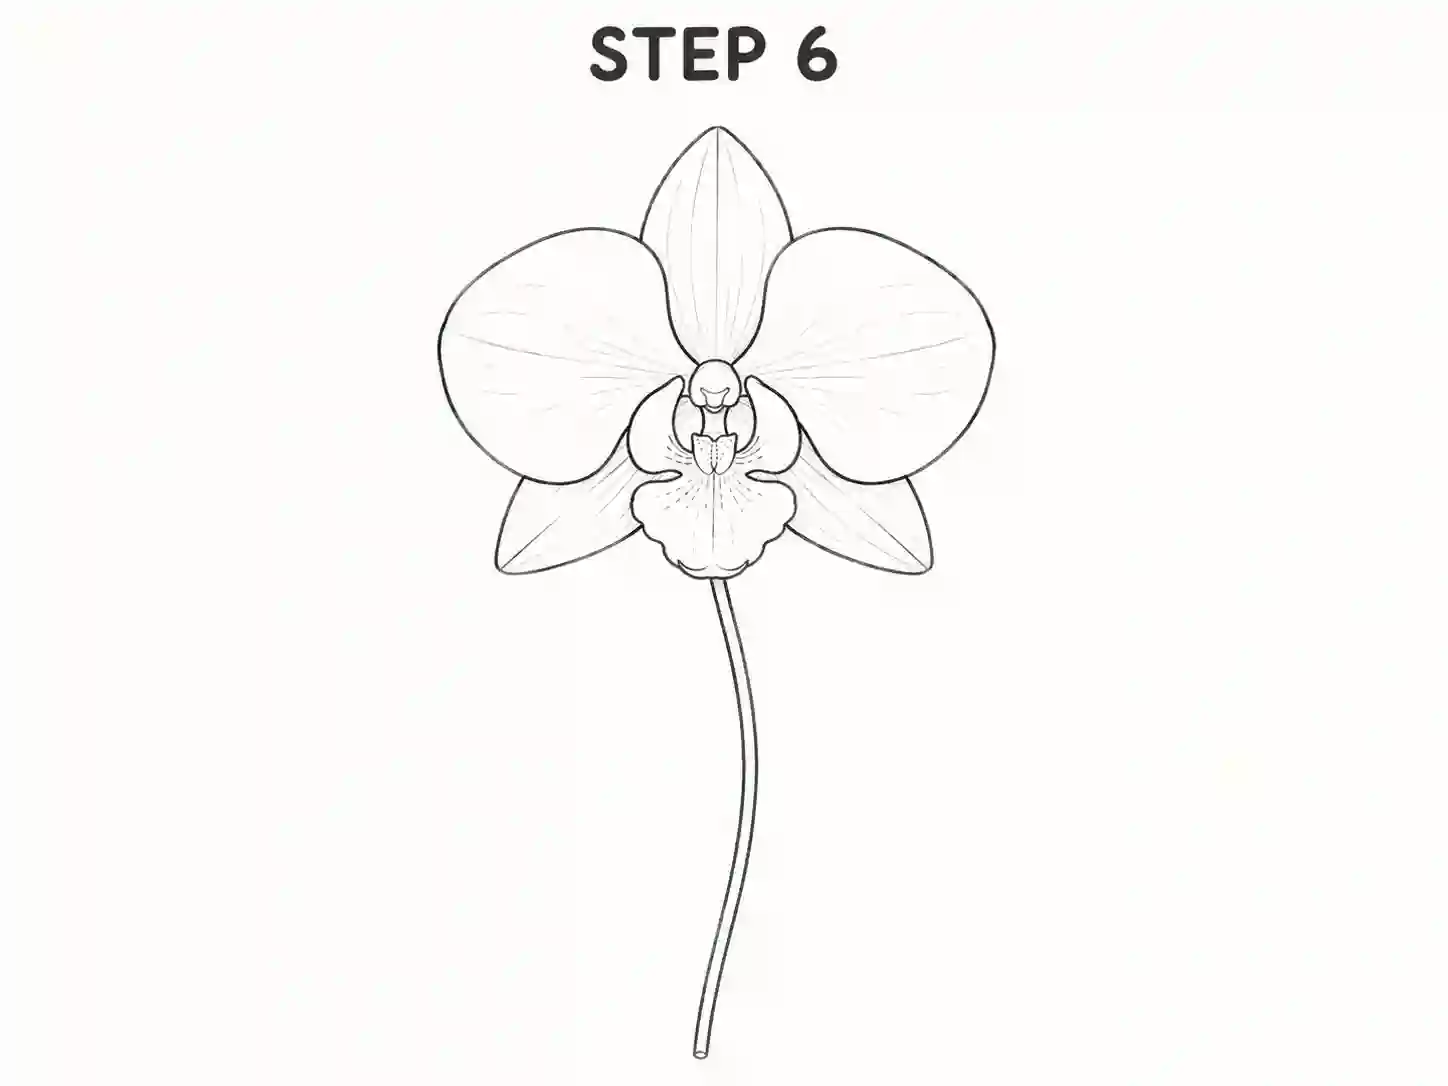
Step 6: Draw the Curved Stem

From behind, draw a long gently curved stem downward.

Use two close parallel lines to give the stem a little width rather than drawing a single straight line.

Orchid stems often bend softly, so avoid making it perfectly vertical.

Keep enough blank space beside the stem for leaves.

orchid leaves drawing
7

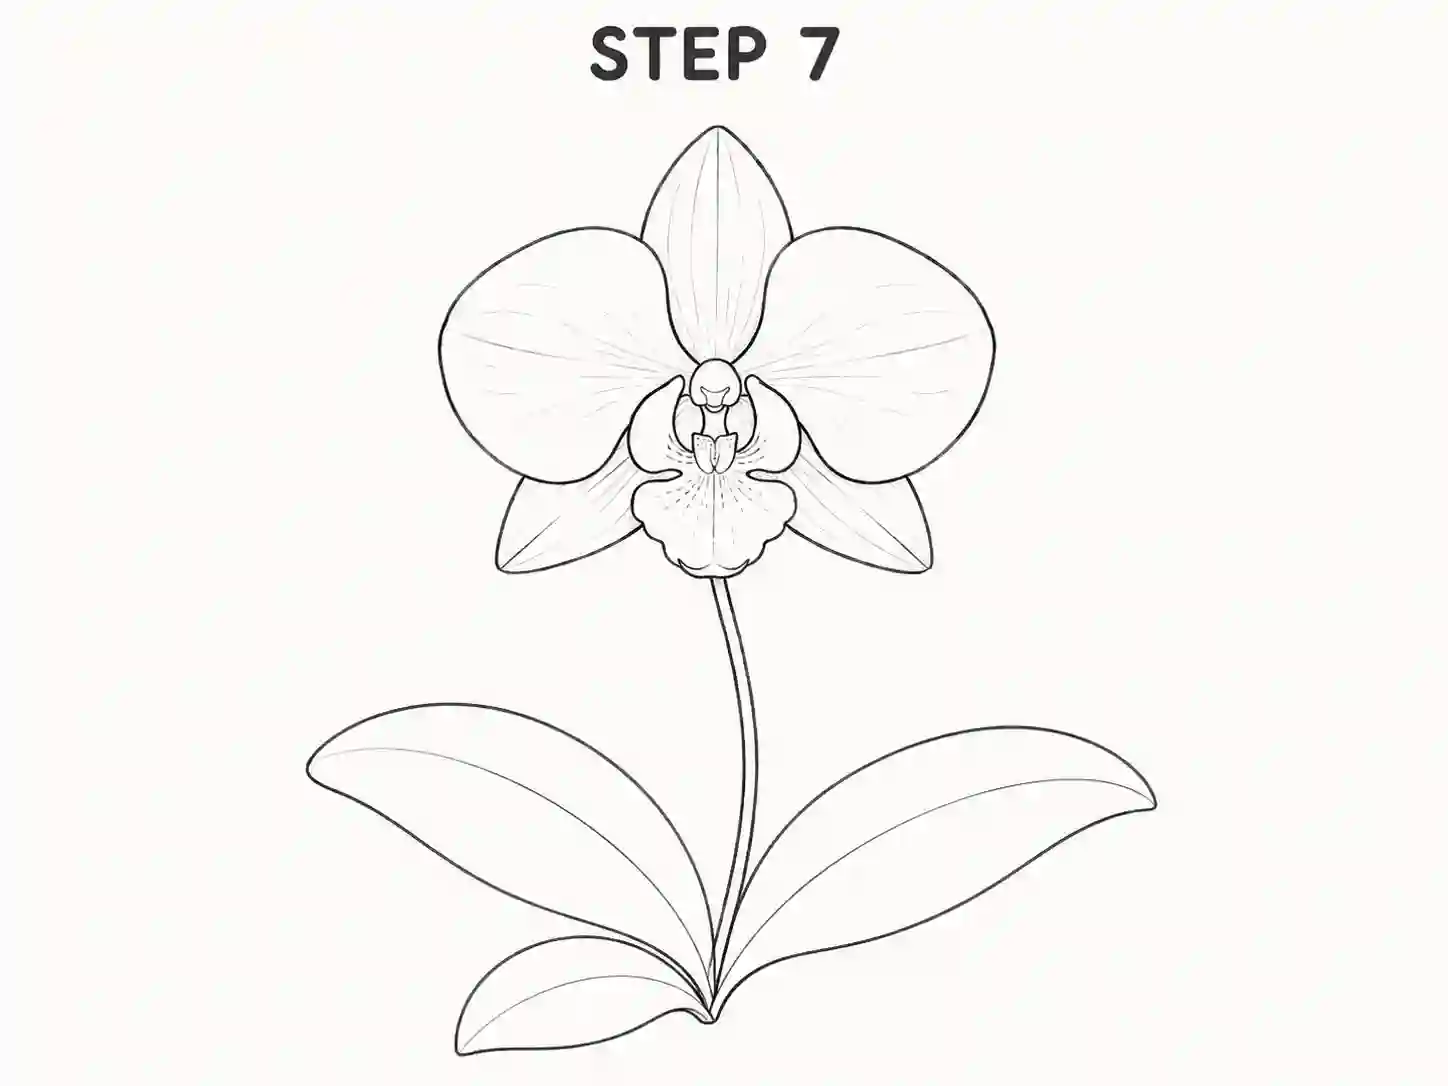
Step 7: Add the Orchid Leaves

Draw two or three long leaves growing from the lower part of the stem.

The leaves should be broader than the narrow lily-style leaves used in some other flower drawings. Give them smooth edges and rounded or gently pointed ends.

Add one light centre vein inside each leaf.

Angle the leaves in different directions to create a balanced orchid plant drawing.

orchid drawing
8

Step 8: Refine the Final Orchid Drawing

Erase unnecessary construction marks and strengthen the important outer lines.

Refine:

  • The petal outlines
  • The upper and lower sepals
  • The central orchid lip
  • The stem
  • The leaves

Keep interior lines slightly lighter than the main outline. You can now leave the artwork as an orchid pencil drawing, add soft graphite shading, or colour the petals. Your finished orchid should include a clear flower centre, broad side petals, narrow sepals, a decorative lip, a curved stem, and leaves.

How to Make a Realistic Orchid Drawing

A realistic drawing does not require every tiny detail. Good proportions, overlapping petals, and controlled shading usually make a bigger difference.

Start by deciding where the light is coming from.

Keep the brightest parts of the petals mostly white and add soft shadows:

  • Near the base of each petal
  • Where petals overlap
  • Inside the central lip
  • Along one side of the stem
  • Near folds in the leaves

Use darker pencil pressure only in the deepest shadow areas.

For a more realistic orchid flower drawing, vary your line weight. The front edges can be slightly darker, while distant or folded edges can remain lighter.

Avoid covering every petal with graphite. Orchids often look delicate, so open highlights help preserve that appearance.

Orchid With Colors

Once your outline is complete, you can turn it into colorful drawings.

Orchids appear in many shades, giving you plenty of creative options.

Pink Orchid

Apply pale pink over the petals and use a slightly deeper pink or magenta around the central lip. Keep the outer petal edges lighter.

Purple Orchid

Use soft lavender as the base and add darker violet near the centre. Blend the colours gradually to avoid harsh transitions.

White Orchid Drawing

Leave most of the petals uncoloured. Use very pale grey, blue, lavender, or cream shadows around folds and overlapping areas. A yellow or pink centre can provide contrast.

Blue Orchid Drawing

A blue orchid drawing can be created with light blue petals and slightly deeper blue or violet shadows. Keep some white areas visible to prevent the petals from appearing flat.

Cattleya Orchid

A cattleya orchid drawing often features large showy petals and a prominent ruffled central lip. Pink, purple, white, and yellow combinations work particularly well.

Moth Orchid

A moth orchid drawing, often inspired by Phalaenopsis flowers, usually has rounded broad petals and a compact decorative centre. Use soft colours and smooth shading for a gentle appearance.

Simple Orchid Drawing Variations

Once you understand the basic flower structure, you can use the same skills for several orchid styles.

For a simple drawing, remove most interior details.

Keep only:

  • Main petals
  • Sepals
  • Central lip
  • Stem
  • Two leaves

This version works well for younger learners and quick sketching practice.

Orchid Drawing Outline

A drawing outline uses clean exterior shapes without graphite shading.

It can be useful for:

  • Colouring pages
  • Worksheets
  • Tracing practice
  • Classroom activities
  • Digital colouring

Simple Orchid Line Drawing

For a simple orchid line drawing, use one consistent line weight and reduce small details around the centre. The result can look clean and decorative while remaining recognisable.

Orchid Sketch Drawing

An orchid sketch drawing can include looser pencil strokes, construction lines, and light shading. It is useful when practising shape and proportion rather than creating a polished final illustration.

Ghost Drawing

A ghost orchid has a more unusual flower structure than the orchid shown in this beginner tutorial. A dedicated ghost orchid tutorial would be better for accurately showing its narrow, distinctive flower shape.

Lady Slipper Orchid Drawing

Lady slipper orchids have a pouch-shaped centre that looks very different from a typical open orchid. A separate lady slipper drawing tutorial can explore that unique structure in more detail.

Easy Orchid Drawing Tips

Use these tips while practising:

  • Begin with very light guidelines.
  • Build the flower from the centre outward.
  • Draw the large petals before adding small details.
  • Let some petals overlap.
  • Keep the central lip distinctive but simple.
  • Avoid forcing perfect symmetry.
  • Use smooth curves rather than straight petal edges.
  • Add shading only after the outline is correct.
  • Keep plenty of white space inside the petals.
  • Compare the entire flower before darkening your lines.

These techniques can make drawing look cleaner without requiring advanced skills.

Common Orchid Easy Drawing Mistakes

Making Every Petal the Same

An orchid naturally contains different shapes around its centre. Making every petal identical can make it look like a generic flower.

Making the Centre Too Large

The decorative centre is important, but it should not overpower the petals. Start small and enlarge it only when necessary.

Drawing Completely Straight Petals

Orchid petals usually curve gently. Use flowing lines to make them appear softer.

Adding Heavy Shading Too Early

Dark pencil marks can make corrections difficult. Complete the entire outline first.

Drawing a Straight Stem

A slight bend in the stem makes the plant feel more natural.

Adding Too Many Interior Lines

A beginner drawing can quickly become cluttered. Use only a few petal folds and centre marks.

Orchid Flower Drawing Easy Practice Method

When the full flower feels difficult, practise individual parts separately.

Start with:

  1. One broad orchid petal
  2. A pair of side petals
  3. The central lip
  4. A curved stem
  5. One broad leaf

After these shapes feel comfortable, combine them into a complete drawing and repeat without tracing.

Repeated practice is usually more helpful than trying to perfect one drawing.

Orchid Tattoo Drawing Ideas

The flowing shape of an orchid can also work as decorative line art.

A simple orchid tattoo drawing may use:

  • Clean black outlines
  • One or two flowers
  • A curved stem
  • Minimal leaves
  • Very little shading

An orchid drawing tattoo concept can also use fine lines, geometric elements, or a small botanical arrangement.

For an actual tattoo, a professional tattoo artist should adapt the drawing for skin placement, line durability, and appropriate sizing.

Creative Uses of Drawings

Your finished drawing of an orchid can be used in many ways:

  • Greeting cards
  • Botanical journals
  • School projects
  • Classroom displays
  • Colouring pages
  • Printable worksheets
  • Flower posters
  • Decorative notebook pages
  • Tattoo concept sketches
  • Digital illustrations
  • Handmade gifts

A clean drawing of orchids can also be scanned and coloured digitally after the pencil outline is complete.

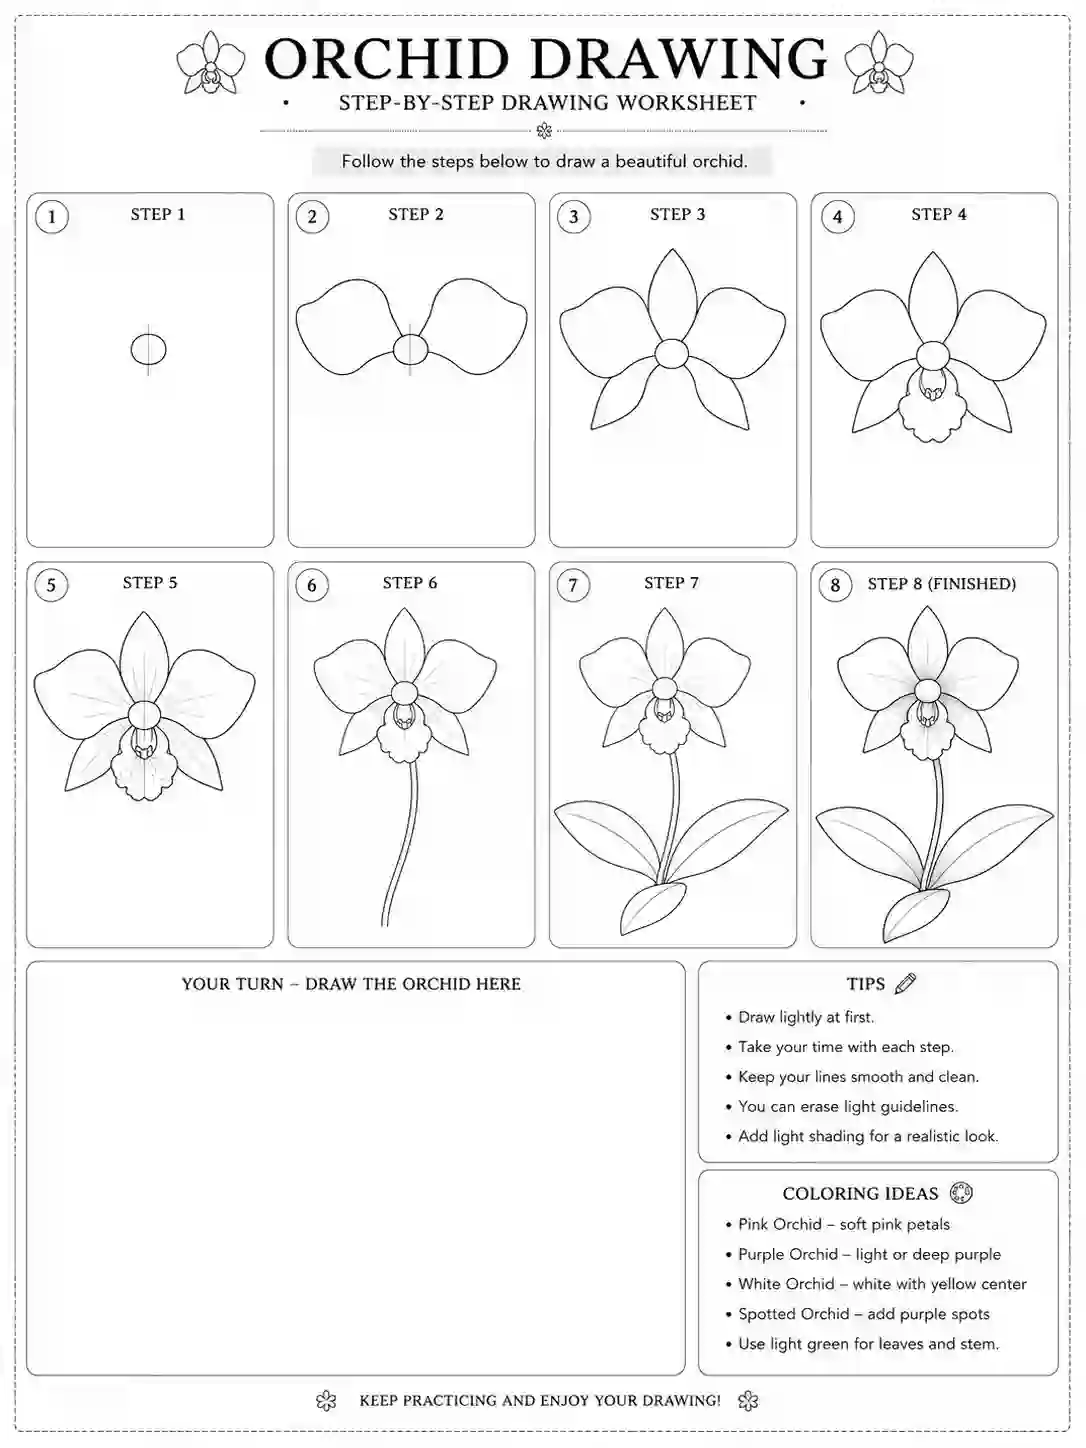
orchid drawing worksheet

Printable Worksheet

A printable worksheet can make the eight-stage process easier to practise.

Students can follow each stage directly on paper instead of repeatedly switching between screens.

Teachers can use the worksheet for:

  • Flower lessons
  • Spring activities
  • Botanical art practice
  • Classroom drawing sessions
  • Quiet creative activities

The worksheet can also be downloaded and printed again whenever additional practice is needed.

Frequently Asked Questions

Not necessarily. Breaking the flower into a small centre, broad petals, narrow sepals, a central lip, stem, and leaves makes the process much easier to understand.

This tutorial uses eight stages, beginning with the centre guide and ending with the refined final orchid.

Use natural petal overlap, slight asymmetry, soft interior curves, varied line pressure, and gentle shadows near the flower centre.

Yes. A pencil is enough to create the complete outline and add soft graphite shading.

Pink, purple, white, yellow, blue, and mixed colour combinations can all work. The central lip can be coloured slightly darker for contrast.

Remove most shading and small interior details. Keep the main petals, sepals, central lip, stem, and leaves as clean open shapes.

A simplified moth-orchid-style flower with broad rounded petals can be beginner-friendly because its main shapes are relatively easy to recognise.

Yes, orchid line art can be used as inspiration for a tattoo concept. A professional tattoo artist should adjust the final design for placement, size, and long-term line clarity.

Final Thoughts

Drawing orchids becomes much easier once you stop treating the flower as one complicated object.

Begin with the centre, add the main petals and sepals, shape the distinctive lip, then finish the plant with a stem and leaves.

Keep your early pencil lines light and save darker outlines for the final stage. Once the structure feels comfortable, experiment with shading, colour, different orchid varieties, or simple outline styles.

With regular practice, you can move from an orchid drawing simple to more detailed and realistic botanical sketches.