Skip to content
FlowerDrawings.orgFlowerDrawings.org

Hibiscus Flower Drawing Easy Step-by-Step Tutorial

A hibiscus is one of the most recognizable flowers to sketch because of its wide petals, trumpet-like shape, and long stamen extending from the center. Although the bloom contains several details, a hibiscus flower drawing becomes much easier when you first understand its main shapes.

This tutorial is designed for beginners, students, kids, and anyone who wants to practice floral illustration. You will begin with the flower center, build five large petals, add the stamen, and finish the drawing with a stem, leaves, clean outlines, and optional shading.

The goal is not to copy every tiny detail immediately. Instead, this guide shows how to simplify the flower into manageable stages while keeping the final result natural and recognizable.

Hibiscus Flower Drawing

Quick Tutorial Details

Difficulty

Beginner to intermediate

Estimated drawing time

25–35 minutes

Main tools

Pencil, eraser, paper, and sharpener

Optional tools

Fineliner, colored pencils, or markers

Drawing style

Front-facing flower with stem and leaves

Number of steps

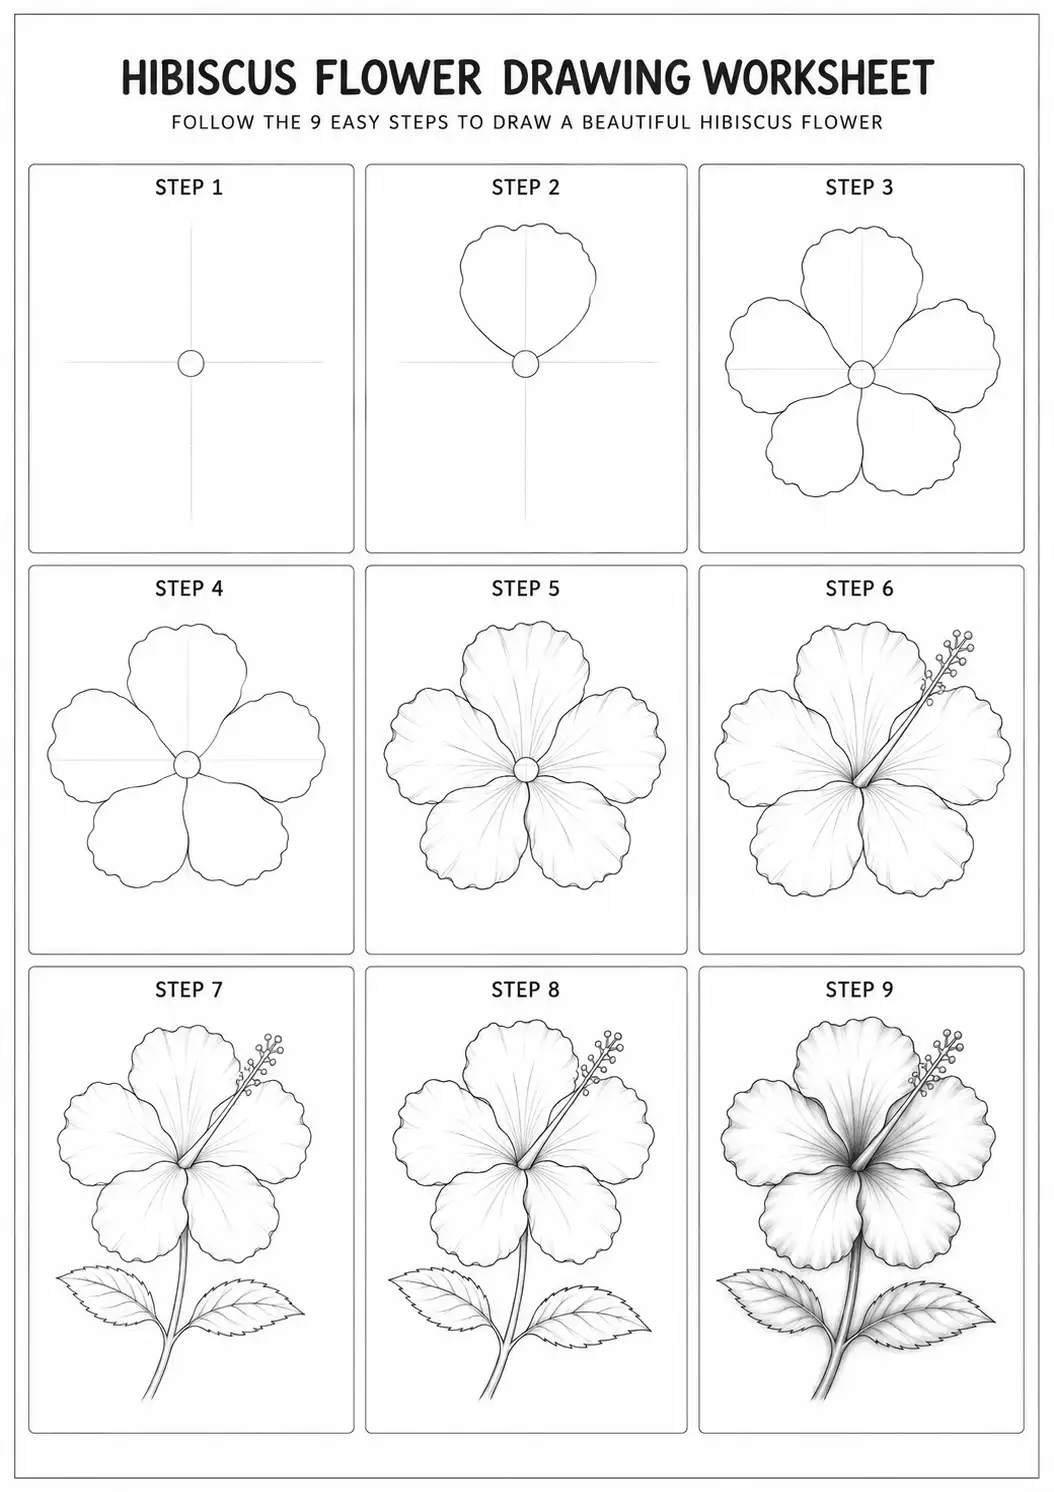
9

This easy hibiscus flower drawing can be completed with basic materials. You do not need professional pencils or expensive art paper to follow the tutorial.

What Makes a Hibiscus Flower Easy to Recognize?

Before drawing, it helps to observe the flower’s main features.

A hibiscus usually has:

  • Five broad petals
  • Gently wavy petal edges
  • A deep center
  • A long stamen extending outward
  • Small anthers near the tip
  • A narrow stem
  • Wide leaves with visible veins
  • Slightly pointed or serrated leaf edges

When creating a drawing of a hibiscus flower, focus first on the overall silhouette. The petal edges and central stamen can be refined after the main shape is established.

Observe the Flower Before You Draw

Look for these visual relationships:

  • Where each petal begins
  • Which petals appear in front
  • Where the petal edges overlap
  • How the stamen extends from the center
  • Which areas are darker
  • How the leaf veins spread outward

Hibiscus Flower Drawing Step by Step

Follow the stages in order and keep the first lines light.

Mark the hibiscus flower center
1

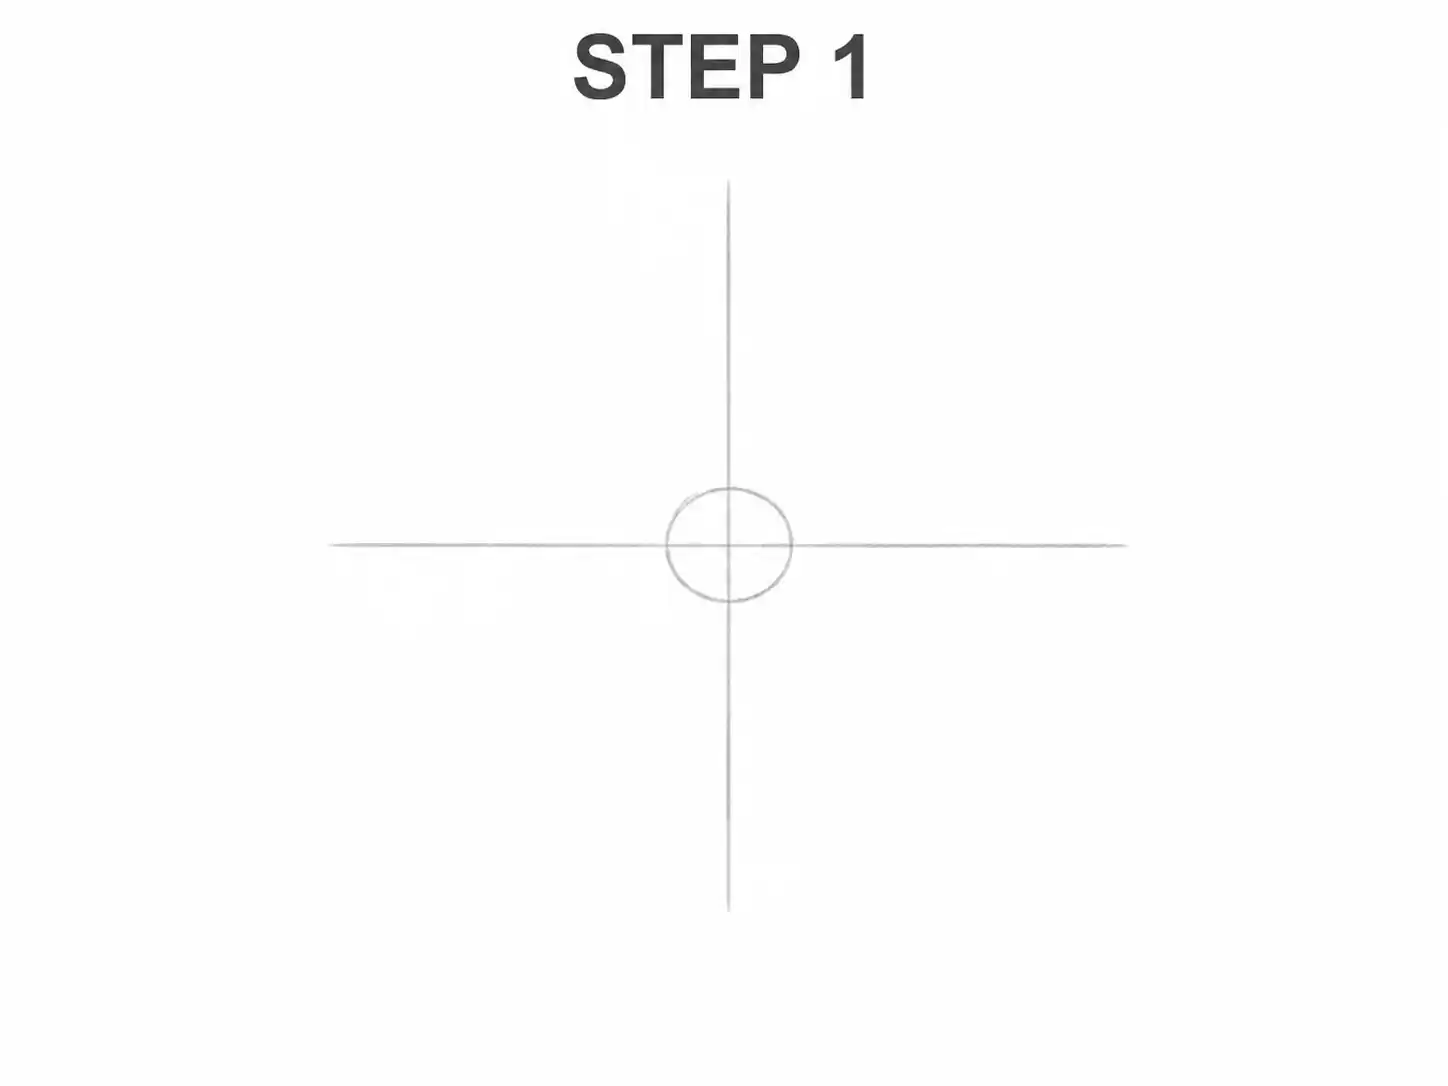
Step 1: Mark the Flower Center

Draw a small oval or circle near the middle of the page. This will guide the inner part of the bloom.

Add two faint guidelines crossing through the center. These will help you position the five petals around the flower.

Do not make the center too large. Most of the space should remain available for the wide petals.
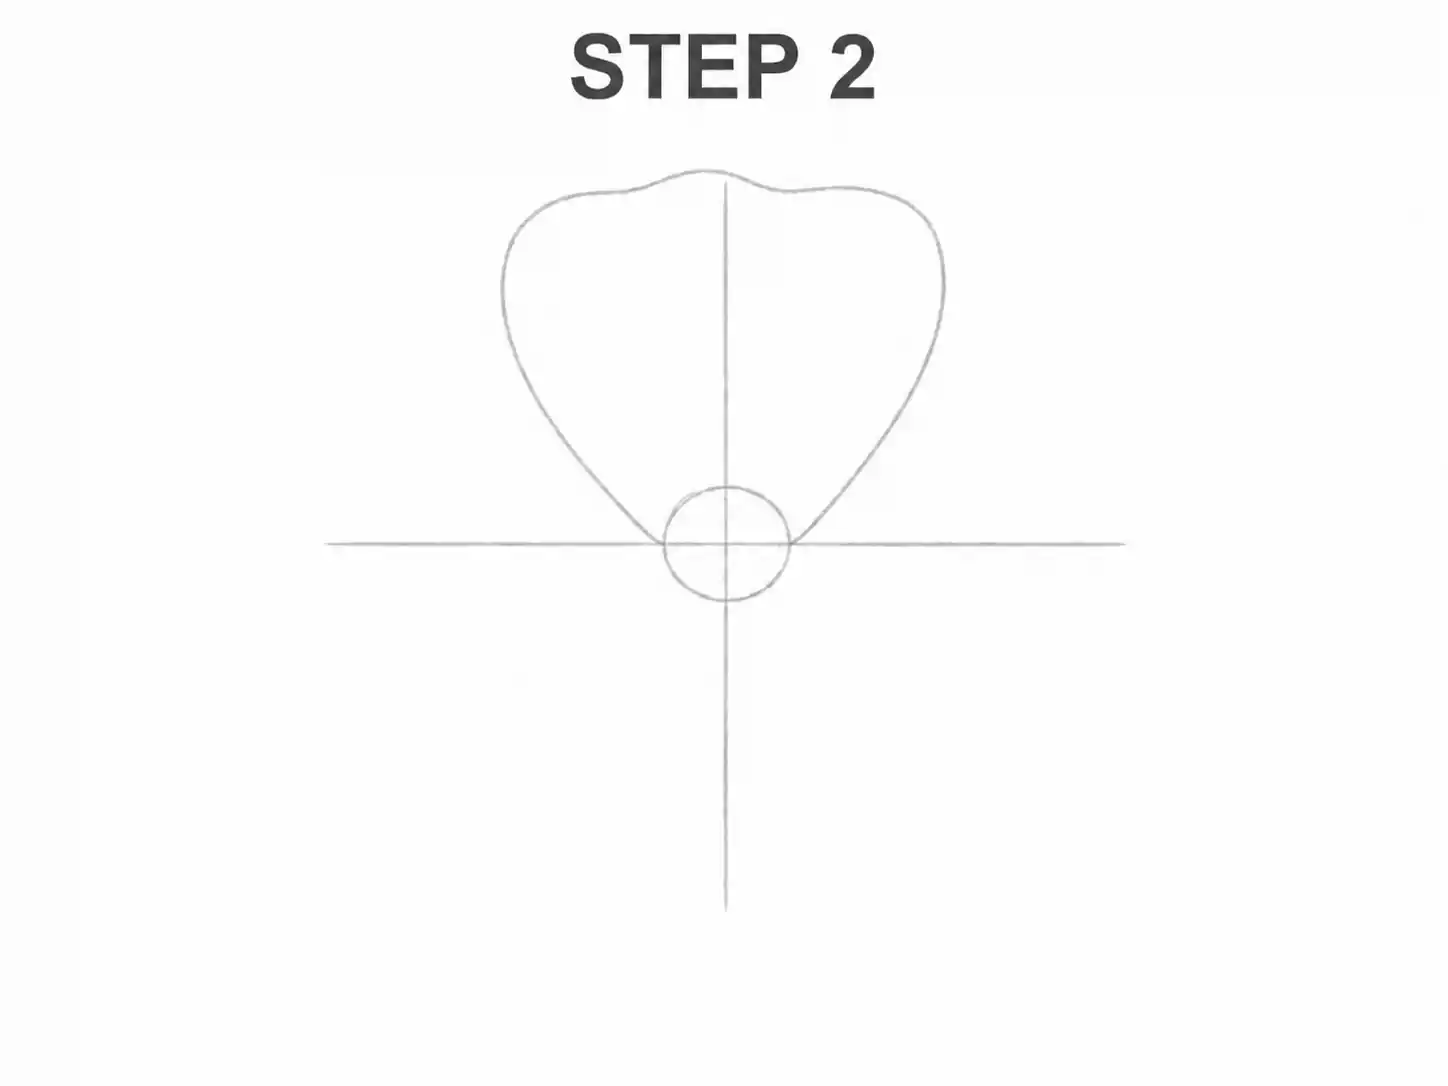
Draw the first hibiscus petal
2

Step 2: Draw the First Petal

Add one large rounded petal above the center. The outer edge should be wider than the base where it connects to the flower.

Give the top edge a gentle wave rather than making it perfectly smooth. A few small curves help suggest the soft and slightly folded texture of the petal.

This first petal will establish the size of the rest of your hibiscus flower drawing.

Add the side hibiscus petals
3

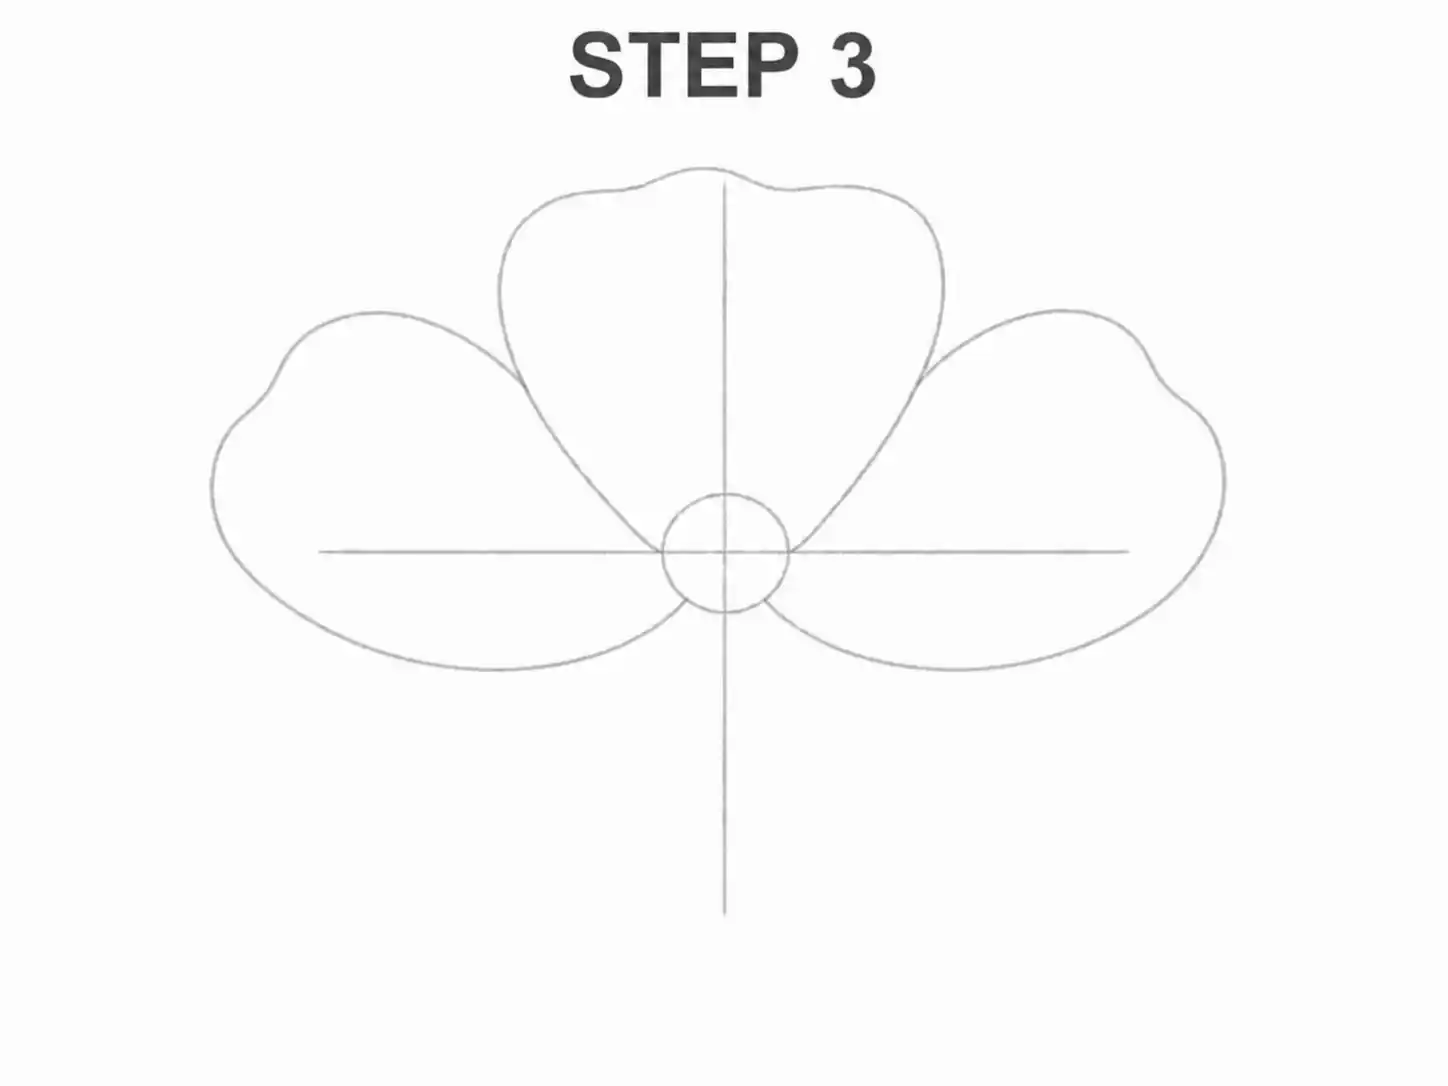
Step 3: Add the Side Petals

Draw one petal on the left and one on the right of the center.

Allow their inner edges to overlap slightly with the first petal. The left and right shapes do not need to be identical, but they should feel similar in size.

Keep checking the distance between the petals so the flower does not become too narrow or too wide.

Complete the five-petal hibiscus shape
4

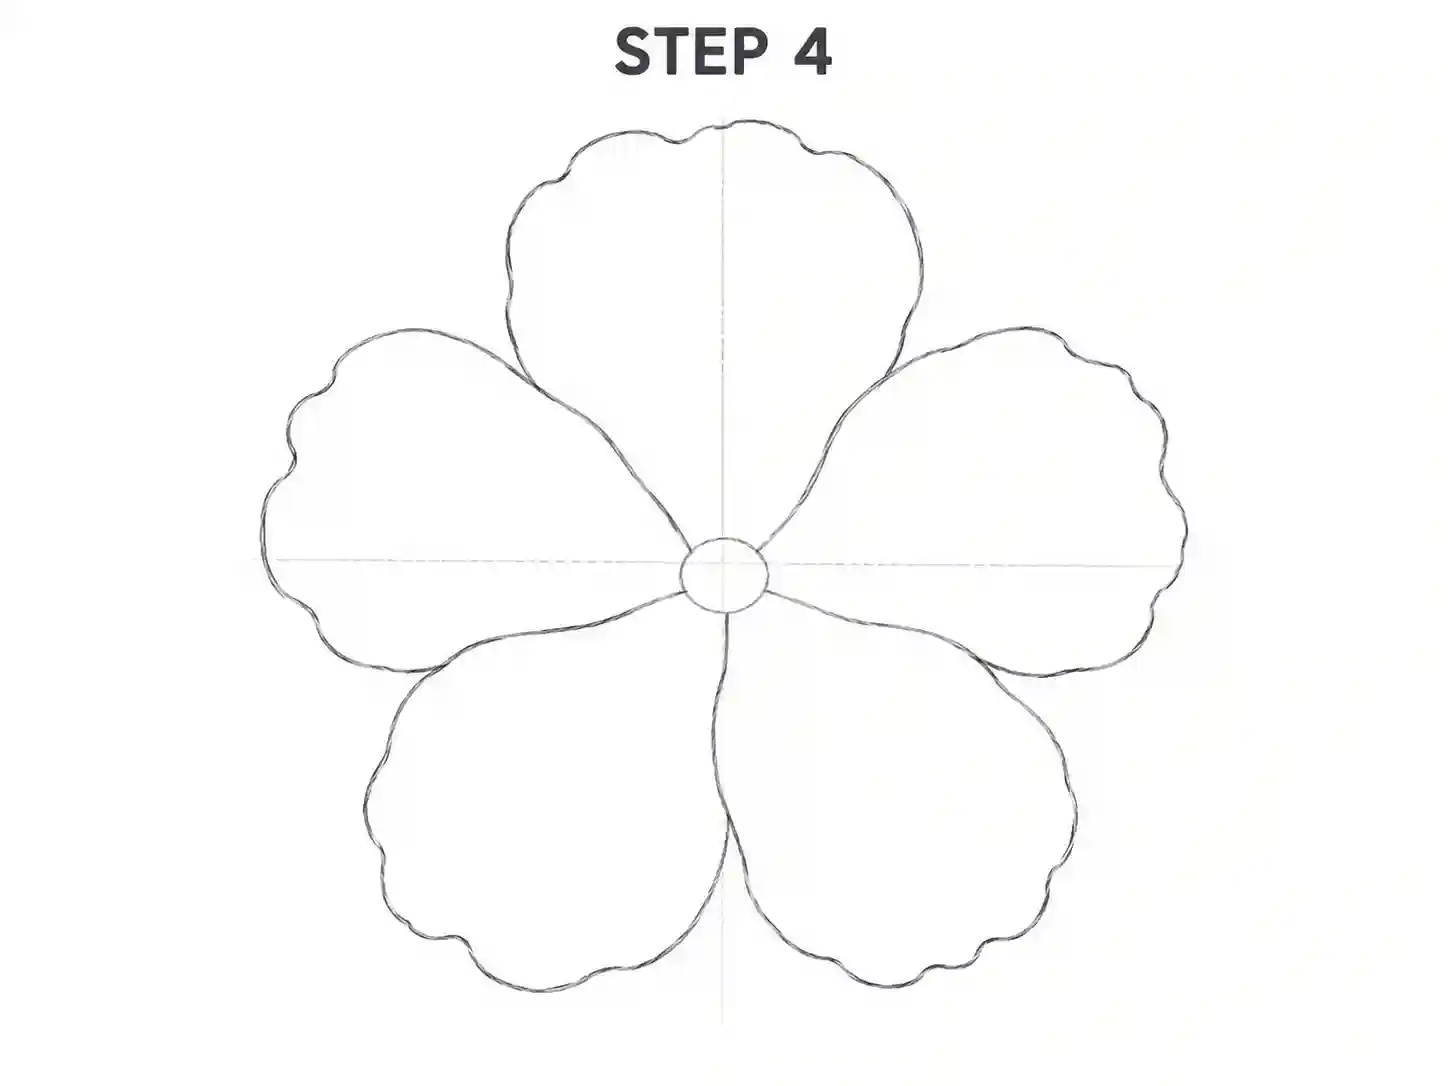
Step 4: Complete the Five-Petal Shape

Add two lower petals to complete the flower.

The bottom petals may appear shorter because part of their shape sits behind the center. Use curved lines to show the overlap.

At this stage, the basic hibiscus flower easy drawing should already look recognizable, even without the stamen, stem, or leaves.

Refine the wavy hibiscus petal edges
5

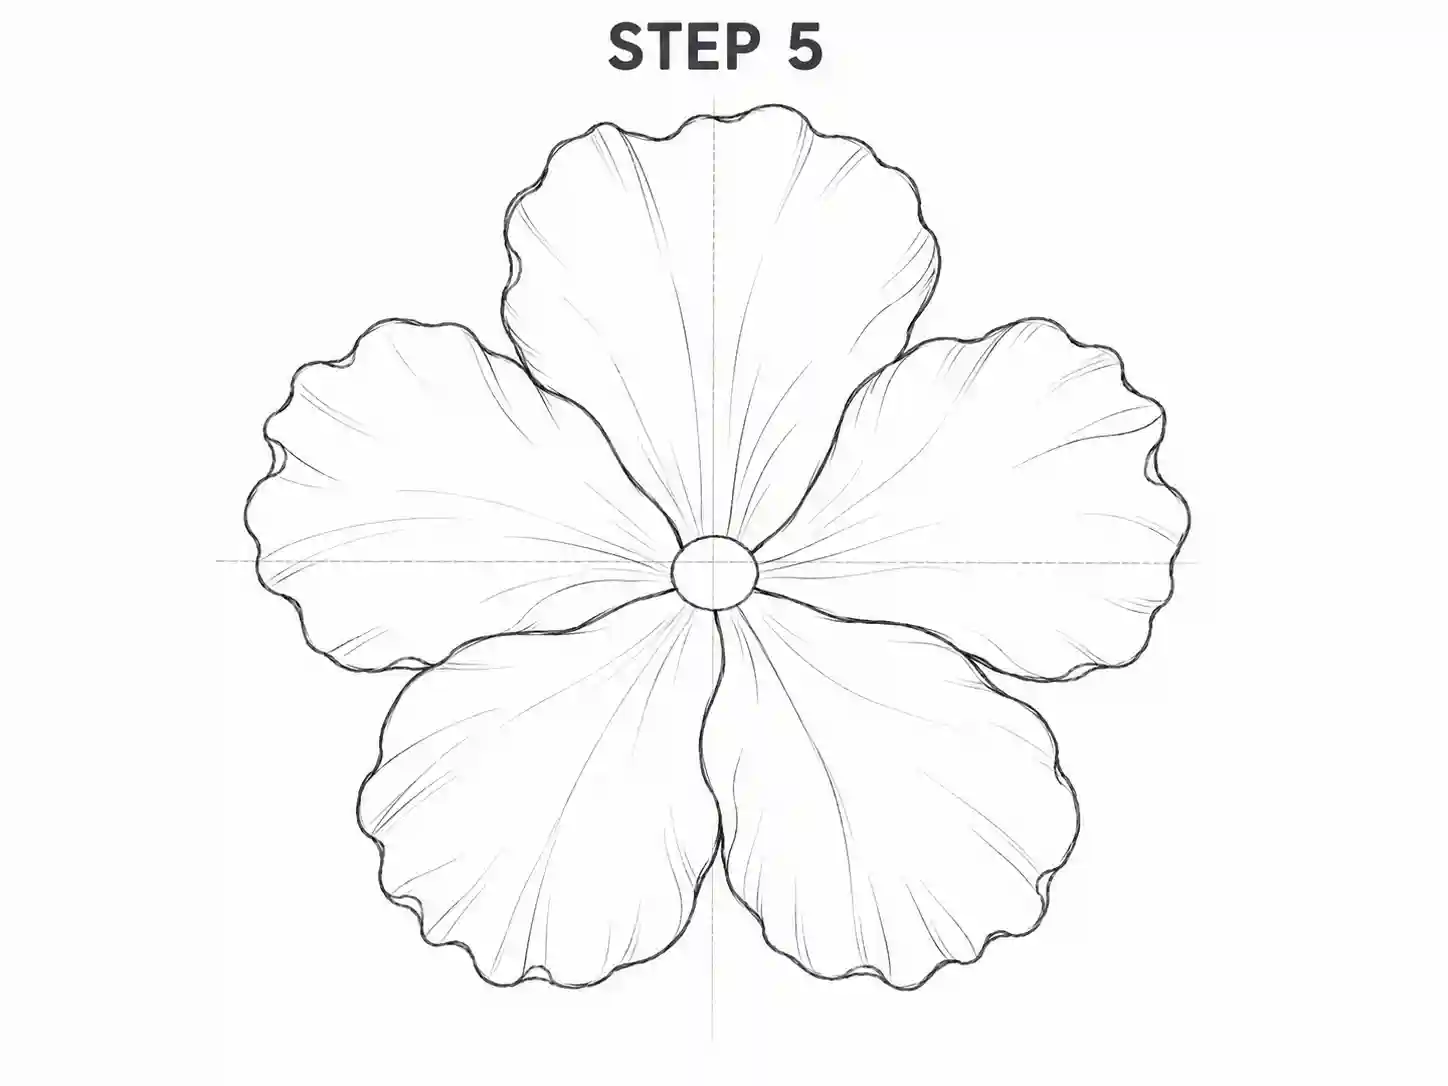
Step 5: Refine the Wavy Petal Edges

Review all five petals and soften any stiff or geometric lines.

Add small dips, curved edges, and gentle folds. Avoid making every edge equally wavy. Some parts can remain smooth while others have more movement.

Draw a few light contour lines from the center toward the outer petal edges. These lines should follow the natural direction of each petal rather than running randomly across the surface.

Draw the long hibiscus stamen
6

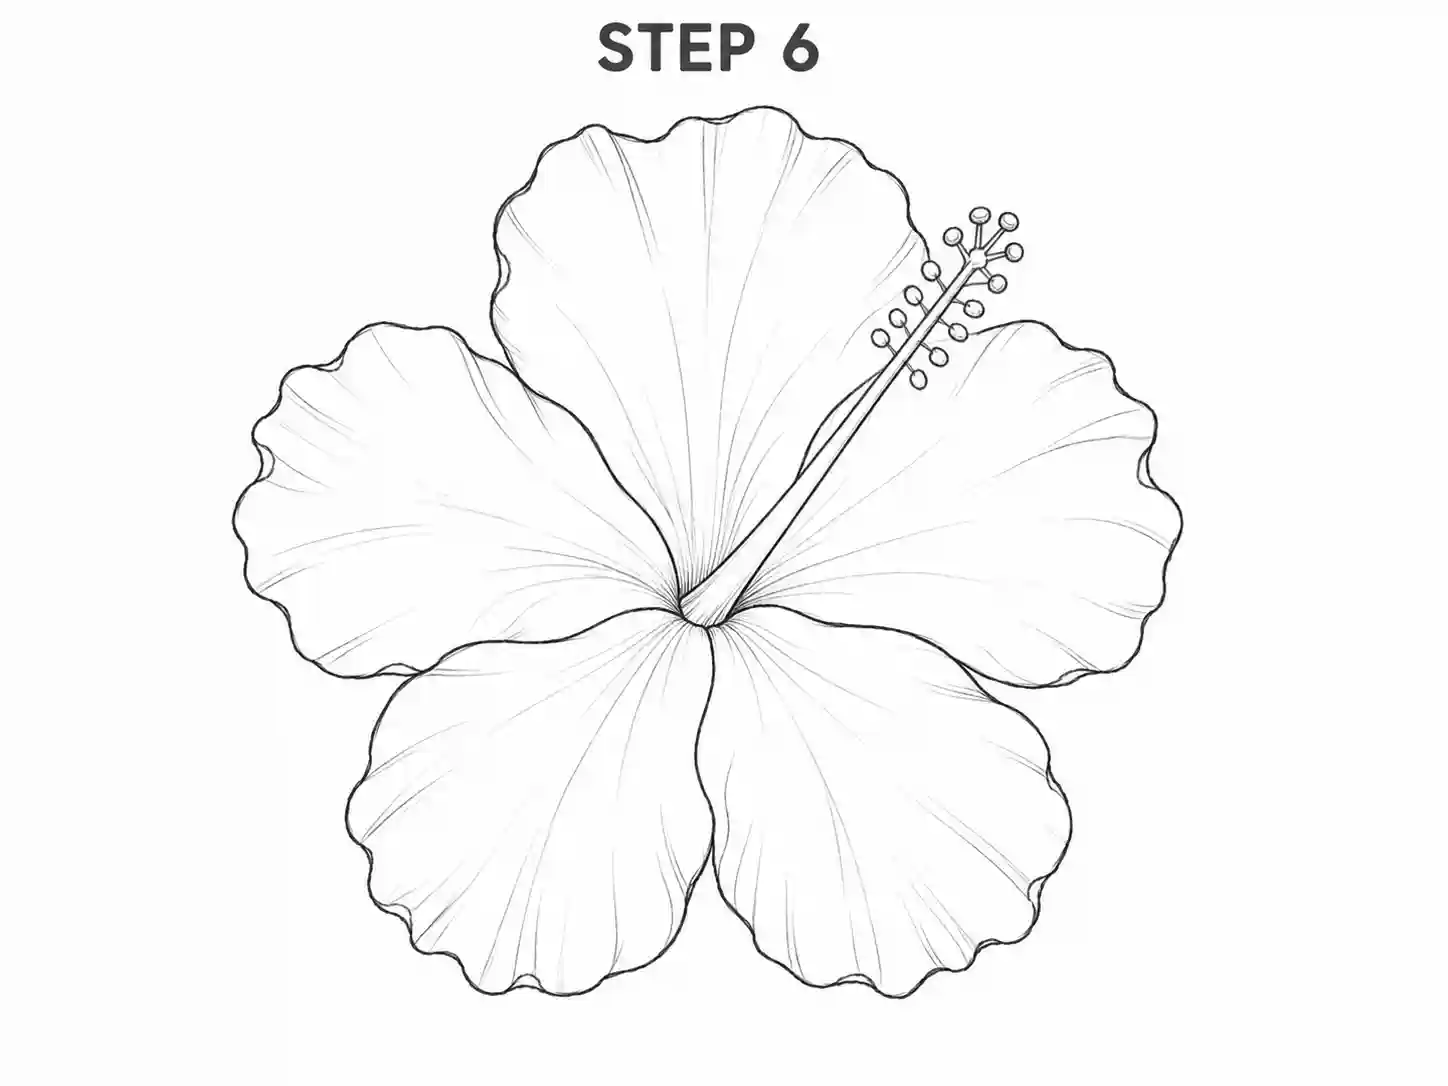
Step 6: Draw the Long Stamen

From the flower center, draw a long narrow shape extending outward. The stamen may point upward, sideways, or slightly downward, depending on the angle of your flower.

At the end, add several small rounded or oval shapes to represent the anthers.

This long central feature is important because it separates a hibiscus flower drawing simple design from a generic five-petal flower.

Keep the stamen slender. If it becomes too thick, it may overpower the bloom.

Add the hibiscus stem and leaves
7

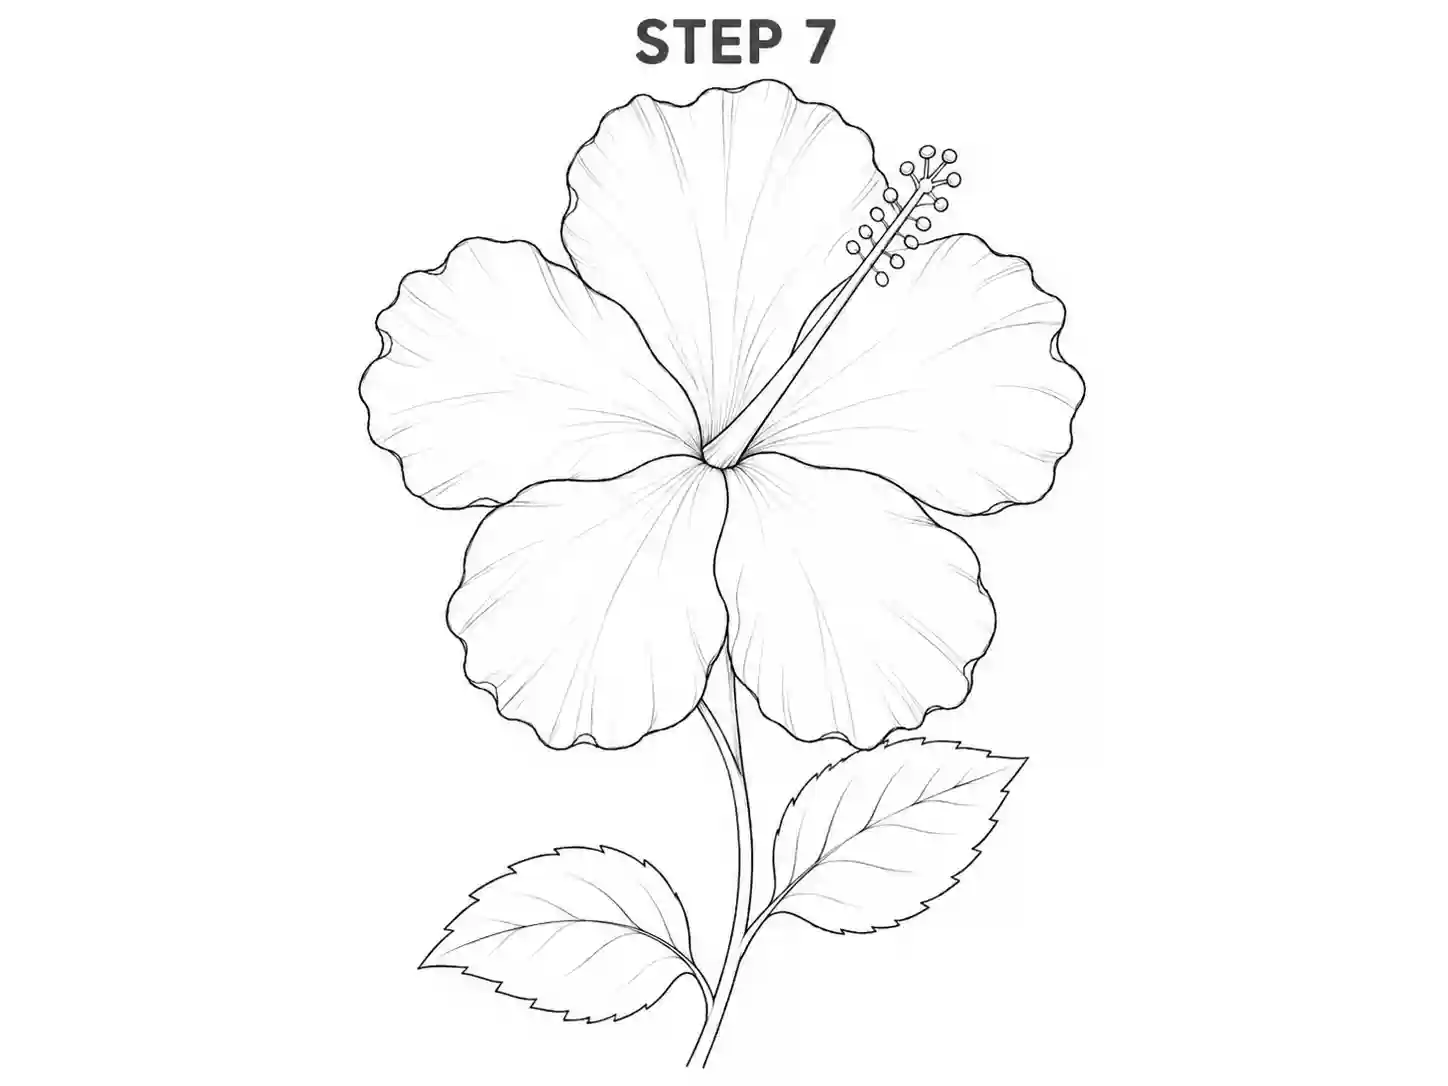
Step 7: Add the Stem and Leaves

Draw two close parallel lines extending from beneath the flower to create the stem.

Add one or two leaves along the stem. Hibiscus leaves are usually wider near the middle and taper toward a pointed tip.

Draw a central vein inside each leaf, followed by shorter side veins. You can use lightly jagged edges to suggest the natural serration of the leaf.

Clean the hibiscus outline
8

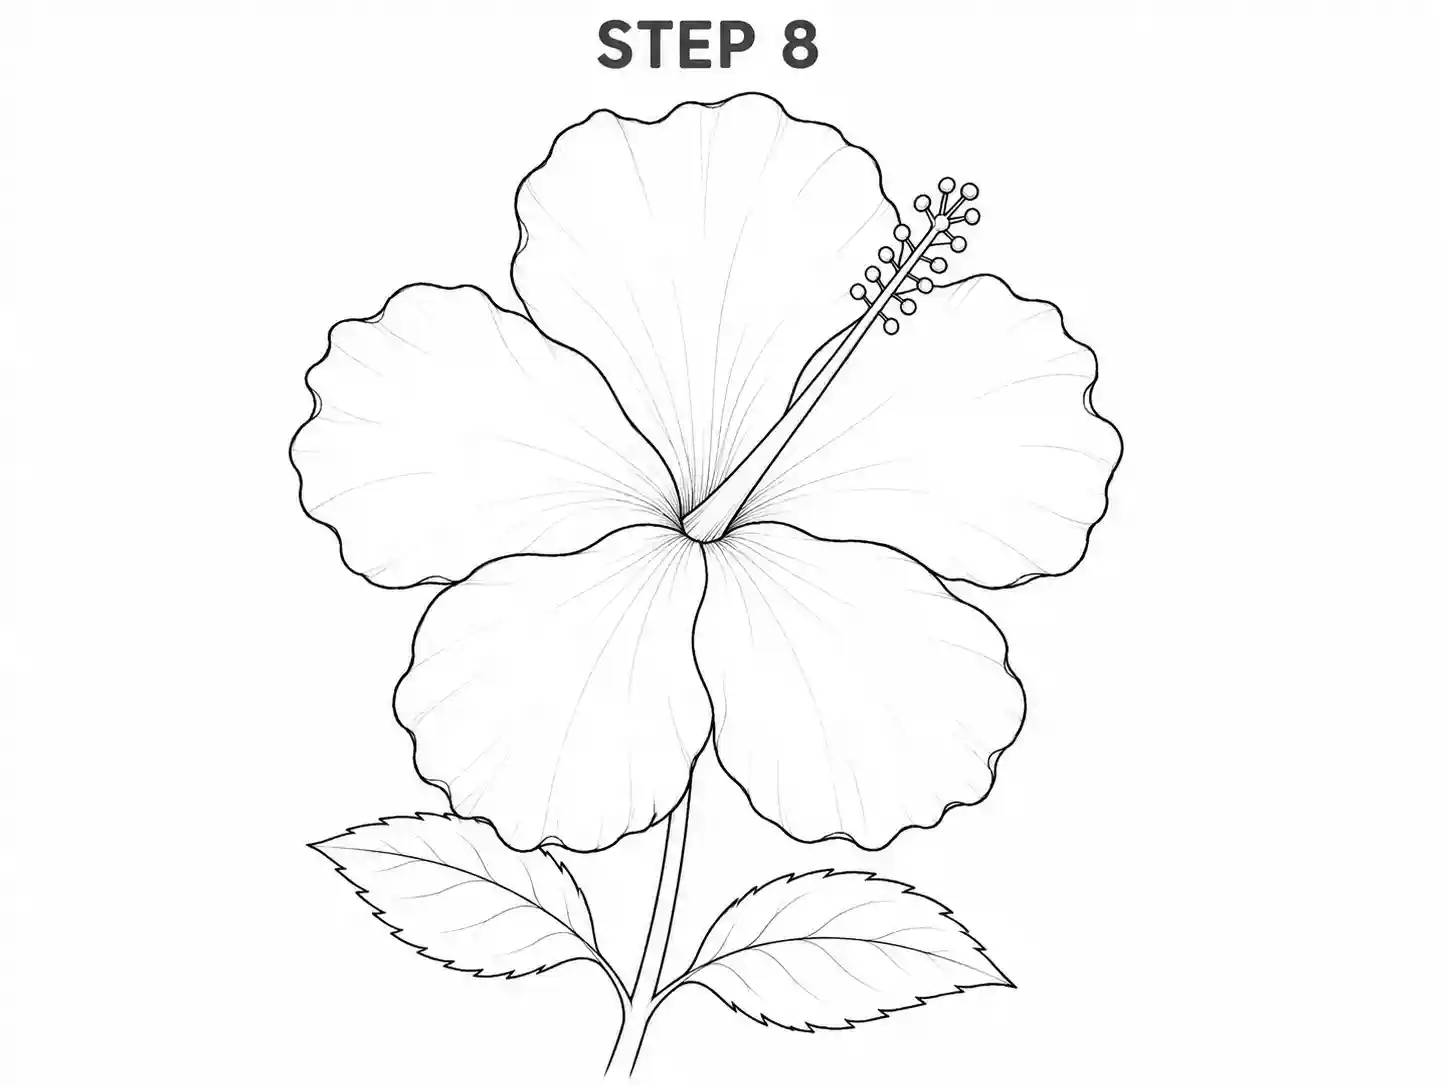
Step 8: Clean the Hibiscus Outline

Erase the construction guidelines and any unwanted overlapping marks.

Strengthen the outer petal edges, stamen, stem, and leaves with cleaner lines. Keep the internal details slightly lighter so the drawing remains easy to read.

A clean hibiscus flower line drawing should still be recognizable without color or heavy shading.

If you plan to use a pen, trace the final pencil lines carefully and allow the ink to dry before erasing the graphite.

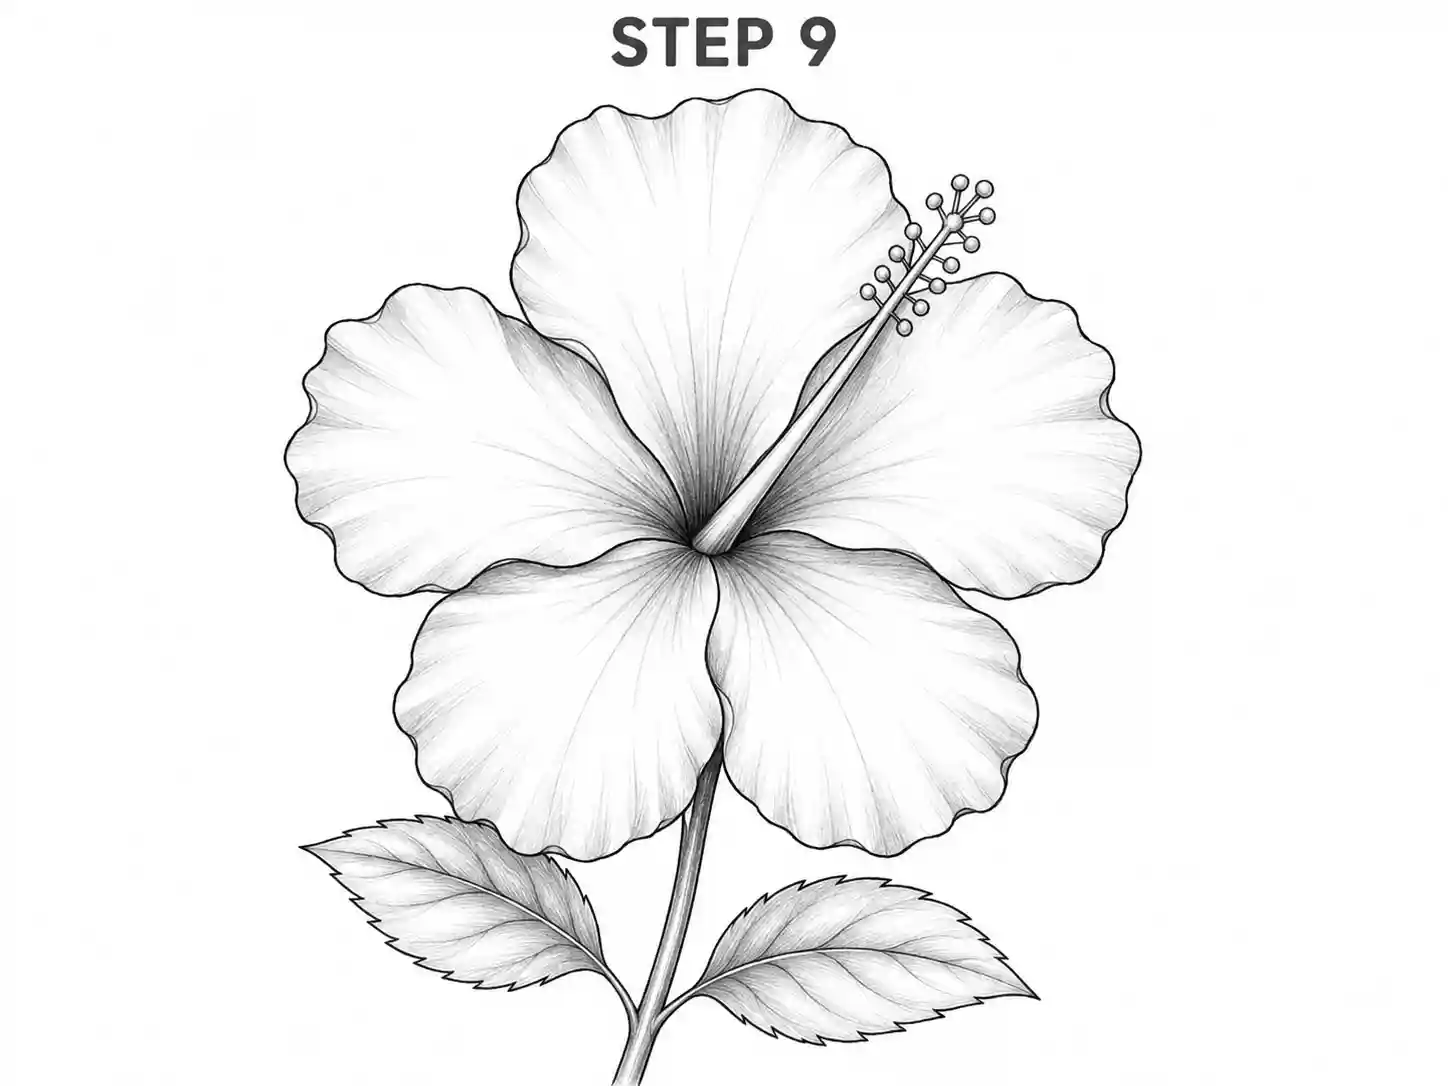
Hibiscus Flower Drawing
9

Step 9: Add Shading or Color

Choose a light direction before shading.

Add darker values:

  • Near the flower center
  • Beneath overlapping petals
  • Along selected petal folds
  • Under the bloom
  • On one side of the stem
  • Beside the main leaf veins

Leave the outer petal surfaces lighter to create contrast. This final stage transforms the basic sketch into a finished hibiscus flower drawing with greater depth and dimension.

Simple Hibiscus Drawing Tips

A simple hibiscus flower drawing looks best when the flower’s main features remain clear.

Use these tips during practice:

  • Draw the five-petal silhouette before adding texture.
  • Keep the first pencil lines light.
  • Make the petals broad rather than narrow.
  • Let some petal edges overlap.
  • Keep the stamen long and slender.
  • Avoid placing heavy details on every petal.
  • Follow the direction of the petal when shading.
  • Draw the leaves after finishing the bloom.
  • Compare the size of the stem with the flower.
  • Leave enough white space around the illustration.

Beginners often improve more quickly by repeating the basic flower two or three times instead of adding too many details to one drawing.

Create an Outline Hibiscus Flower Drawing

An outline drawing is useful for coloring pages, worksheets, classroom projects, Cricut-style references, and simple decorative illustrations.

Begin by removing all guidelines and unnecessary interior marks. Keep only the main petal edges, flower center, stamen, stem, and leaves.

You can create two outline styles:

Minimal Outline

Use smooth petal edges, one long stamen, a curved stem, and two basic leaves. This version is ideal for kids, beginners, and tracing exercises.

Detailed Outline

Add petal folds, small anthers, leaf veins, and slightly serrated leaf edges. This version offers more visual interest without requiring full shading.

For a clean hibiscus flower outline drawing, avoid placing too many lines inside the petals. The image should remain clear when printed at a smaller size.

Easy Hawaiian Hibiscus Flower Drawing

The hibiscus is strongly associated with tropical and Hawaiian imagery. A hawaiian hibiscus flower drawing often uses a wide open bloom, flowing petal edges, bright colors, and surrounding tropical leaves.

To create a Hawaiian-inspired version:

  • Make the petals wider and more flowing.
  • Curve the stamen outward.
  • Add one or two large tropical leaves.
  • Use coral, pink, red, orange, or yellow.
  • Include a soft color transition near the flower center.
  • Keep the composition open and decorative.

For a hawaiian hibiscus flower drawing easy enough for beginners, use one large front-facing flower instead of a complex arrangement.

You can later combine several hibiscus flowers with palm leaves or simple curved branches to create a tropical border.

How to Make a Realistic Hibiscus Flower Drawing

A realistic hibiscus flower drawing depends on shape, overlap, texture, and controlled shading.

Study the Petal Folds

Hibiscus petals often contain long folds running from the center toward the outside. Use curved pencil strokes that follow the direction of these folds.

Add Depth Near the Center

The flower center is usually darker because the petals curve inward. Build the shadow gradually rather than filling the area with solid graphite.

Vary the Petal Edges

Some petal edges may fold forward while others turn away. Use changes in line weight and small contour lines to show these differences.

Shade the Stamen Carefully

Add a soft shadow along one side of the stamen. Keep the small anthers visible and avoid turning them into one dark shape.

Use Uneven Highlights

Do not shade every petal equally. Leave lighter areas on the surfaces facing the light.

A hibiscus flower drawing realistic in appearance should still have clean, readable forms. Too much graphite can hide the natural petal structure.

Colored Hibiscus Flower Drawing Ideas

Pink Hibiscus Flower Drawing is most liked flower colour and it appear in many vibrant combinations.

Try these Colours:

  • Red petals with a dark burgundy center
  • Yellow petals with orange shading
  • Coral petals with a red center
  • Purple petals with violet shadows
  • White petals with pale pink folds
  • Orange petals with yellow highlights

Blend colors gradually and keep the lightest areas visible. Adding the darkest color only near the center and overlapping edges can make the petals feel softer.

Small Hibiscus Flower Drawing

A small hibiscus flower drawing is suitable for journals, greeting cards, bookmarks, small worksheets, and quick sketchbook practice.

When working at a small size:

  • Reduce the number of petal folds.
  • Keep the stamen clear and simple.
  • Use one stem and one leaf.
  • Avoid heavy shading.
  • Strengthen the outer contour slightly.
  • Leave enough space between interior lines.

Try drawing three small hibiscus flowers at different angles. This helps you practice shape variation without committing to a large detailed illustration.

Common Mistakes to Avoid

Drawing More Than Five Main Petals

A hibiscus is usually represented with five broad petals. Too many equally large petals can make it resemble a different flower.

Making the Petals Too Narrow

Hibiscus petals are generally open and wide. Narrow shapes can make the bloom look stiff.

Forgetting the Stamen

The long stamen is one of the flower’s most distinctive features. Without it, the drawing may look generic.

Using a Perfectly Straight Stem

A slight curve usually gives the composition more movement.

Making Every Petal Identical

Natural flowers contain variation. Change the width, curve, and edge of each petal slightly.

Adding Dark Shading Too Early

Finish the structure first. Early heavy shading can hide proportion problems and make corrections difficult.

Ignoring Leaf Structure

Even simple leaves should have a central vein and a clear pointed shape.

Frequently Asked Questions

Start with a small center and arrange five broad petals around it. Add wavy edges, a long stamen, a curved stem, and one or two pointed leaves.

Drawing hibiscus details can look difficult, but the flower becomes manageable when it is divided into the center, five petals, stamen, stem, and leaves.

Most hibiscus flowers are represented with five main petals. Their widths, angles, and folds can vary.

Use gently wavy edges, vary the petal shapes, allow some forms to overlap, and add light contour lines from the center toward the outside.

Yes. Complete the pencil sketch, remove the guidelines, and trace only the main contours. Keep the inside mostly blank so it can be colored easily.

Pink, red, orange, yellow, white, coral, and purple all work well. Darker tones near the flower center can create depth.

A sketch hibiscus flower drawing improves when the pencil lines follow the petal direction. Use light strokes first, then add darker values only near folds and overlapping areas.

A drawing of hibiscus flower can be simplified for children by using five smooth petals, one long stamen, a short stem, and two basic leaves.

Complete Your Drawing

Begin with the center, place the five petals carefully, and add the stamen only after the main bloom feels balanced. Keep the early lines light and refine the edges gradually.

A hibiscus drawing flower exercise is a useful way to practice curved lines, broad petal shapes, overlaps, shading, and leaf details in one illustration.

Use the printable worksheet for extra practice and repeat the flower at different sizes or angles. With regular sketching, your hibiscus flower drawing will become cleaner, more confident, and more natural.