Skip to content
FlowerDrawings.orgFlowerDrawings.org

Easy Rose Drawing Step-by-Step Guide for Beginners

A rose may look complicated because its petals overlap and curl in different directions, but the basic structure is easier to understand when you draw it one layer at a time. This beginner-friendly rose drawing easy tutorial will help you create the center, build the surrounding petals, refine the outline, and complete the stem and leaves.

You do not need advanced art supplies or previous experience. A pencil, an eraser, and a clean sheet of paper are enough to begin. By starting with light shapes and gradually adding detail, you can turn a small spiral into a complete drawing of a rose.

The tutorial also includes practice tips, outline ideas, shading guidance, and a printable worksheet. Follow the visual stages slowly, and do not worry if your petals are not perfectly symmetrical. Natural roses also have uneven folds, varied edges, and overlapping forms.

rose drawing

Rose Drawing Tutorial Information

Difficulty

Beginner

Estimated time

5 - 10 minutes

Drawing style

Pencil outline with optional shading

Main subject

Rose with a stem and leaves

Best for

Beginners

Materials You Need

You can complete this tutorial with a few basic drawing tools:

  • HB or number 2 pencil
  • Clean drawing paper
  • Soft eraser
  • Pencil sharpener
  • Black fineliner, if you want a darker outline
  • Colored pencils or markers, if you want to add color

Use light pressure during the first few stages. Construction lines are easier to adjust when they are faint, and the final result will look cleaner after the unnecessary marks are erased.

Rose Drawing Step by Step

Follow these stages in order. Keep your pencil lines light until the overall shape looks balanced.

Draw the rose center
1

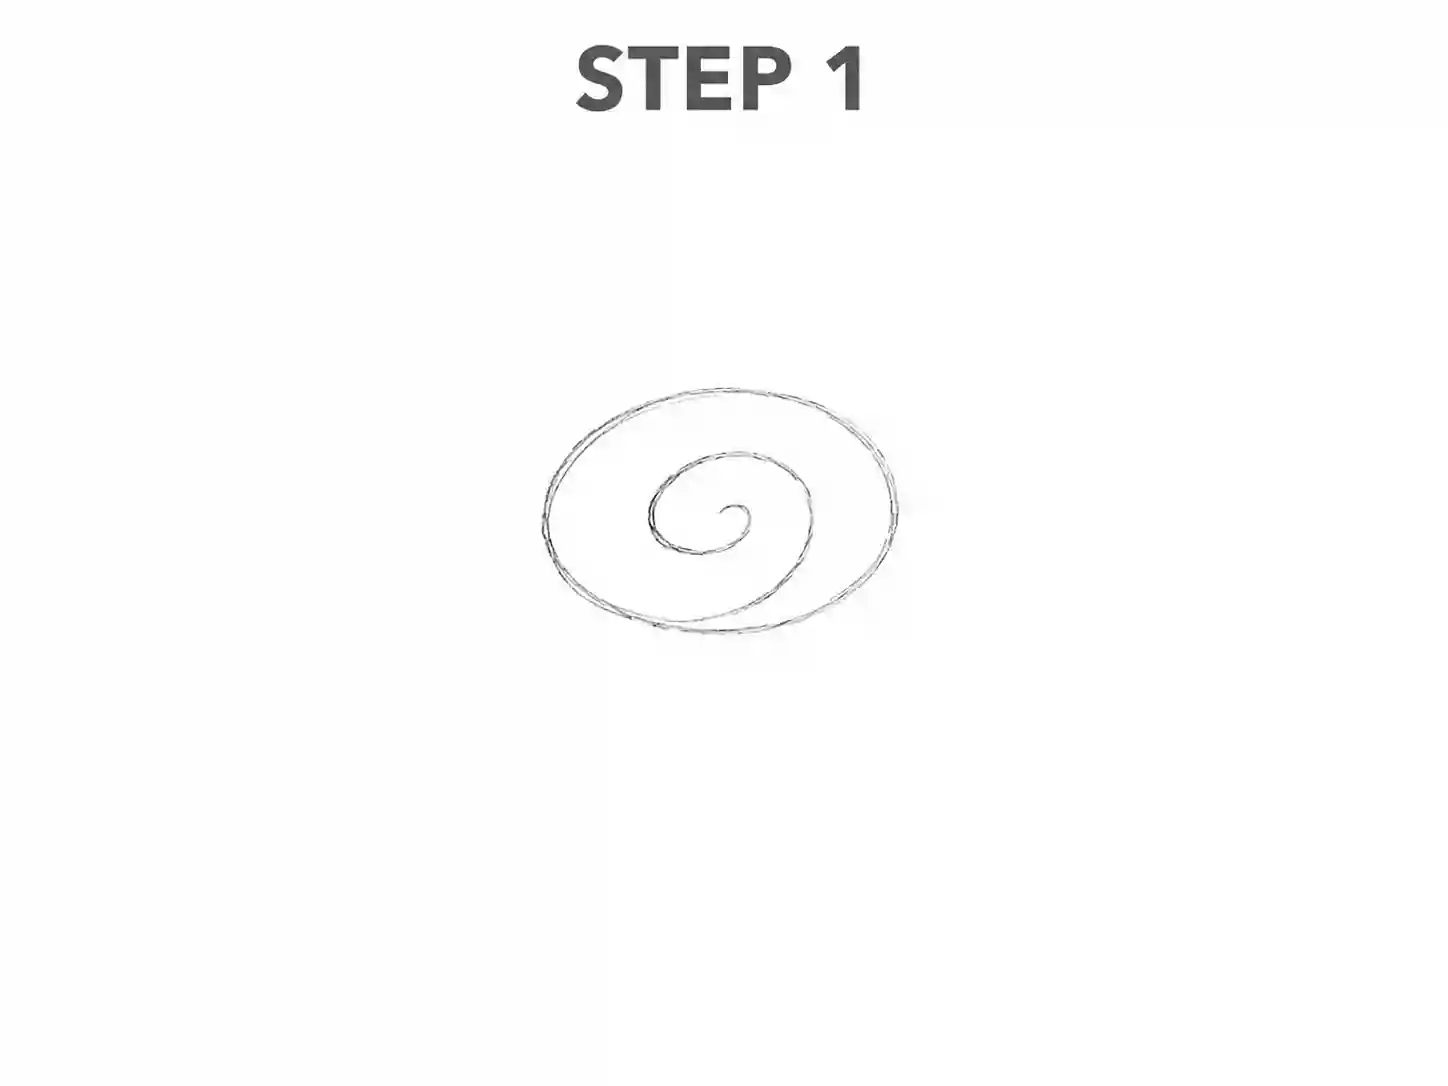
Step 1: Draw the Rose Center

Begin with a small oval near the center of the page. Inside the oval, draw a short curved line that resembles a loose spiral or a folded ribbon.

This first shape represents the tightly wrapped petals inside the rose. It does not need to be perfectly round. A slightly uneven center often makes the flower appear more natural.

Avoid making the central spiral too large. Leave enough space around it for several additional layers of petals.
Add the first folded petals
2

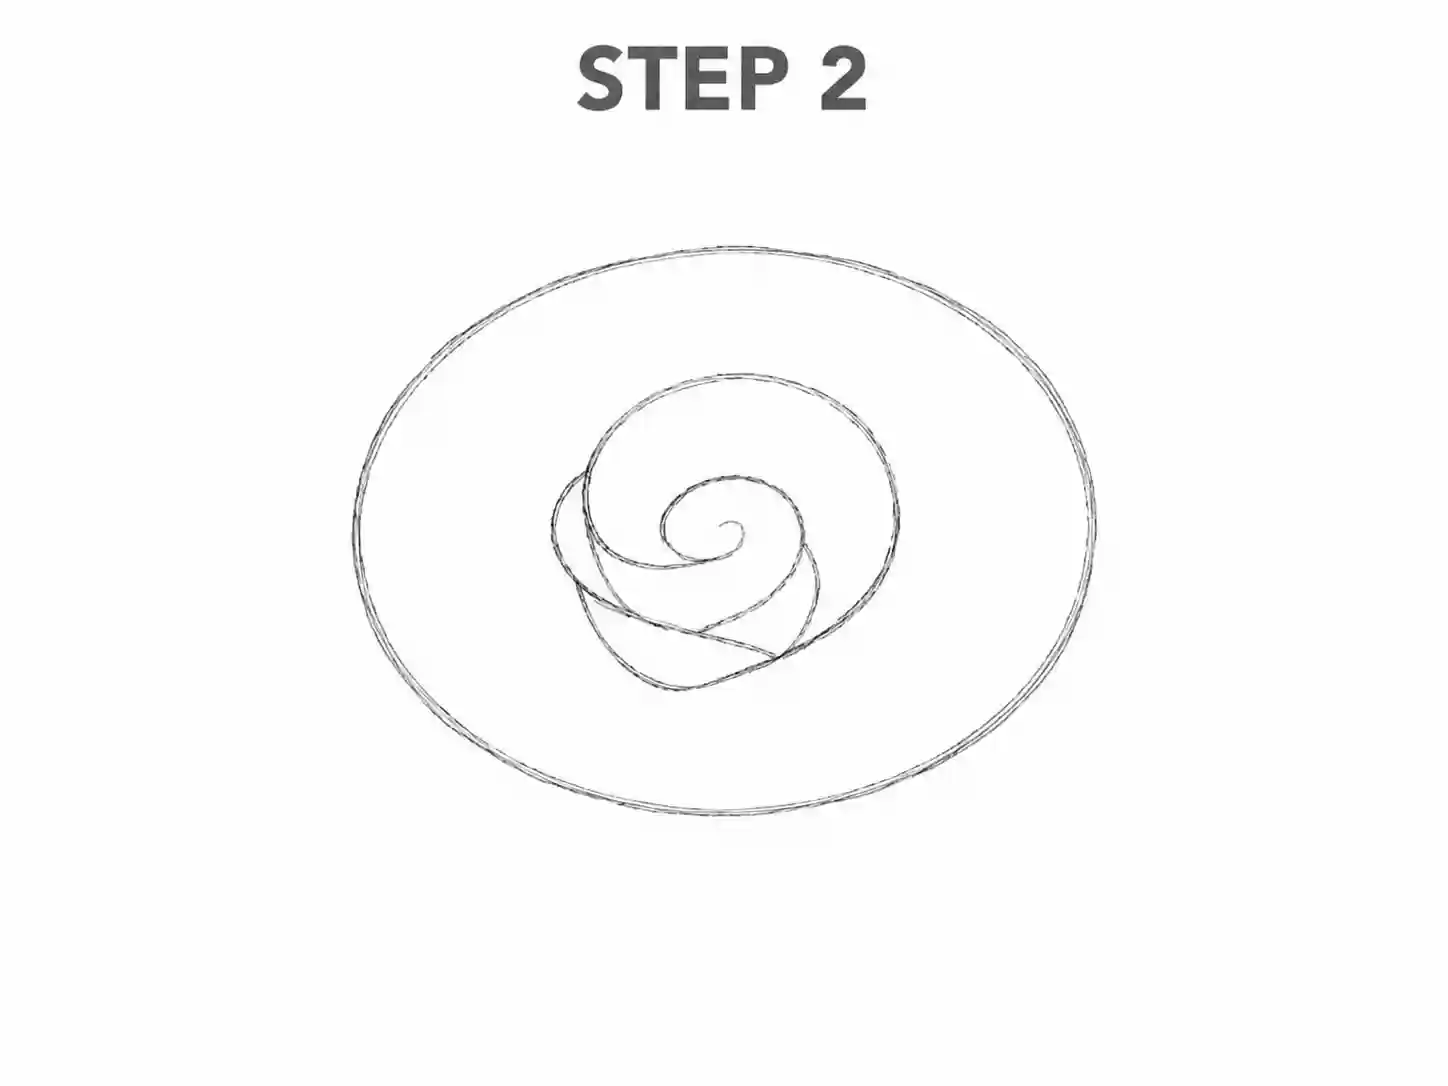
Step 2: Add the First Folded Petals

Draw two or three short curved shapes around the center. Allow each petal to partially cover the one behind it.

The lines should curve inward near the center and open slightly toward the outside. Think of these early petals as small cups wrapped around the middle of the flower.

At this stage, your drawing may look more like a collection of curved ribbons than a finished flower. That is normal. The recognizable rose shape will appear as you add more layers.

Build the middle petals
3

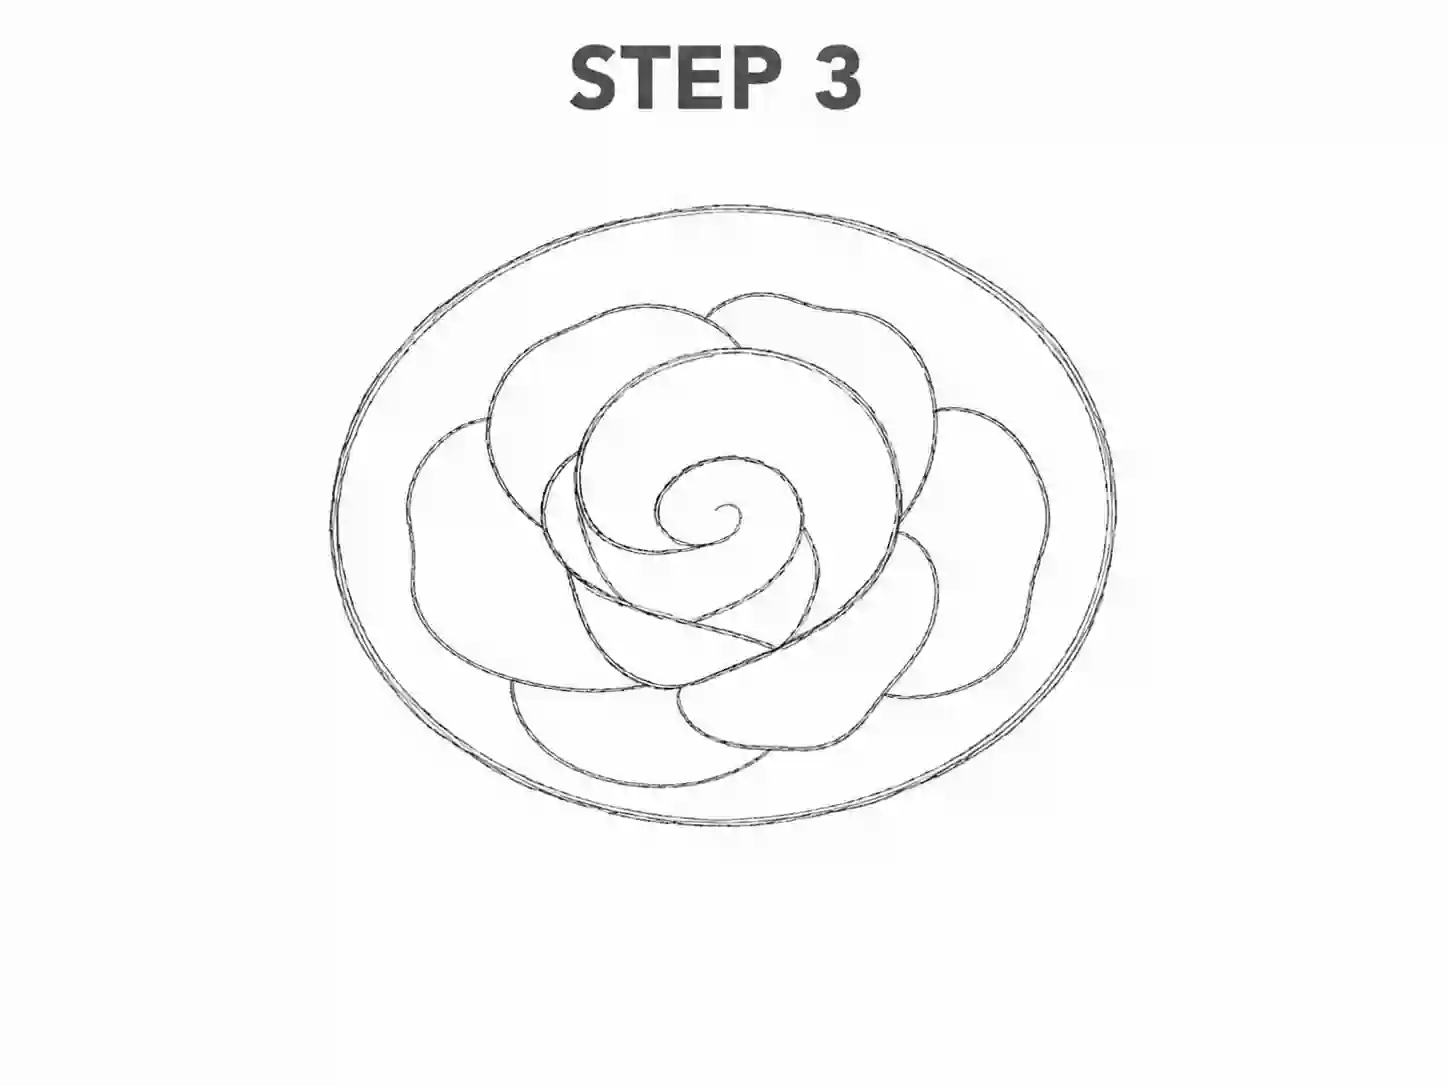
Step 3: Build the Middle Petals

Add a second layer of petals around the first group. Make these petals slightly wider and allow their edges to turn outward.

Try not to place every petal directly beside another. Let some overlap from the front while others disappear partly behind nearby shapes. Overlap creates depth and gives the rose more three-dimensional appearance.

Rotate your paper if a curved line feels uncomfortable. Moving the paper can help you draw smoother petal edges.

Add the outer petals
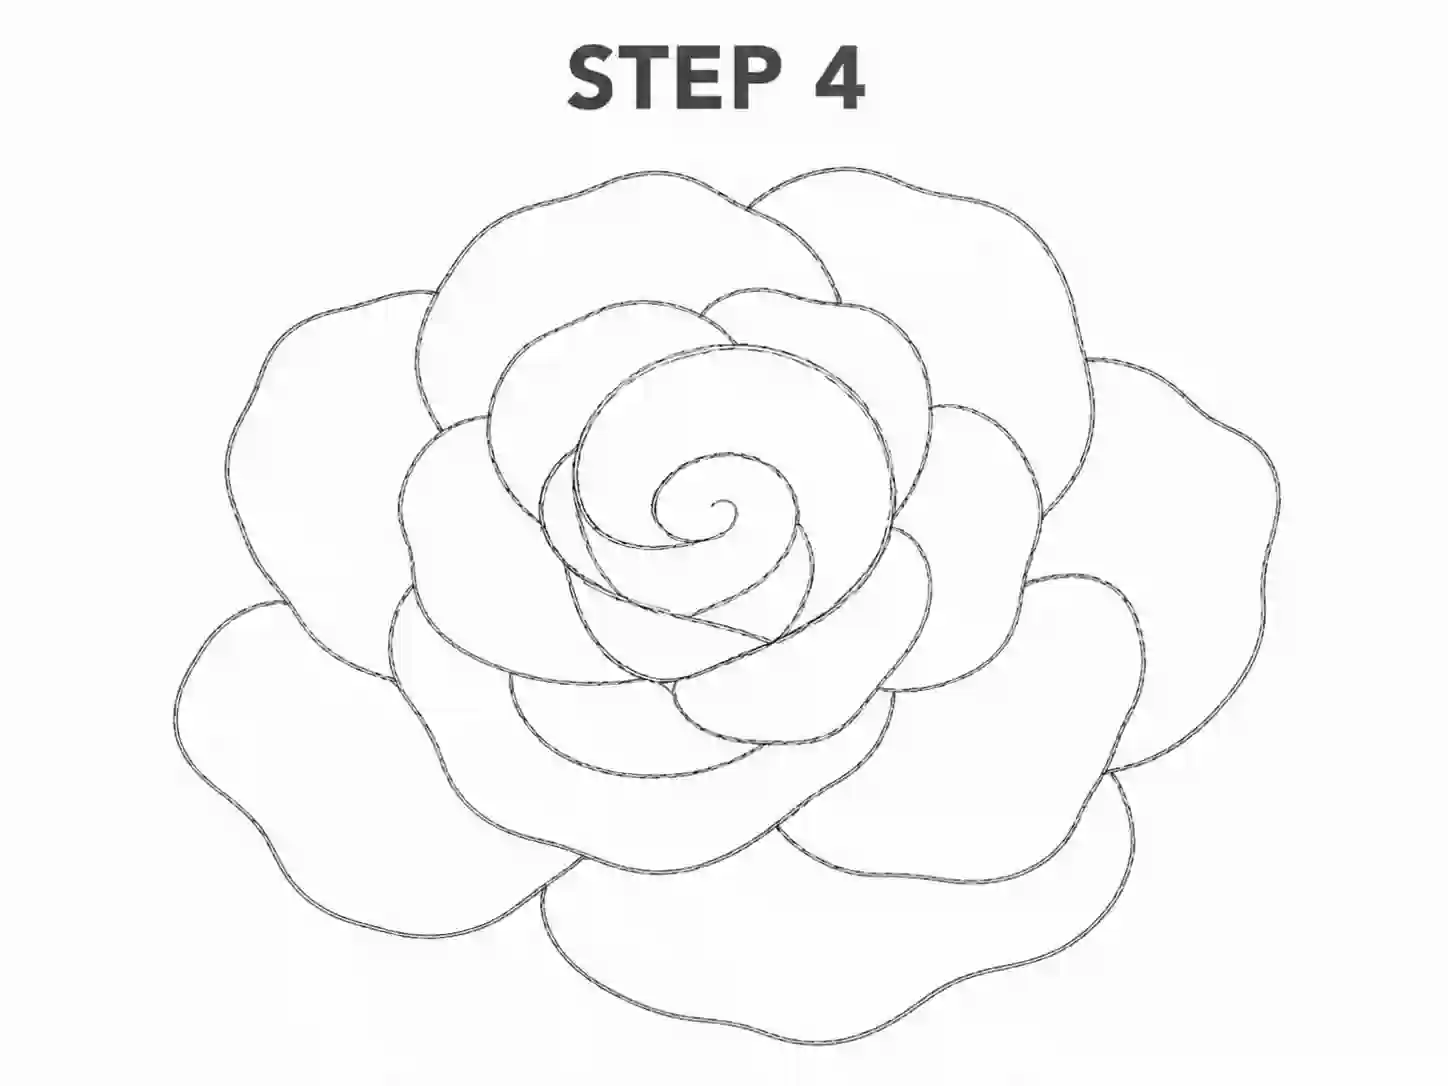
4

Step 4: Add the Outer Petals

Draw several larger petals around the middle section. These outer shapes should be broader and more open than the inner petals.

Vary their size and direction. One petal may curve upward, another may spread to the side, and another may fold downward. This variation prevents drawing from looking too mechanical.

Check the complete flower shape before adding more details. The bloom should feel balanced, but it does not need to form a perfect circle.

Refine the petal edges
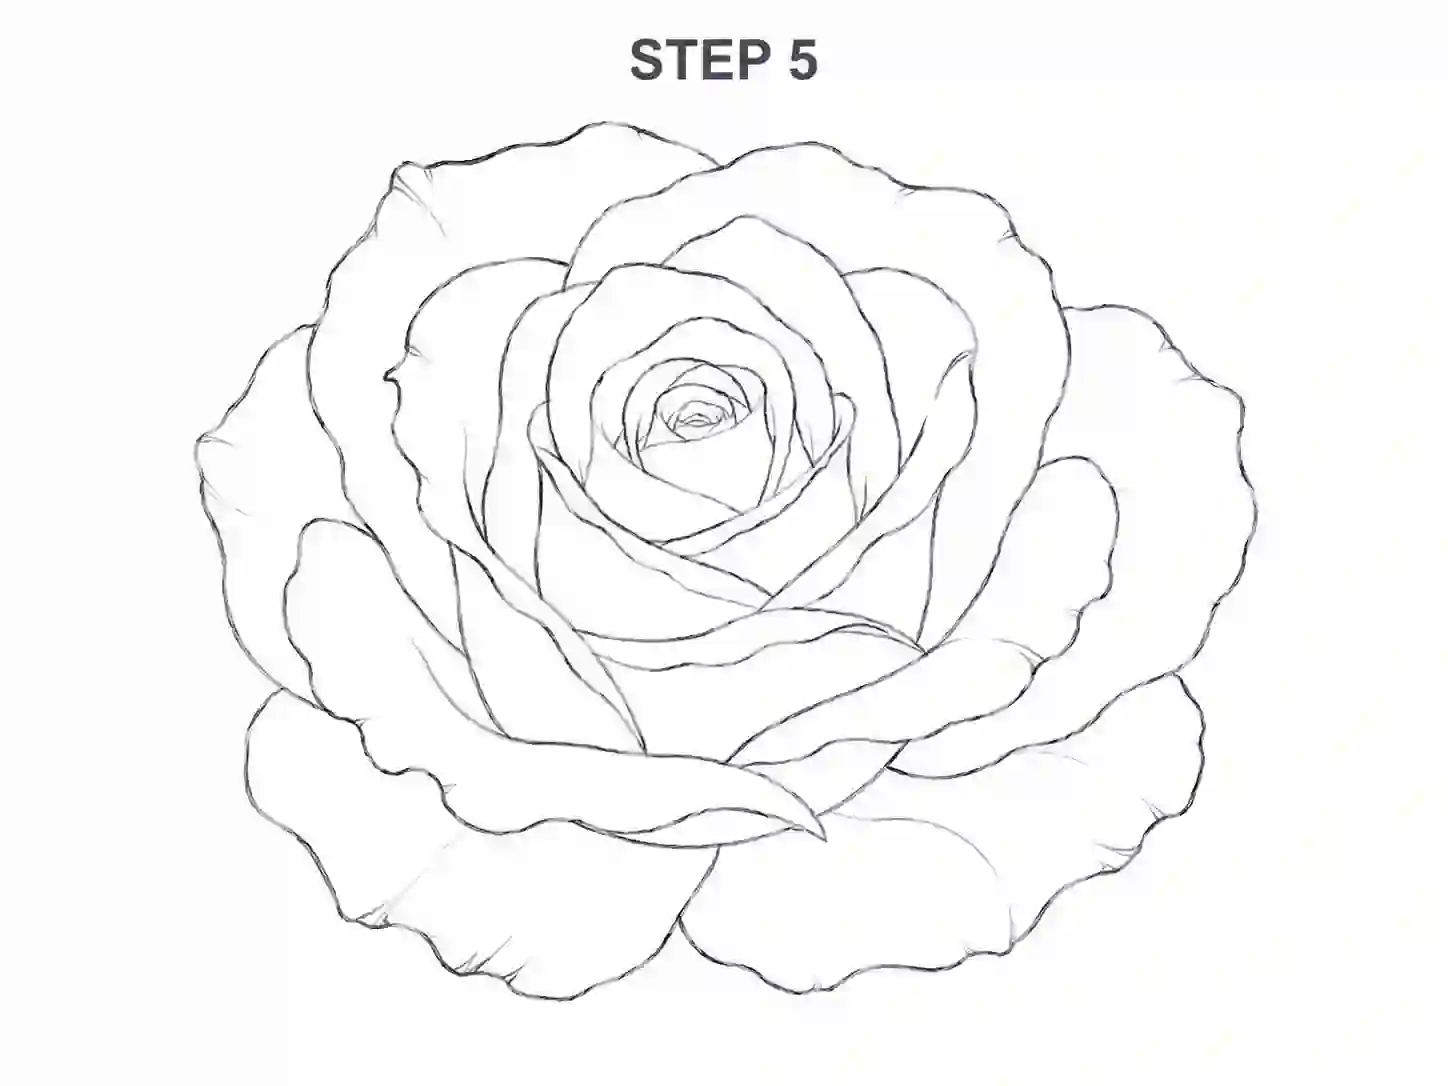
5

Step 5: Refine the Petal Edges

Review the petals and adjust any shapes that look too narrow, pointed, or crowded. Add gentle dips and curves along a few outer edges to suggest natural folds.

Erase construction lines that are no longer needed, but keep the main contours visible. Strengthen only the lines you want to include in the final rose line drawing.

You can also add one or two short interior lines to show where a petal bends. Avoid filling every petal with detail because too many marks can make the flower look cluttered.

Draw the stem and sepals
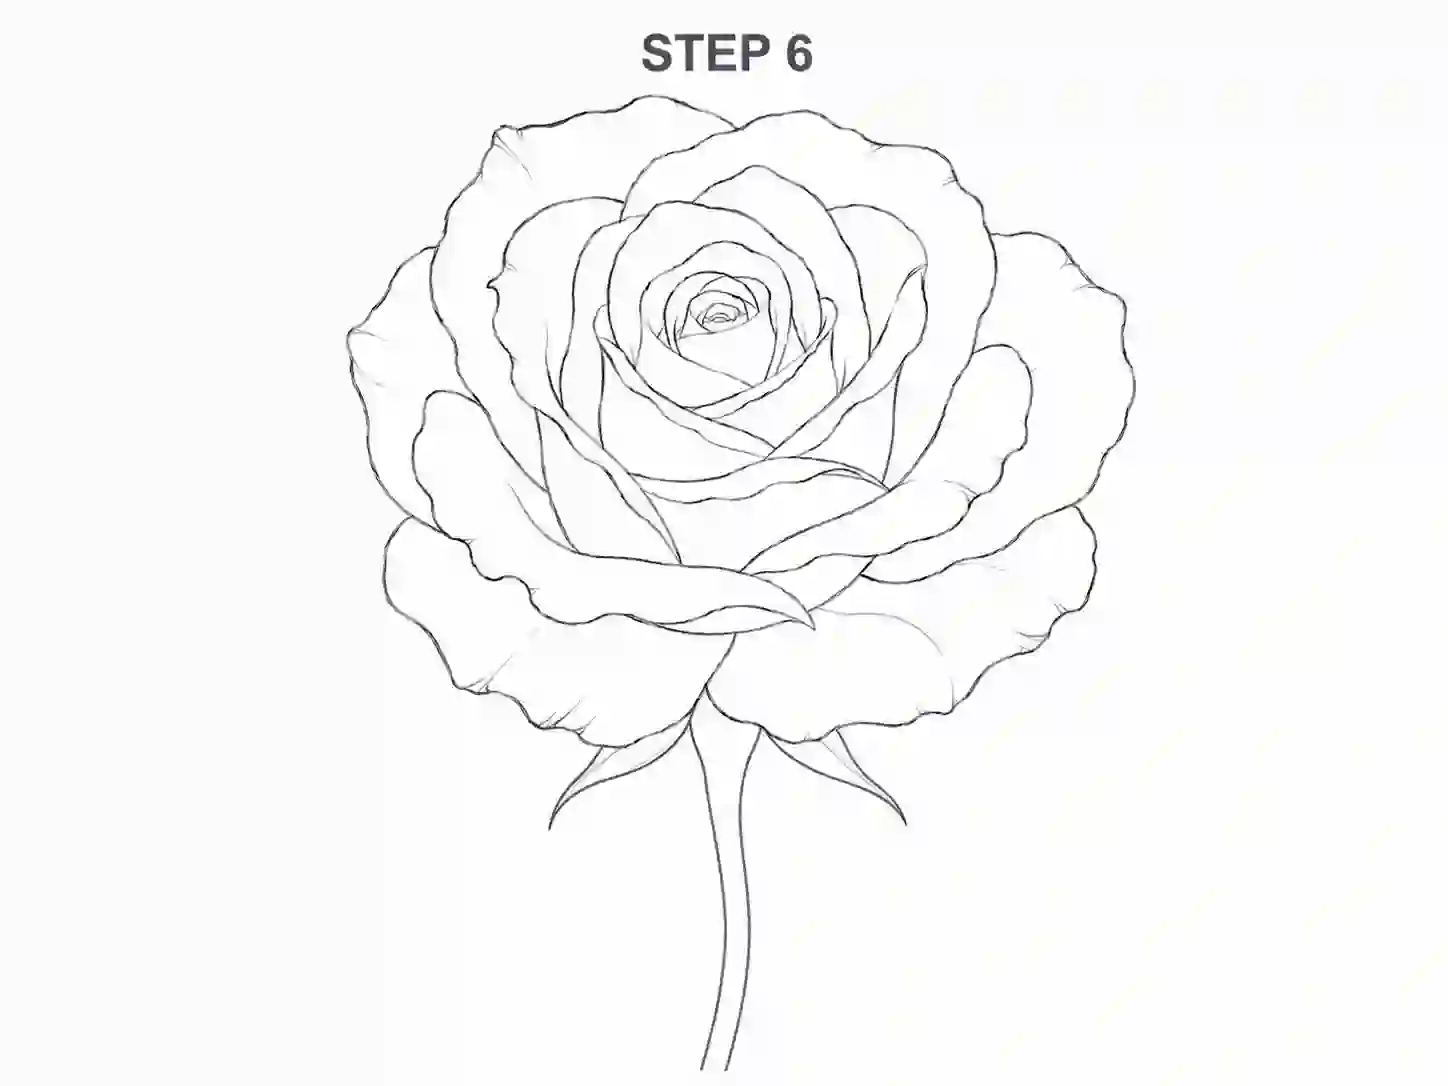
6

Step 6: Draw the Stem and Sepals

From underneath the flower, add two close parallel lines to form the stem. A slight curve will usually look more natural than a completely straight stem.

At the base of the bloom, draw a few narrow pointed sepals. These small leaf-like forms sit beneath the petals and connect the flower to the stem.

This stage transforms the bloom into a complete flower rose drawing instead of an isolated flower head.

Add rose leaves
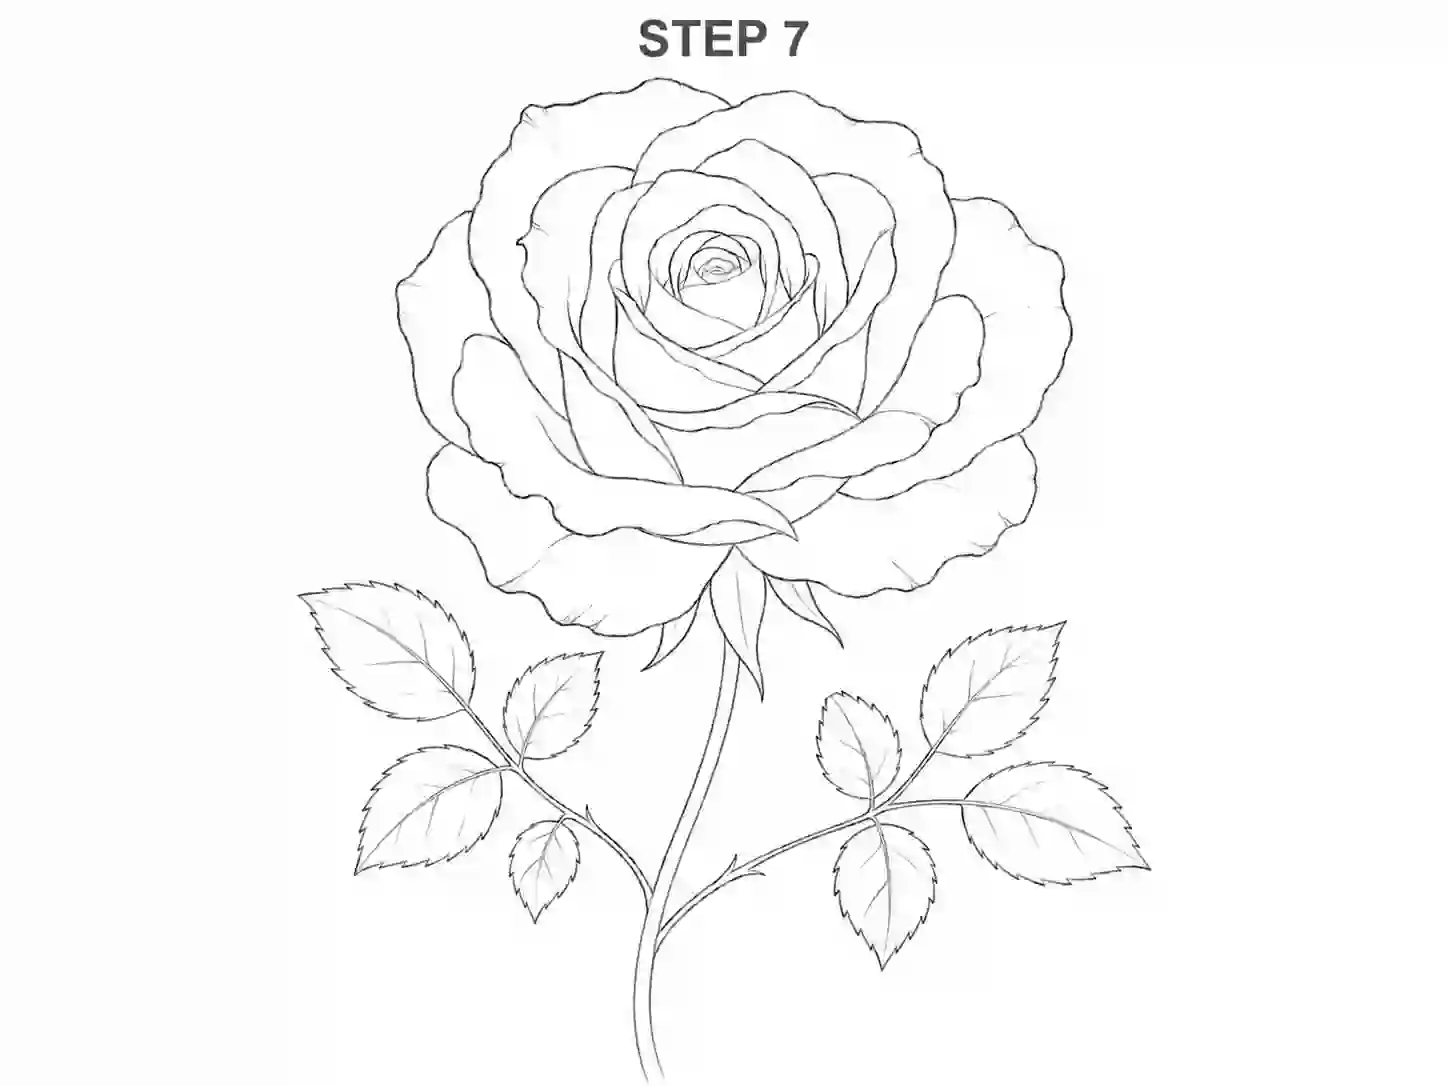
7

Step 7: Add Rose Leaves

Draw one or two leaf stems extending from the main stem. Rose leaves often grow as a group of smaller leaflets rather than as a single large leaf.

Create each leaflet with a pointed tip and a slightly serrated outer edge. Add a central vein and a few short side veins.

For a beginner version, keep the leaf edges smooth. More detailed serrations can be added when you feel comfortable with the basic shapes.

Clean the final outline
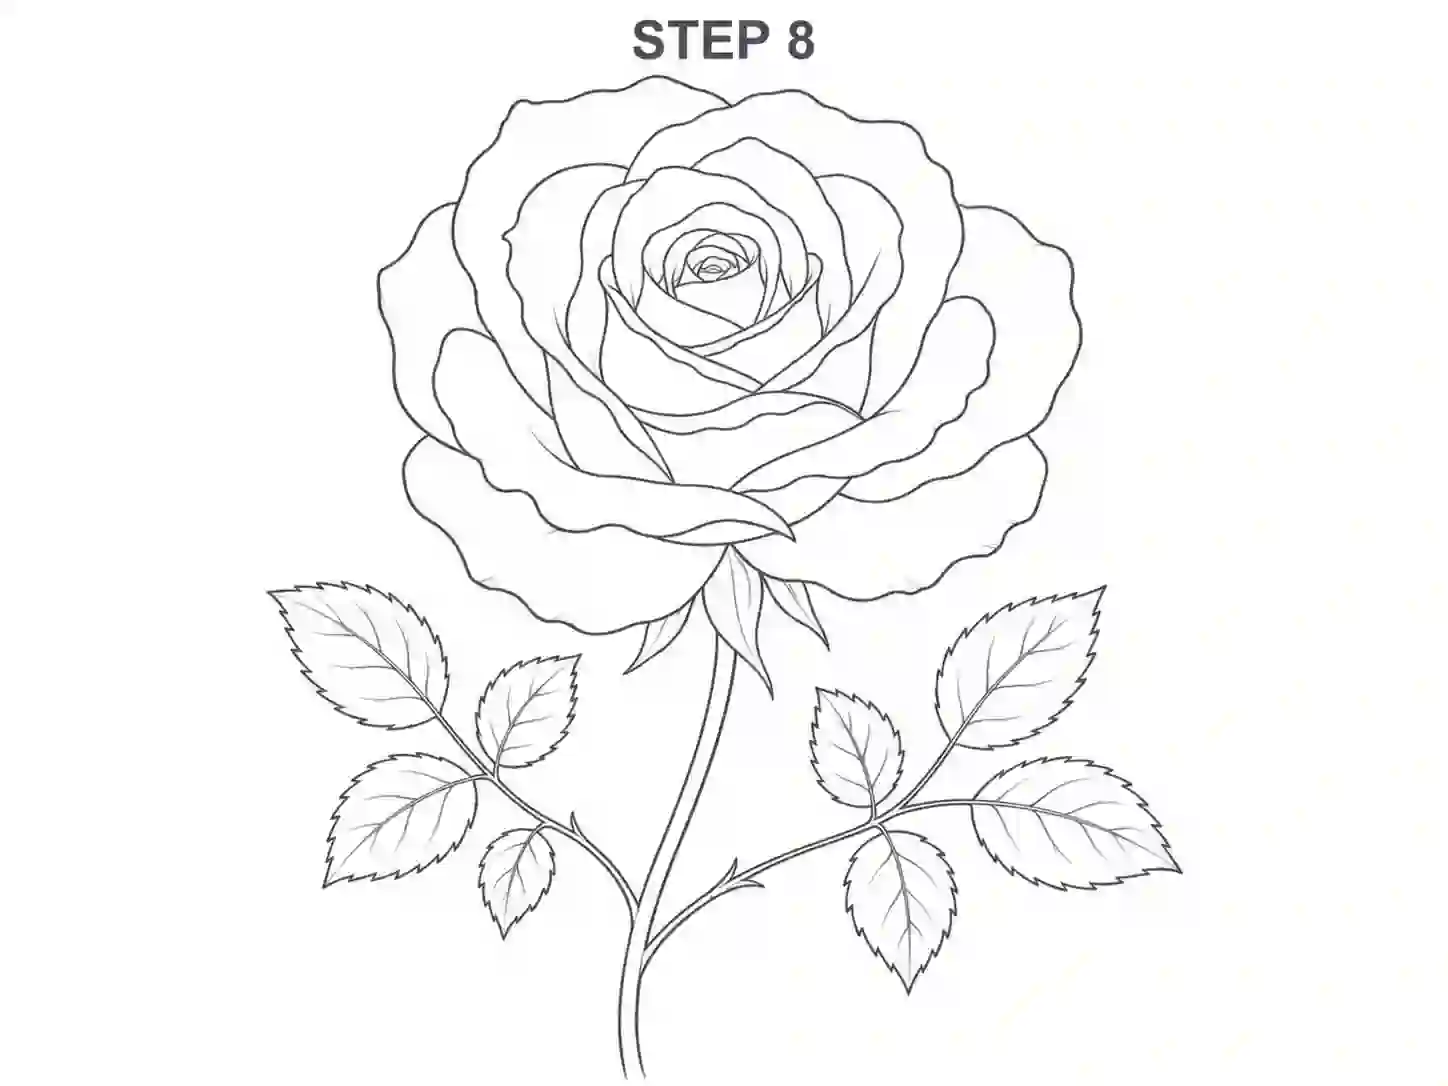
8

Step 8: Clean the Final Outline

Look over the complete drawing and remove any remaining guidelines. Darken the most important edges while keeping the inner petal details slightly lighter.

Your final drawing should now include:

  • A tightly folded center
  • Several overlapping petal layers
  • Wider outer petals
  • Small sepals
  • A curved stem
  • One or more groups of leaves

Use an eraser gently so the paper remains clean and the pencil lines do not smudge.

rose drawing
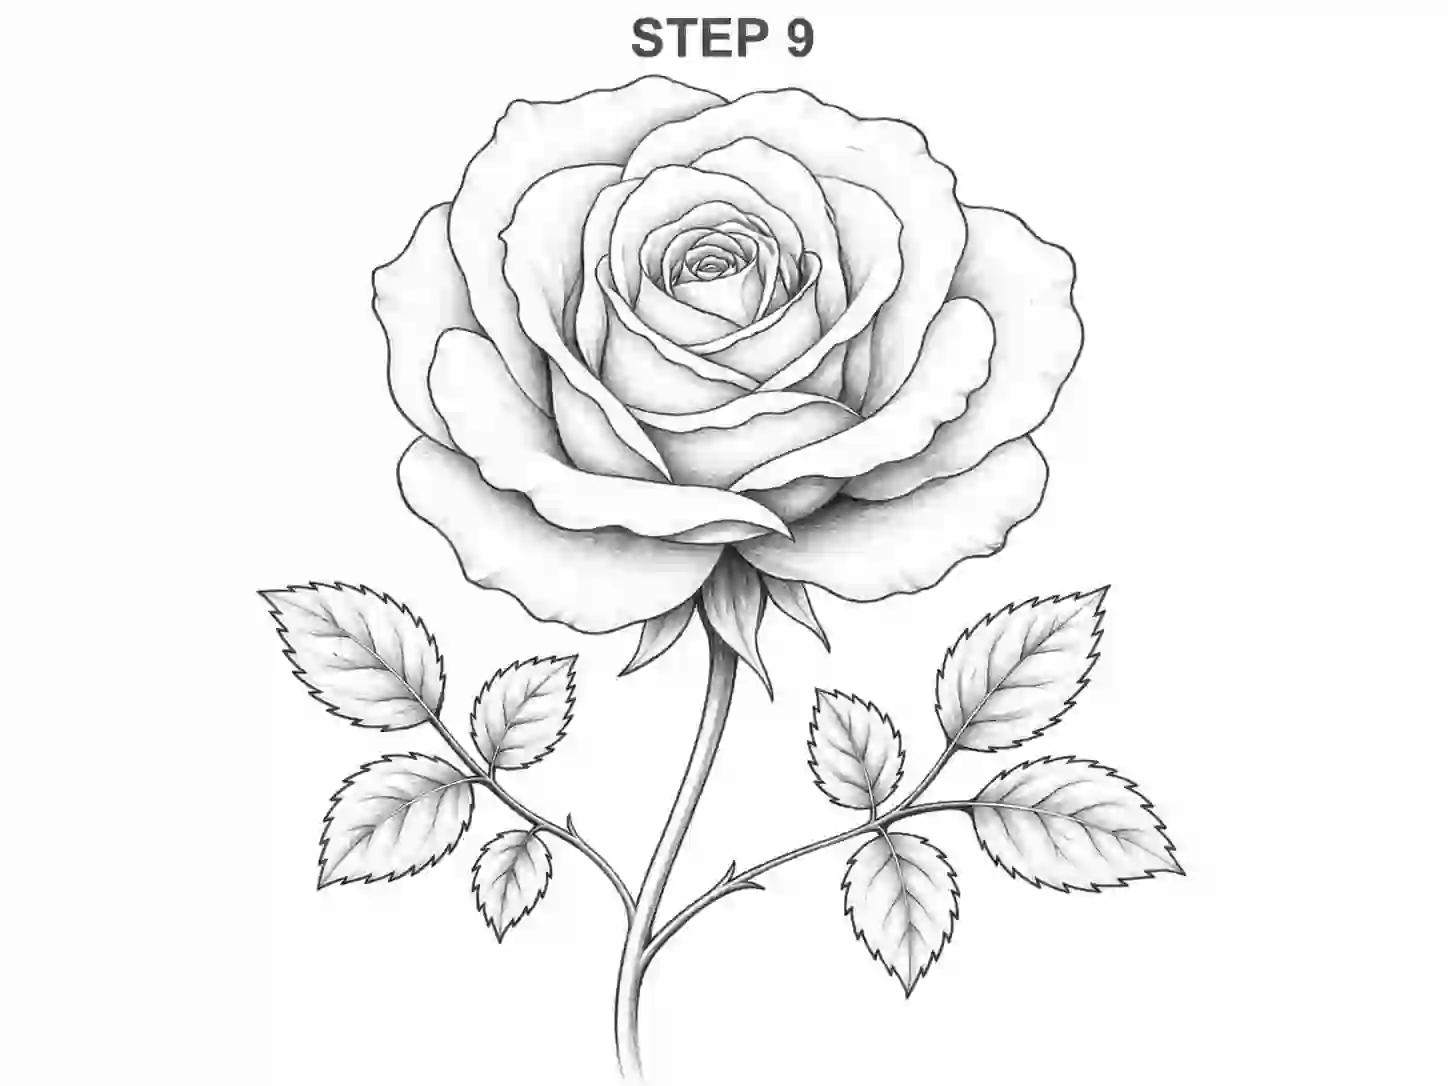
9

Step 9: Add Light Shading

Choose a general light direction before shading. Leave the areas facing the light mostly white and add darker values beneath overlapping petals.

Useful places for shadow include:

  • The spaces between the inner petals
  • Under folded petal edges
  • Near the base of the bloom
  • Beneath the flower head
  • Along one side of the stem
  • Around the center veins of the leaves

A sketch rose drawing does not require heavy shading. Soft graphite values and a few darker accents are enough to create depth.

Simple Rose Drawing Tips for Beginners

A rose easy drawing works best when the artist focuses on structure before detail. If the center, petal layers, and overall shape are correct, the flower will already be recognizable.

Use these tips while practicing:

  • Keep the inner petals small.
  • Increase petal size gradually.
  • Allow several petals to overlap.
  • Avoid drawing every petal in the same direction.
  • Use curved lines instead of sharp geometric edges.
  • Leave some areas simple and uncluttered.
  • Add shading only after the outline is complete.
  • Compare the width and height of the flower frequently.
  • Step back from the page to check the overall shape.
  • Repeat the center separately if it feels difficult.

Keeping your rose drawing simple does not mean the result must look unfinished. Clear shapes, controlled lines, and a balanced composition can create an attractive drawing without complicated details.

How to Create Outline

A clean outline is useful for worksheets, coloring pages, tattoo references, classroom activities, and simple illustrations.

For a clear rose outline drawing, use the pencil sketch as your foundation. Trace only the lines that define the main petals, stem, sepals, and leaves. Remove construction marks and unnecessary interior details.

You can create two versions:

Basic Outline

Use smooth lines and fewer petals. This is suitable for beginners, kids, tracing activities, and printable worksheets.

Detailed Outline

Include more overlapping petals, folded edges, leaf veins, and small contour lines. This version is better for intermediate artists or anyone who wants a more decorative result.

A clean outline should remain readable even when viewed at a smaller size. Avoid placing too many short lines inside the flower center.

How to Make a Realistic Rose Drawing

A realistic rose sketch depends more on observation and value than on the number of petals. Adding dozens of random lines will not automatically make the result realistic.

Focus on the following areas:

Petal Direction

Observe how petals grow outward from the center. Inner petals usually stand more upright, while outer petals spread and curve away from the bloom.

Overlapping Forms

Show clearly which petal sits in front and which one falls behind. Darkening the contact areas between petals creates separation.

Folded Edges

Some petals curl inward while others bend outward. A short contour line near an edge can suggest a fold without covering the petal in unnecessary detail.

Light and Shadow

Keep the light-facing areas soft and add stronger shadows in narrow spaces. The darkest values are often found near the center and beneath overlapping forms.

Uneven Shapes

Real petals are not identical. Vary their widths, lengths, angles, and outer edges.

To make your rose drawing realistic, work gradually. Add one layer of shading, pause to evaluate it, and then strengthen only the darkest areas.

Red Rose Drawing with Colored Pencils

For a traditional red rose, begin with a light pink or pale red base. Add darker red near the flower center and underneath folded petal edges.

Leave small lighter areas on each petal to represent highlights. Burgundy, dark red, purple, or a touch of brown can be used for deeper shadows.

Color the leaves with a medium green and add darker green near the central veins. Use a lighter green or yellow-green on the areas receiving more light.

Avoid pressing heavily during the first layer. Gradual color buildup creates smoother transitions and makes the petals appear softer.

White Rose Drawing Tips

A white rose still needs shadows because plain white petals can disappear against white paper.

Use light gray, pale blue, cream, or very soft purple to define the folded areas. Keep most of the petals uncolored and place gentle shadows only where forms overlap.

A darker background can also help a white rose stand out, but beginners can achieve a clear result with simple pencil shading around the petal edges.

Small Rose Drawing Practice

A small rose is useful for sketchbooks, greeting cards, journal decorations, borders, and quick daily practice.

When drawing at a smaller size:

  • Use fewer petals.
  • Keep the center open and readable.
  • Avoid tiny interior details.
  • Use one clear stem and two simple leaves.
  • Strengthen the outer outline slightly.

Practice drawing several small roses in a row. Change the direction, petal width, stem curve, or opening angle each time.

Cute Rose Drawing Easy Idea

For a cute rose drawing use a rounded spiral center and six to eight large outer petals. Keep the shapes smooth and avoid realistic shading.

Add a short curved stem, two rounded leaves, and optional facial features if you want a cartoon style. Soft pink, red, peach, or purple colors can make the illustration feel playful.

This version is suitable for cards, classroom crafts, stickers, and simple digital artwork.

Rose Bouquet Drawing Basics

Rose bouquet drawing combines several flowers at different stages of opening. Start with one main rose near the center, then add smaller flowers or buds around it.

Vary the directions of the blooms so they do not all face forward. Connect them with stems and fill the gaps with leaves or smaller plant details.

Keep the main flower slightly larger than the surrounding roses. This creates a focal point and prevents the arrangement from looking crowded.

For your first bouquet, use three roses rather than a large group. A small composition is easier to balance and shade.

Common Mistakes When Drawing a Rose

Making Every Petal the Same

Identical petals make the flower look flat. Change their size, angle, and curve as you move outward.

Starting with Dark Lines

Heavy construction lines are difficult to erase. Use gentle pressure until the structure is complete.

Making the Center Too Large

A large spiral leaves little room for the surrounding petals. Keep the first shape compact.

Adding Too Many Random Lines

Extra lines can make the flower confusing. Every contour should describe a fold, edge, or overlap.

Forgetting the Base of the Flower

Sepals help connect the bloom to the stem and make the drawing of rose structure feel complete.

Shading Every Area Equally

Uniform shading removes depth. Keep highlights light and place darker values only in selected areas.

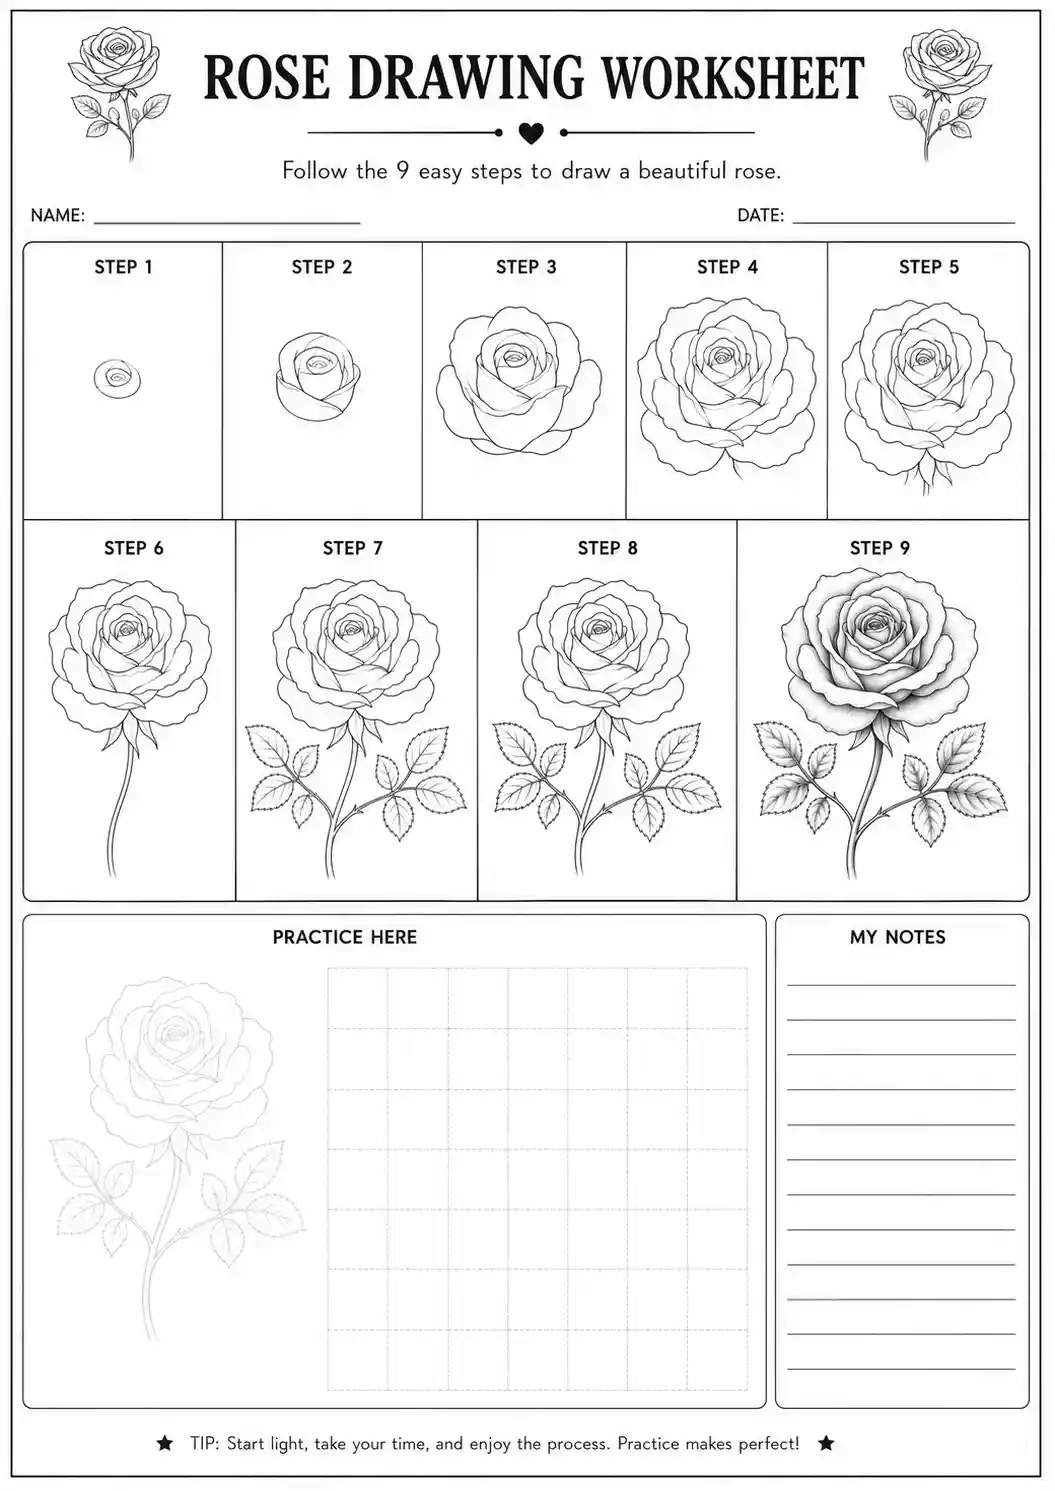
rose drawing worksheet

Downloadable Worksheet

The printable worksheet allows you to study the complete picture and practice the same process independently.

  • A completed rose picture for reference
  • A light tracing outline
  • A simplified petal exercise
  • The main drawing stages
  • A blank practice box
  • Space to recreate the final rose
  • A difficulty level
  • Suggested practice time

The worksheet is useful for anyone looking for a rose flower drawing easy enough to follow at home, in class, or during independent sketchbook practice.

Begin by tracing the lighter version. Next, copy the flower while looking at the reference. Finally, cover the examples and try drawing it from memory.

Frequently Asked Questions

Start with a small oval or loose spiral for the center. Add short overlapping petals around it, then gradually increase the petal size as you move outward.

Beginners should practice the center and petal layers separately before completing the full flower. Repeating the same basic structure several times improves line control and confidence.

Yes drawing a rose is easy enough if you use fewer petals, smooth rounded lines, a short stem, and simple leaves. A tracing worksheet can also help children understand the shapes.

There is no fixed number. A simple version may contain eight to twelve visible petals, while a detailed version may include many more overlapping shapes.

Improve drawing by varying the petal sizes, adding a few overlaps, refining the outer contour, and placing light shadows near the center.

A pen outline is optional. Complete the pencil version first, then trace the final lines with a fineliner. Allow the ink to dry before erasing the pencil marks.

Add a light red or pink base, deepen the shadows with darker red, and leave small highlights on the petals. Build the color gradually rather than pressing hard immediately.

Start Your Roses Drawing

Prepare your pencil and paper, begin with a small center, and build the petals slowly. Do not try to make every curve perfect on the first attempt.

An easy drawing of a rose becomes more natural each time you repeat the center, petal folds, stem, and leaves. Use the worksheet for guided practice, compare your sketch with the reference, and focus on improving one small detail at a time.

With patient observation and regular practice, your drawing will become cleaner, more balanced, and more expressive.