
Skip to content
FlowerDrawings.orgFlowerDrawings.org

Daisy Drawing Easy Step-by-Step Guide for Beginners

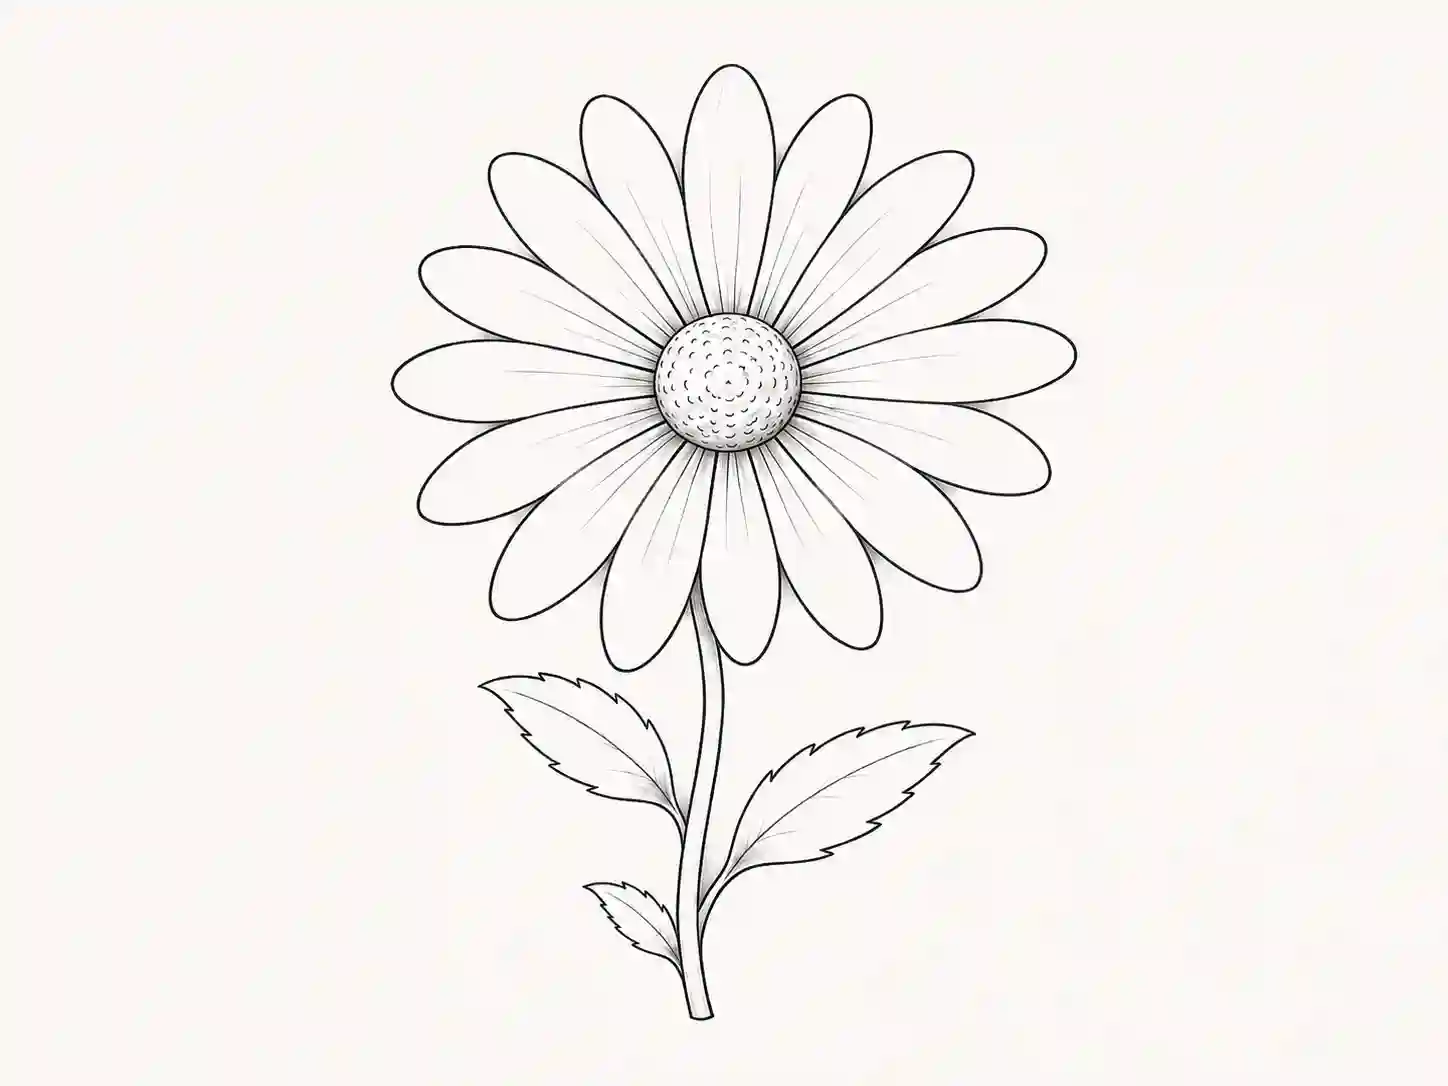
A daisy drawing is a great flower project for beginners because its basic structure is easy to understand: a round centre surrounded by long petals. Once you learn how to space those petals and vary their shapes slightly, you can turn a very simple sketch into a natural-looking flower.

This tutorial shows how to draw a daisy in eight clear stages. You will begin with the flower centre, build the petals gradually, refine the outline, and then add a stem and leaves before finishing with light pencil details.

The method is simple enough for children and first-time artists, but you can also develop the same drawing into a realistic daisy drawing, clean line illustration, coloured flower, bouquet, or decorative design.

Visit Flower Drawing to access tutorials of similar flowers in one place.

daisy drawing

What Makes a Daisy Easy to Draw?

Unlike flowers with many overlapping petal layers, a daisy has a clear structure that is easy to divide into basic shapes.

The main parts are:

  • A rounded flower centre.
  • A ring of long petals.
  • A narrow stem.
  • Simple leaves.
  • Optional texture and shading.

The petals do not need to be identical. In fact, slightly different lengths and angles usually make a drawing look more natural.

Tutorial Details

Difficulty

Beginner

Drawing time

About 10–15 minutes

Number of steps

8

Style

Pencil line drawing

Optional finish

Light shading or colour

Suitable for

Beginners, kids, students, teachers, and hobby artists

Materials for Drawing a Daisy

You only need a few basic supplies.

  • HB or number 2 pencil
  • Plain drawing paper
  • Soft eraser
  • Pencil sharpener
  • Black fineliner, optional
  • Coloured pencils or crayons, optional

For a more detailed daisy sketch drawing, a 2B pencil can also be useful for adding soft shadows around the centre and between petals.

Look at the Flower Before You Draw

The flower centre is usually round, but the petals around it do not form a perfectly mechanical pattern. Some petals may lean sideways, overlap slightly, or appear shorter because of their angle.

Keep these points in mind:

  • Start with a small centre rather than a very large circle.
  • Space petals around the whole flower.
  • Vary the petal lengths slightly.
  • Keep each petal narrow near the centre and broader through the middle.
  • Avoid making every petal perfectly identical.

These small differences will help your drawing of a daisy feel softer and more natural.

How to Draw a Daisy Flower Step by Step

The easiest way to learn how to draw a daisy how to draw daisy floweris to build it from the centre outward.

Keep your first marks fairly light so you can make adjustments as the flower develops.

drawing drawings daisy flowers
1

Step 1: Draw the Daisy Centre

Start with a small circle near the upper-middle part of your paper.

It does not need to be mathematically perfect. A slightly uneven circle can actually make the flower look more organic.

Keep enough empty space around the circle because the petals will extend outward in every direction.

Do not add details inside the centre yet.
drawing of daisy
2

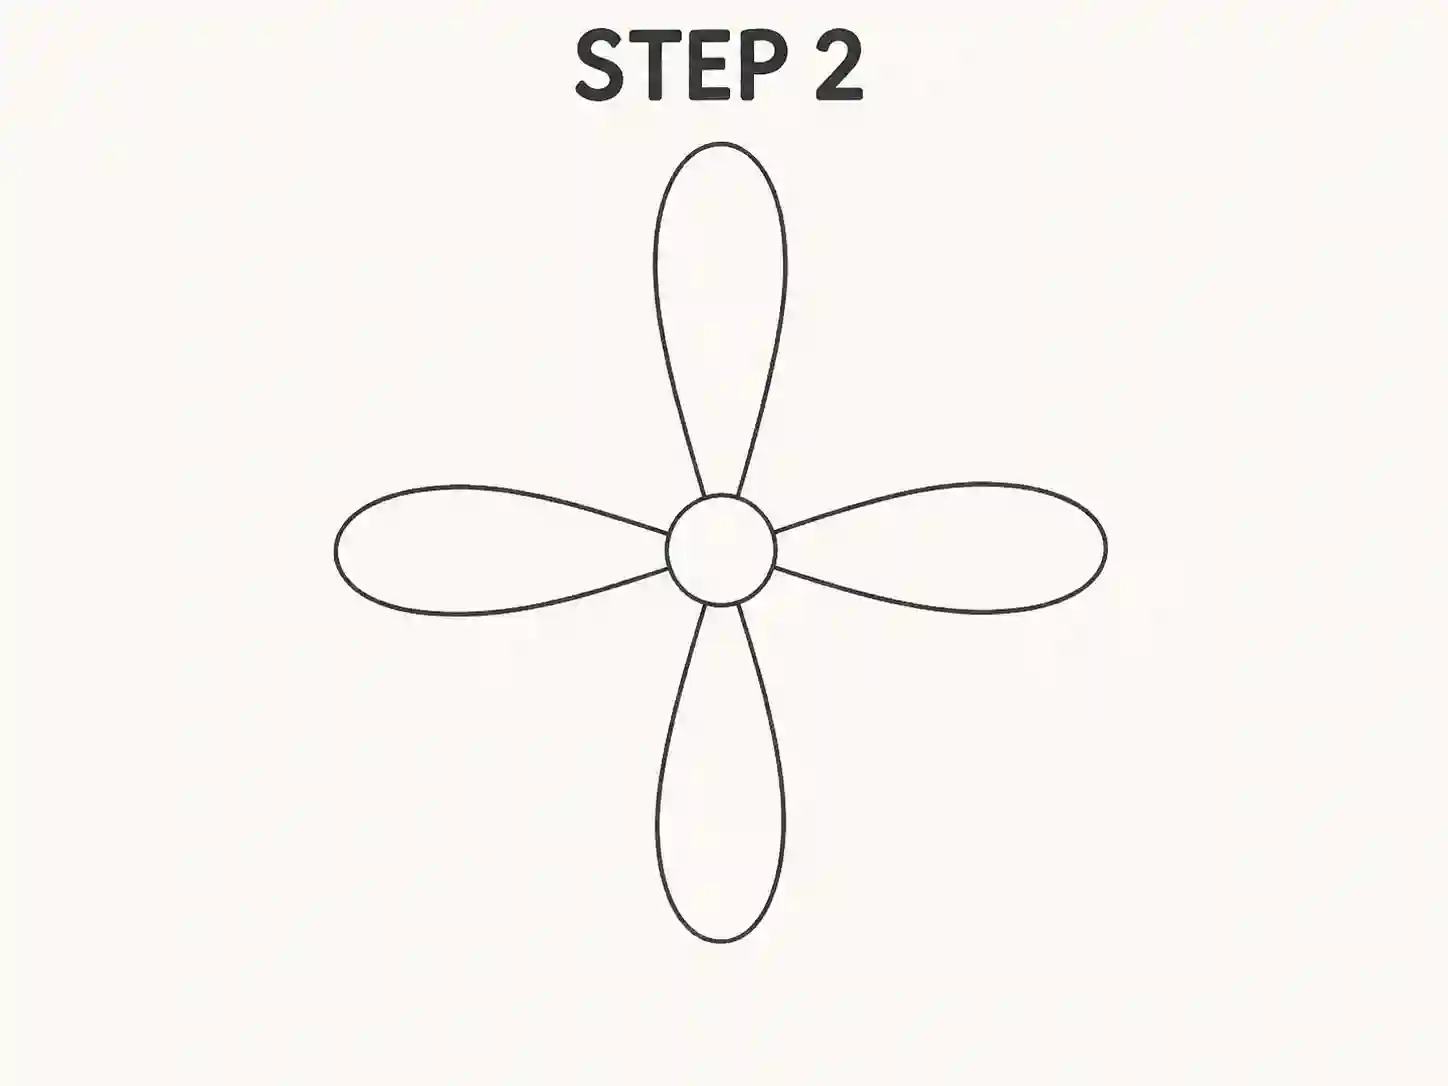
Step 2: Add the First Four Petals

Draw four long petals around the centre:

  • One pointing upward.
  • One pointing downward.
  • One extending left.
  • One extending right.

Each petal should begin narrow near the centre, widen gently through the middle, and finish with a softly rounded tip. These first four petals act as guides for spacing the remaining petals.

cute daisy drawing
3

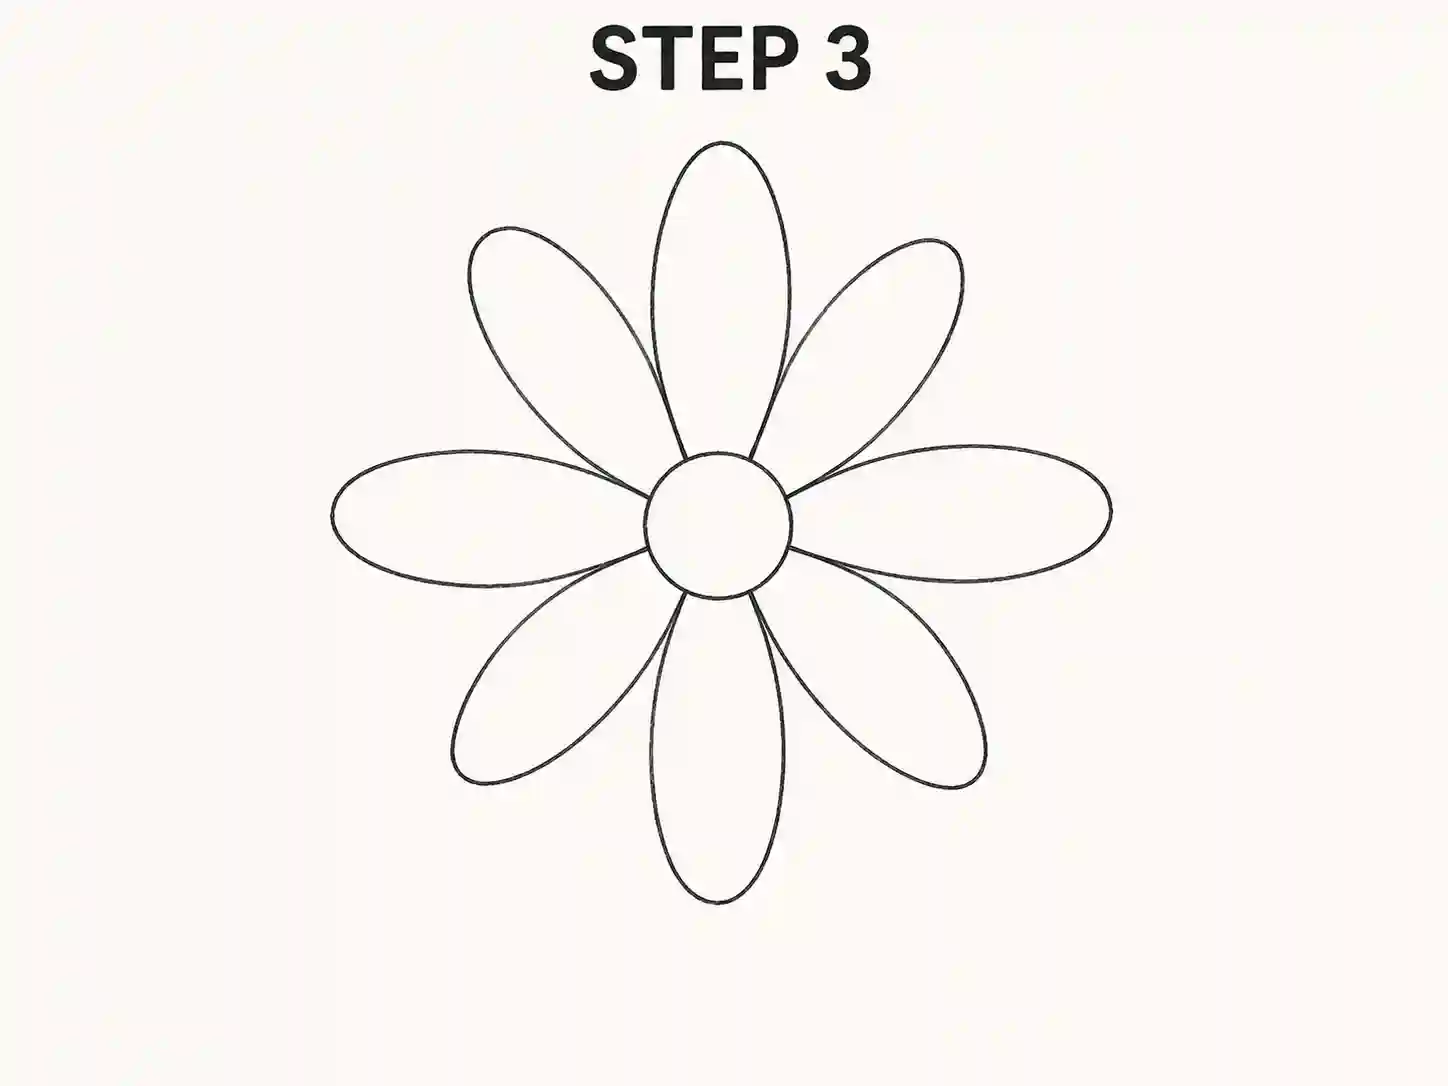
Step 3: Fill the Large Petal Gaps

Add more petals between the four guide petals.

Try to keep the spacing fairly even, but do not make the flower perfectly symmetrical.

Allow some petals to:

  • Tilt slightly left or right.
  • Become a little shorter.
  • Curve gently.
  • Overlap neighboring petals slightly.

At this stage, the easy daisy drawing should already have a recognizable flower shape.

daisy flower drawing easy
4

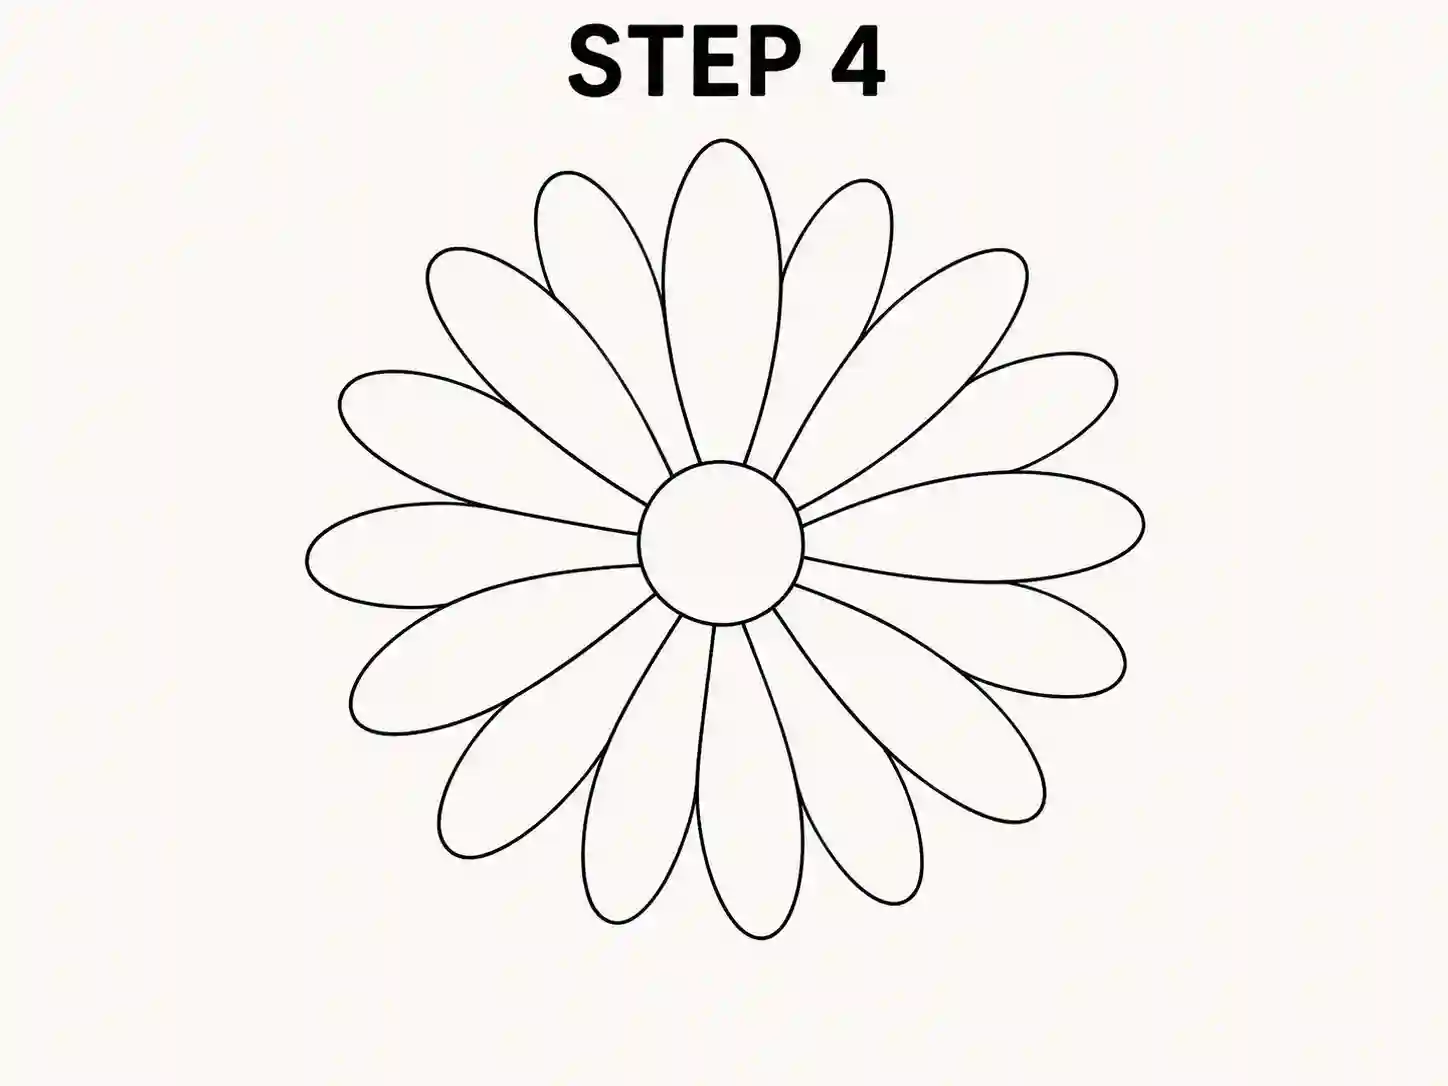
Step 4: Complete the Petal Ring

Continue adding petals until the centre is surrounded.

Avoid squeezing too many petals into tiny spaces. It is better to use fewer clean shapes than many confusing lines.

Look at the complete bloom before continuing.

Check that:

  • There are no unusually large empty gaps.
  • Petal lengths vary slightly.
  • The centre remains clearly visible.
  • The overall flower feels balanced.
easy daisy drawing
5

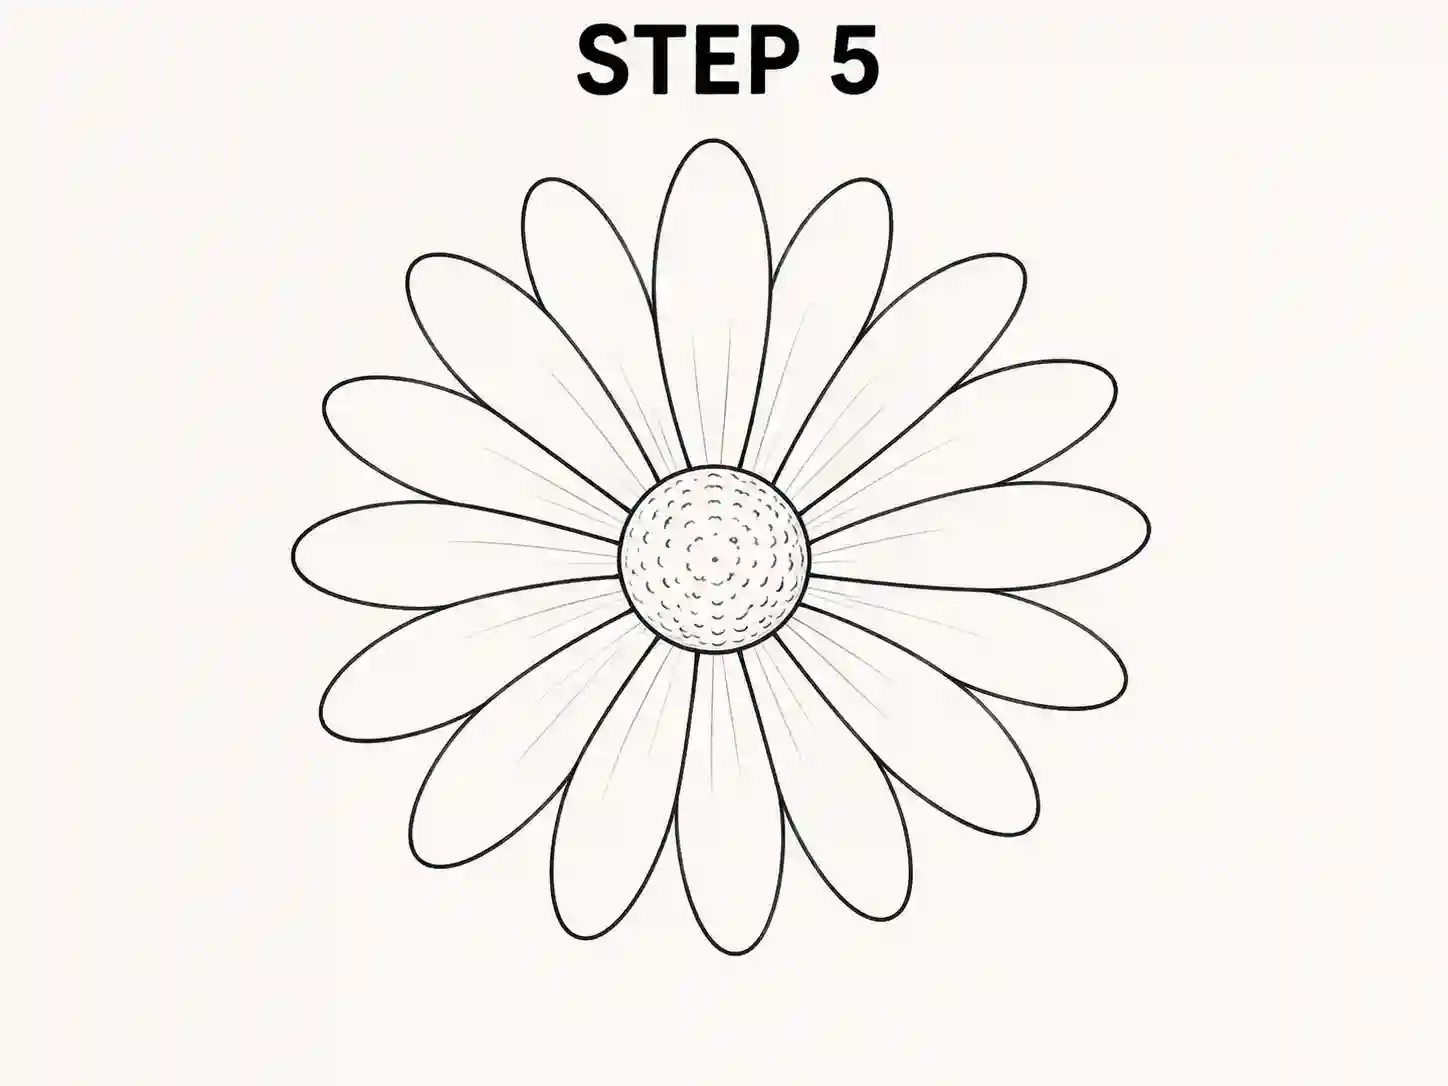
Step 5: Add Centre Texture and Petal Details

Now add some detail to the flower.

Inside the circular centre, use small dots, tiny curves, or short irregular marks to suggest the many small florets found in a real daisy.

Keep the texture controlled rather than filling the centre with heavy black marks.

Next, add one or two very light lines inside selected petals. These lines should follow the direction of each petal and suggest a gentle fold.

Do not detail every petal.

Drawing usually looks cleaner when many petals remain open and uncluttered.

daisy drawing easy
6

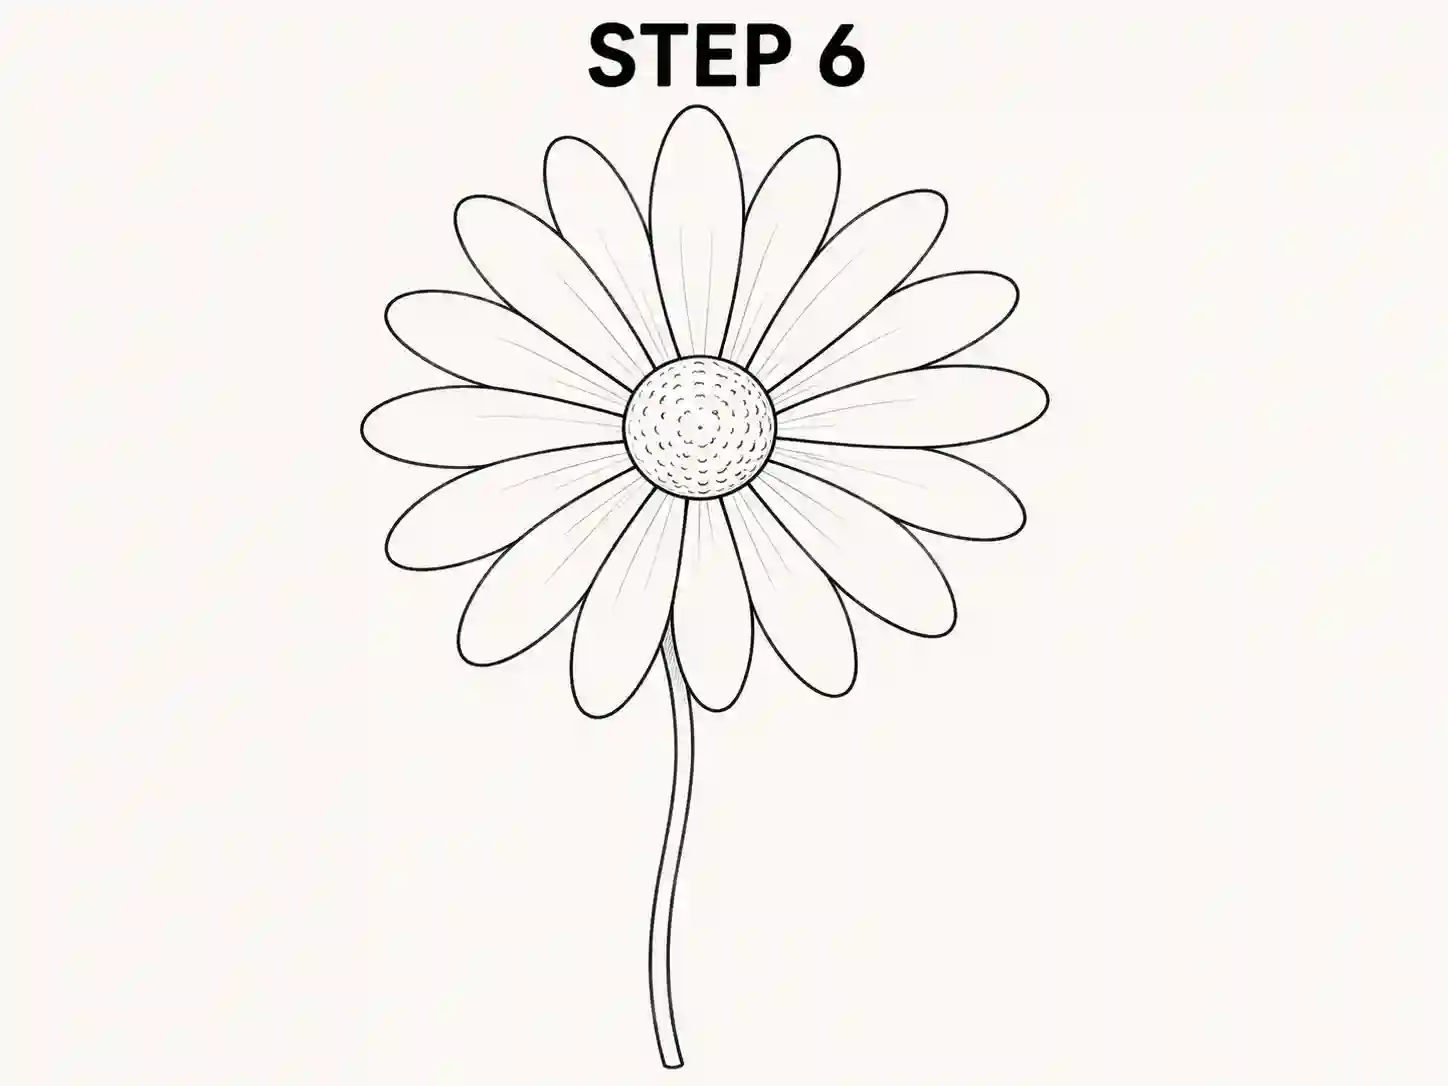
Step 6: Draw the Daisy Stem

From behind the lower petals, draw a long stem extending downward.

Use two close parallel lines to give the stem a narrow natural width.

The stem can bend slightly to one side instead of being completely straight.

A soft curve adds movement to the drawing and prevents the flower from looking too stiff.

how to draw daisy flower
7

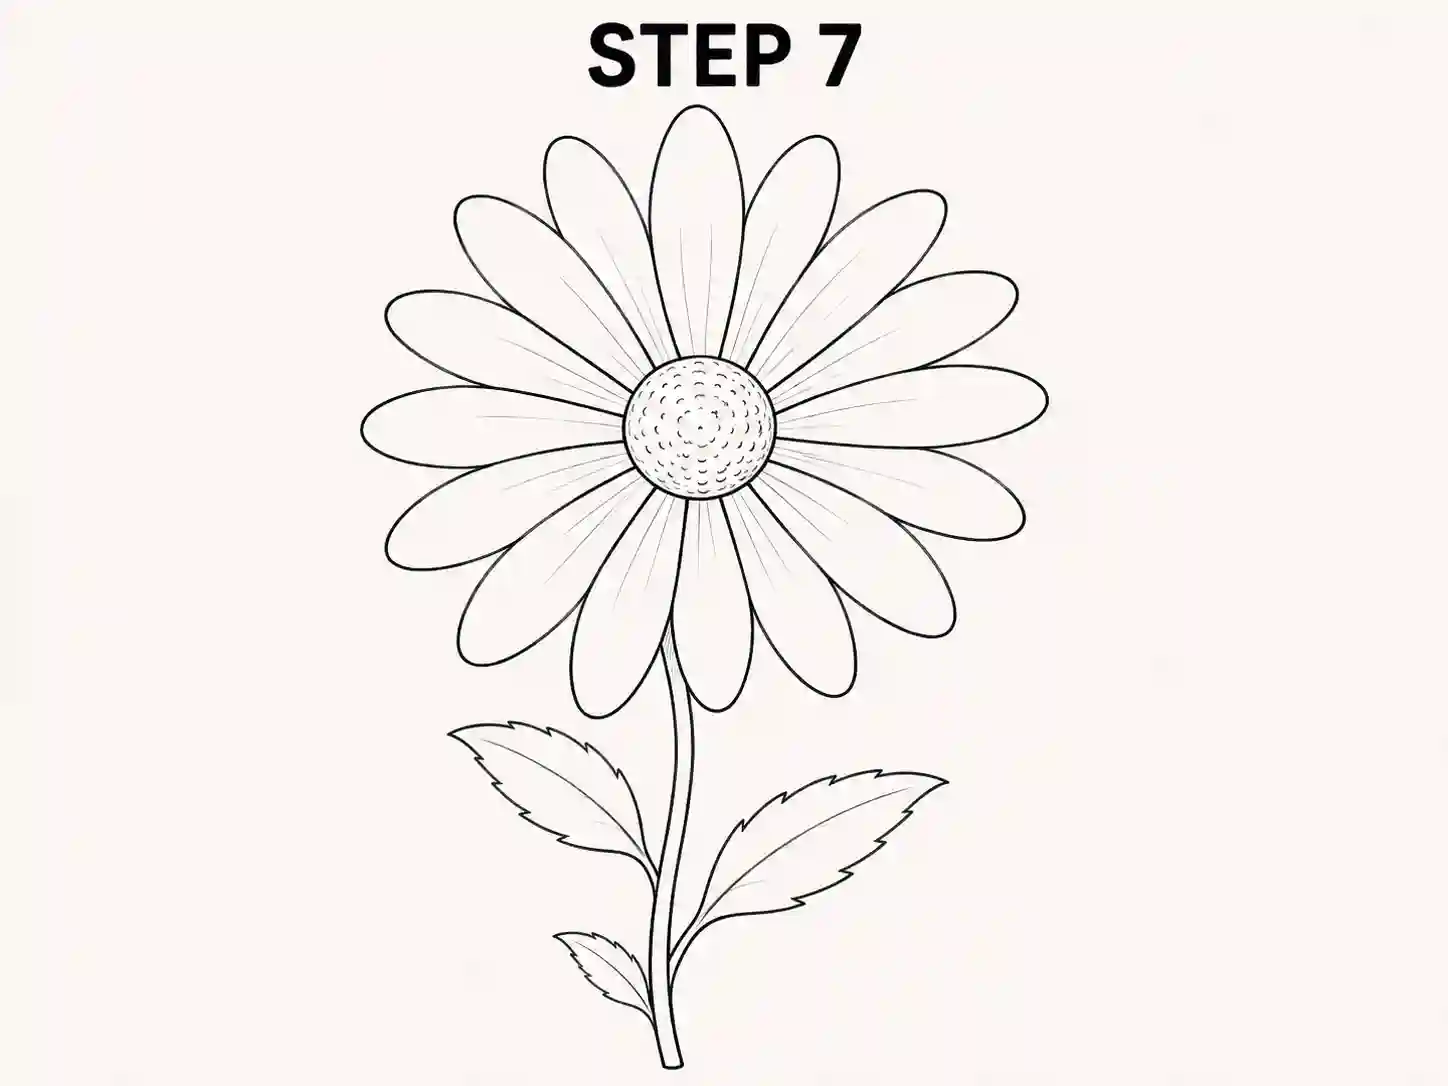
Step 7: Add Daisy Leaves

Draw a few leaves growing naturally from the stem.

Leaves can vary depending on the species, so for a beginner tutorial use simple narrow leaves with gently irregular edges.

Try adding:

  • One larger leaf extending toward the left.
  • One leaf extending toward the right.
  • One smaller leaf lower on the stem.

Add a light central vein to the larger leaves. Keep the leaves secondary so they do not compete with the flower.

how to draw a daisy
8

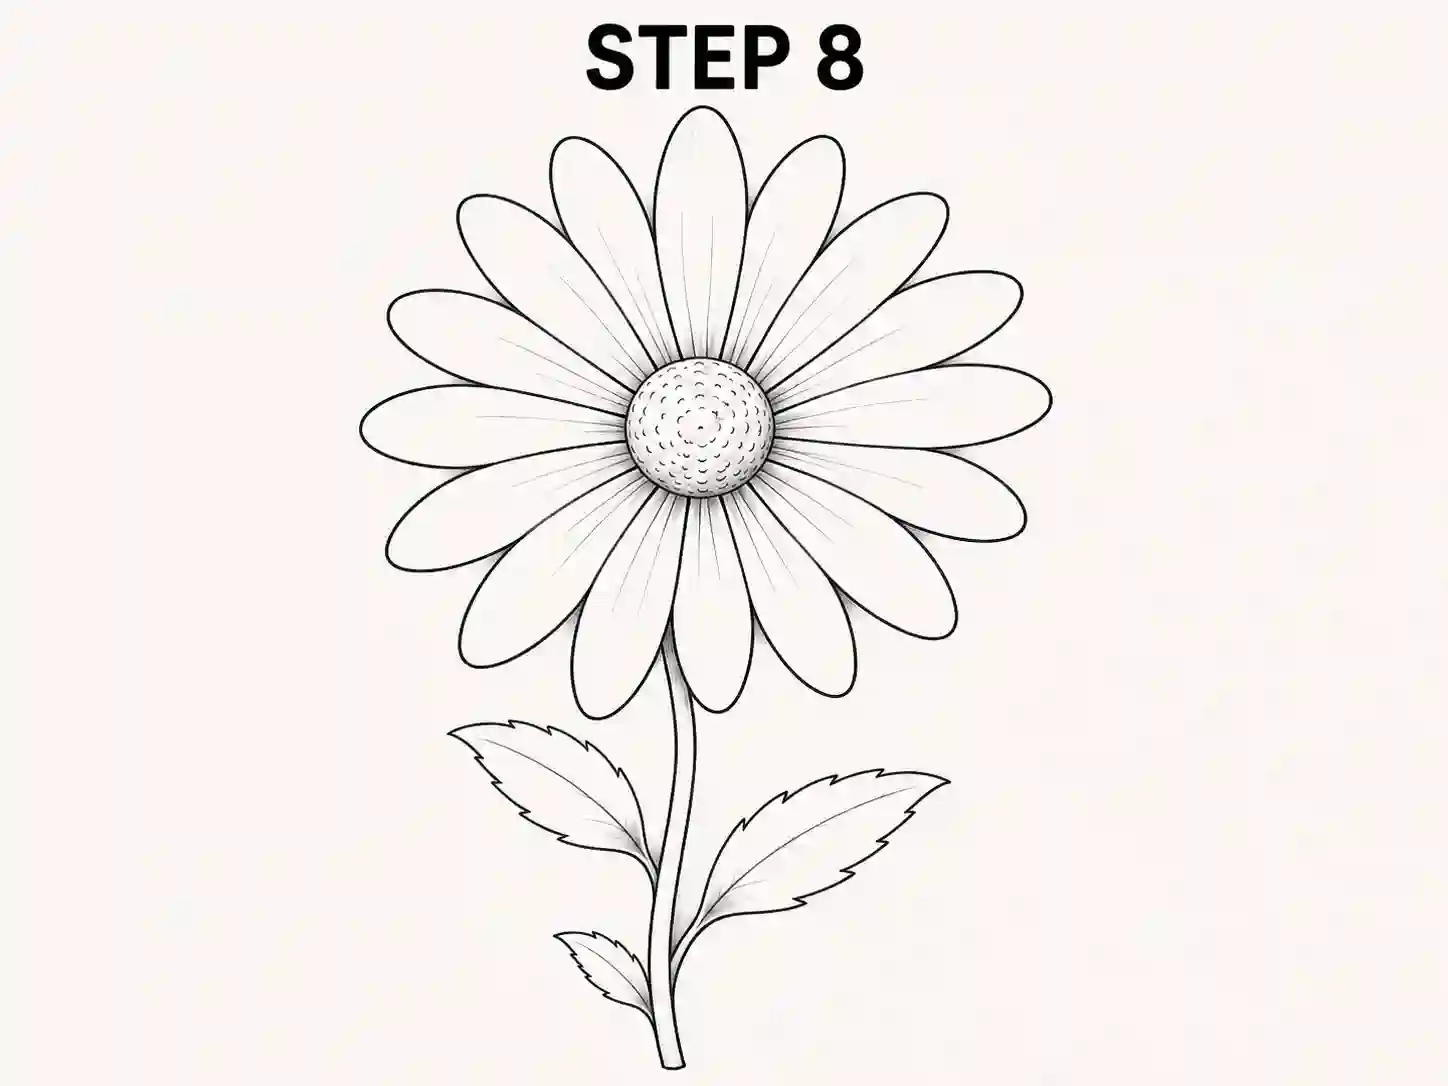
Step 8: Refine and Finish the Daisy

Erase unnecessary construction marks and strengthen the final outline.

Keep the main outer edges darker than the interior details.

Add very light graphite shading in selected places:

  • Around parts of the flower centre.
  • Between a few overlapping petals.
  • Near the bases of some petals.
  • Along one side of the stem.
  • Beneath overlapping leaf sections.

Leave most of the petals bright. Your finished daisy drawing easy tutorial result should remain clean enough for a beginner to reproduce.

How to Make a Simple Daisy Drawing Look Natural

A daisy is simple, but overly perfect shapes can make it look artificial.

Vary the petals

Instead of drawing twenty identical petals, introduce small differences:

  • Change the length slightly.
  • Tilt some petals.
  • Make a few tips more rounded.
  • Let occasional petals overlap.
  • Curve some petals gently.

These subtle variations make a daisy simple drawing much more convincing.

Keep the centre proportional

A very large centre can make the flower look more like a sunflower.

Keep the central disk relatively compact compared with the full width of the daisy.

Use light interior lines

Petal folds should support the form, not dominate it.

One or two fine marks on selected petals are usually enough.

Daisy Drawing Outline and Line Art

A drawing outline works especially well for beginners because the flower can be recognised without any shading.

To create a clean outline version:

  1. Complete the basic flower shape.
  2. Erase construction marks.
  3. Trace the important outer edges.
  4. Keep the centre texture minimal.
  5. Use only a few interior petal lines.
  6. Leave most areas completely white.

Simple design uses

This produces a simple design suitable for:

  • Colouring pages.
  • Worksheets.
  • Tracing exercises.
  • Greeting cards.
  • Journal decorations.
  • Digital line art.

For an even cleaner result, a daisy line drawing can use a single consistent line weight throughout the flower.

How to Draw a Realistic Daisy

A realistic drawing does not require hundreds of details. The biggest improvements come from petal variation, centre texture, and careful shading.

Make the petals less uniform

Real petals may twist, bend, overlap, or face slightly different directions.

  • A few shorter petals.
  • Some longer petals.
  • Slight overlaps.
  • Small directional changes.
  • Subtle curved edges.

A realistic flower should contain:

Develop the flower centre

The centre should look textured rather than like a flat circle.

Use many tiny controlled marks, keeping some areas lighter and some slightly darker. Avoid drawing a perfectly solid black centre.

Add shadows beneath overlaps

Use soft shading where:

  • One petal crosses another.
  • Petals connect to the centre.
  • A leaf overlaps the stem.
  • The flower head meets the stem.

This creates depth without making the drawing overly dark.

Tips to Make Realistic Daisy Drawing

Beginners can create a realistic drawing without changing the basic eight-step method.

After completing the outline:

  1. Slightly adjust a few petal shapes.
  2. Add more centre texture.
  3. Add light shadows at overlaps.
  4. Vary the pressure of your pencil.
  5. Leave highlights on most petals.

The result will still be easy to reproduce while looking more dimensional.

Daisy Drawing With Color

A daisy drawing with color can be very simple because traditional daisies often have white petals and a yellow centre.

Classic white daisy

Use:

  • White or uncoloured petals.
  • Yellow centre.
  • Green stem.
  • Green leaves.

Because the petals are white, you can use a very pale grey or cool blue near the petal bases to make their shapes easier to see.

Creative daisy colours

You do not have to stay realistic.

  • Pink petals.
  • Pale blue petals.
  • Lavender petals.
  • Soft yellow petals.
  • Peach petals.
  • Multi-coloured petals.

Try:

For children, a cute daisy drawing can use brighter colours and simpler outlines.

White Daisy Drawing Tips

A drawing of daisy needs careful contrast because the petals and paper may both be white.

Instead of filling the petals with colour:

  1. Keep the outer outlines clear.
  2. Add faint grey shading near the bases.
  3. Darken only the deepest overlaps.
  4. Keep the central disk noticeably darker.
  5. Leave large areas of each petal untouched.

This creates white petals without needing to colour them white.

Daisy Flower Drawing Easy for Kids

Daisy flower is easy enough for children as it use fewer details.

You can simplify the lesson by using:

  • One round centre.
  • Eight to twelve larger petals.
  • One straight or gently curved stem.
  • Two simple leaves.
  • No detailed pencil shading.

Children can then colour the finished design.

A daisy flower easy drawing is also useful for classroom activities because students can complete the basic flower quickly and then personalise it.

Cute Daisy Easy Drawing Ideas

To make a daisy look cute rather than realistic, simplify the shapes.

Try:

  • Larger rounded petals.
  • A slightly bigger centre.
  • Fewer petals.
  • Smooth simple leaves.
  • Bright colours.
  • A shorter stem.

The flower can also be used in small illustrations, journal pages, stickers, or greeting card designs.

Keep facial features or cartoon additions optional so the underlying flower drawing still remains clear.

Gerbera Daisy Drawing

Gerbera drawing follows a similar basic structure but usually has more petals packed around a larger centre.

Compared with the simple daisy in this tutorial, a gerbera often includes:

  • A larger central disk.
  • More numerous petals.
  • Several visible petal layers.
  • Narrower individual petals.
  • More dramatic colour.

Beginners should first practise the basic daisy. Once the spacing feels comfortable, additional petal layers can be added to create a gerbera-inspired flower.

Daisy Bouquet Drawing

After practising one flower, try making a daisy bouquet drawing.

Start by placing the largest flower first.

Then add:

  • Two or three smaller daisies.
  • Flowers facing slightly different directions.
  • Overlapping stems.
  • Small leaves.
  • A few partially hidden blooms.

Do not make every daisy the same size.

Variation gives the bouquet a more natural composition.

Daisy Tattoo Drawing and Linework Ideas

Daisy tattoos often uses a simpler design than a shaded botanical sketch.

Popular approaches include:

  • Single daisy line art.
  • Small stem and flower.
  • Daisy bouquet outline.
  • Fine-line petals.
  • Minimal leaf details.
  • Several small daisies connected by stems.

For actual tattoo use, a professional tattoo artist should adapt the artwork for placement, size, line weight, and long-term readability on skin.

Common Drawing Mistakes

Making every petal identical

Perfectly repeated petals can make the flower look mechanical. Vary their lengths, angles, and curves slightly.

Making the centre too large

An oversized centre can change the character of the flower. Keep it proportional to the petals.

Adding too many petal lines

Petals do not need several dark lines inside them. Use only a few subtle folds.

Making the flower completely flat

Small overlaps and shadows add depth. Allow some petals to appear slightly in front of others.

Using a perfectly straight stem

A slight curve usually makes the composition more natural.

Shading white petals too heavily

Most of the petals should remain light. Use shading mainly near overlaps and bases.

Practice Ideas After Finishing the Tutorial

Once your drawing is complete, practise different versions.

Try:

  • One simple daisy.
  • A realistic pencil daisy.
  • A clean outline version.
  • A coloured daisy.
  • A white daisy.
  • A gerbera-style daisy.
  • A small daisy bouquet.
  • A minimal line drawing.

Repeating the same basic flower in different styles is a useful way to improve line control and petal spacing.

More Flower Drawing Practice

Once you can draw the daisy confidently, practising other flowers can help you learn different petal structures.

Daisies are useful for learning radial petal placement, while flowers with layered or irregular petals teach different drawing skills.

Continue with other flower drawing tutorials to practise a wider range of floral shapes and step-by-step techniques.

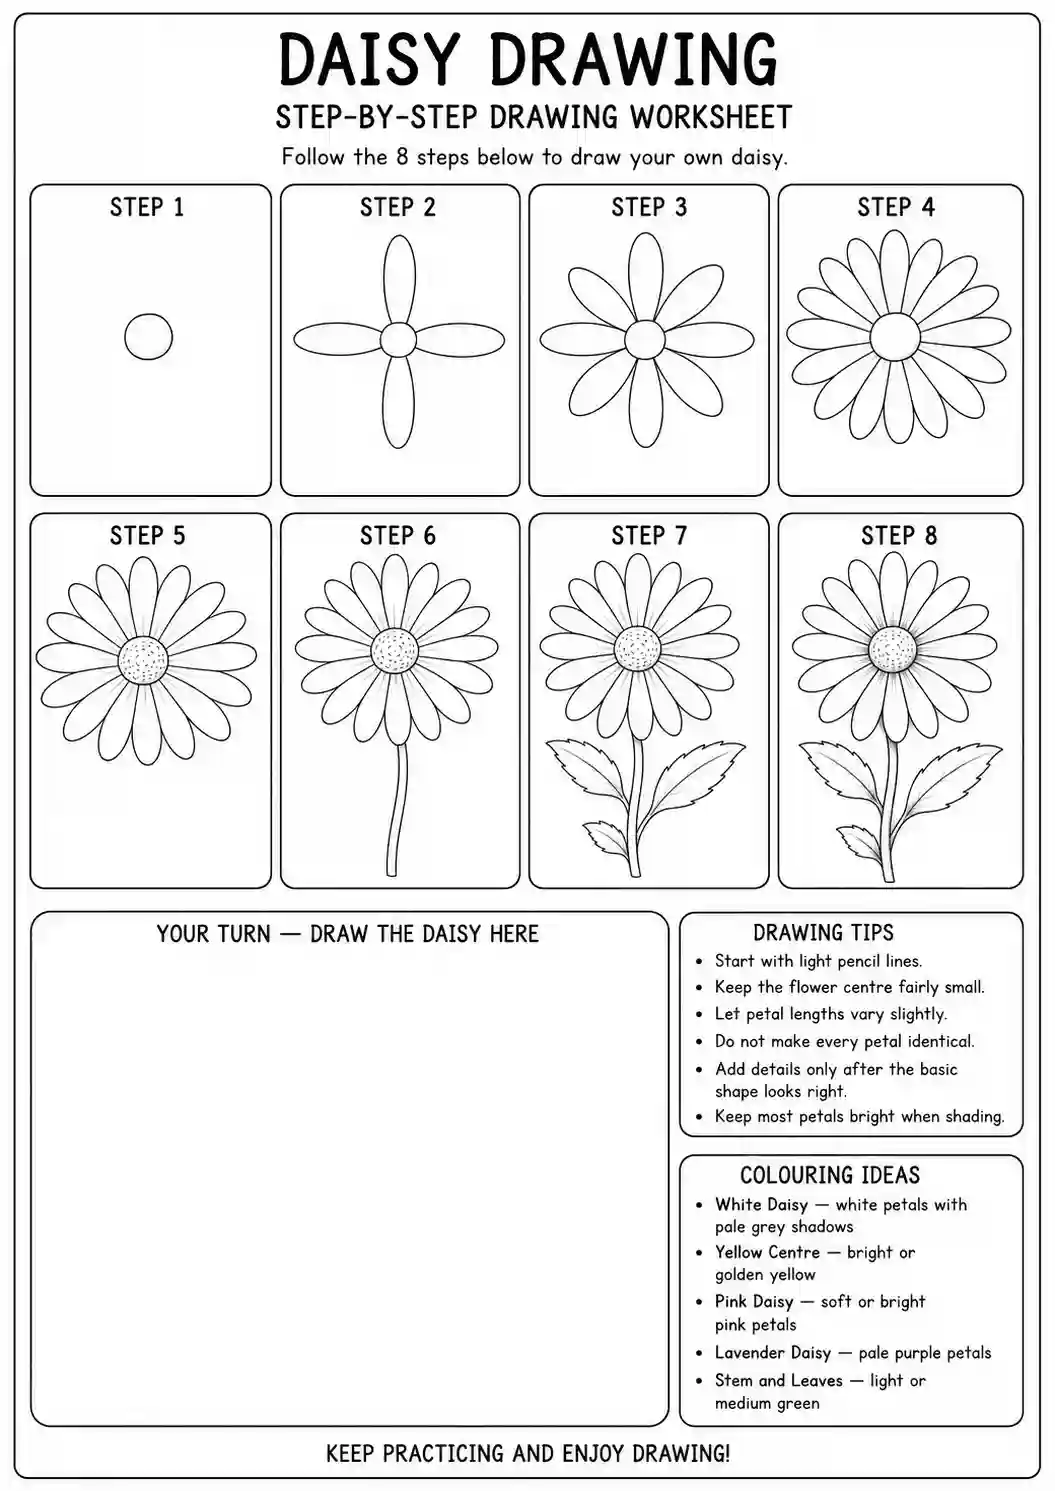
daisy drawing worksheet

Printable Daisy Drawing Worksheet

A printable worksheet allows you to repeat each stage without needing to remember the entire process.

Download for Free.

Frequently Asked Questions

Start with a small circular centre, add four guide petals around it, then fill the spaces with additional petals before adding the stem and leaves.

There is no fixed number required for a beginner drawing. Use enough petals to create a full ring around the centre without overcrowding the flower.

Vary the petal lengths and angles, add texture to the centre, use slight overlaps, and apply light shading where petals meet.

Yes. A simplified daisy with one circle, several large petals, a stem, and two leaves is suitable for young beginners.

An HB pencil is enough for the complete tutorial. A 2B pencil can be useful if you want slightly darker shadows.

Keep the outlines visible and use very light grey shading near petal bases and overlaps instead of trying to fill the petals with white.

Yes. Remove the shading and construction marks, then retain only the clean outer contours and a small amount of centre detail.

Gerbera daisies generally have a larger centre and more densely layered petals, so they require additional petal rows compared with a simple daisy.

Final Thoughts

A daisy drawing becomes much easier when you stop trying to place every petal perfectly.

Begin with a small centre, establish a few guide petals, and then gradually fill the spaces around them. Slight differences between petals will usually improve the final result rather than hurt it.

Once the basic flower is complete, you can keep it simple, refine it into realistic pencil art, create clean linework, add colour, or combine several flowers into a bouquet.

The same basic construction gives you many ways to practise while keeping the drawing beginner-friendly.