Skip to content
FlowerDrawings.orgFlowerDrawings.org

Easy Tulip Drawing Step-by-Step Tutorial for Beginners

A tulip has a clean, recognizable shape that makes it a good subject for beginners. Its flower head can be simplified into a rounded cup, while the stem and long leaves are created with smooth curved lines.

This tulip drawing tutorial will help you build the flower from basic guidelines, shape the overlapping petals, add the stem and leaves, refine the outline, and finish the illustration with pencil shading or color.

You do not need advanced drawing skills or expensive materials. A pencil, eraser, and clean sheet of paper are enough to begin. The lesson is suitable for students, kids, hobby artists, and anyone practicing botanical illustration.

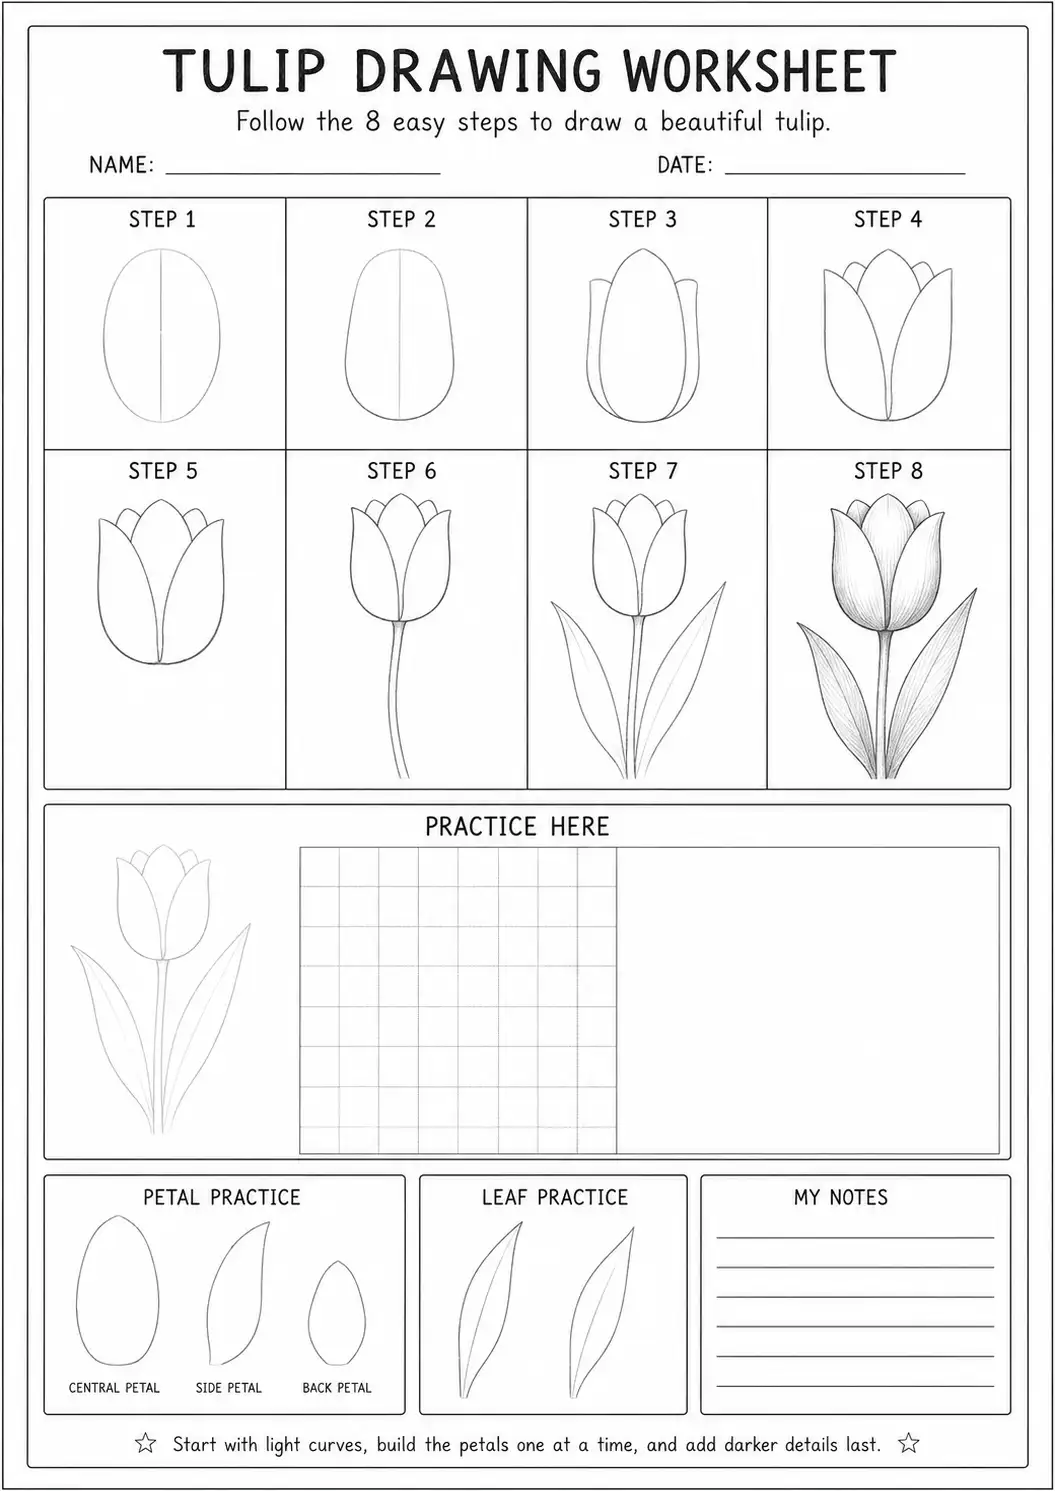
A printable worksheet is also included so you can trace the main shapes, follow the drawing sequence, and recreate the flower drawing tulip independently.

Tulip Drawing

Why Drawing Tulips Are Beginner-Friendly

Tulips have fewer visible petals than many other flowers. Their overall form is usually compact, smooth, and easy to organize on the page.

A basic tulip consists of:

  • A rounded flower head
  • Three to six visible petals
  • A narrow base beneath the bloom
  • One long stem
  • Two or more pointed leaves
  • Gentle folds where petals overlap

The flower also remains recognizable in outline, pencil, cartoon, and realistic styles.

Quick Drawing Plan

Difficulty

Beginner

Estimated time

12 minutes

Number of steps

8

Drawing style

One tulip with a stem and two leaves

Main tools

Pencil, eraser, paper, and sharpener

Optional tools

Fineliner, colored pencils, markers, or blending stump

This flower drawing uses a front-facing bloom with gently overlapping petals. The same method can later be adapted for side-view flowers and bouquets.

Materials You Will Need

Prepare the following supplies:

  • HB or number 2 pencil
  • Soft eraser
  • Pencil sharpener
  • Plain white drawing paper
  • 2B pencil for shadows
  • Black fineliner for optional line art
  • Pink, red, yellow, purple, or orange coloring tools
  • Green pencil or marker for the stem and leaves

Keep your early lines light. Tulip petals have smooth edges, so visible construction marks can make the final drawing look untidy.

Understand the Tulip Shape First

Before learning how to draw a tulip, look at the main direction of the bloom.

The flower head is usually wider near the middle and narrower where it connects to the stem. The top edge may contain several rounded points created by the petals.

Some petals sit in front while others appear behind them. This overlap creates the cup-like form of the flower.

The leaves are long and narrow, but they are usually wider than the stem. They may curve away from the plant or partially wrap around it.

When drawing focus on the flower’s silhouette before adding interior folds.

Tulip Drawing Step by Step

Follow the stages in order and avoid pressing hard with the pencil during the first half of the tutorial.

Draw the main tulip flower guide
1

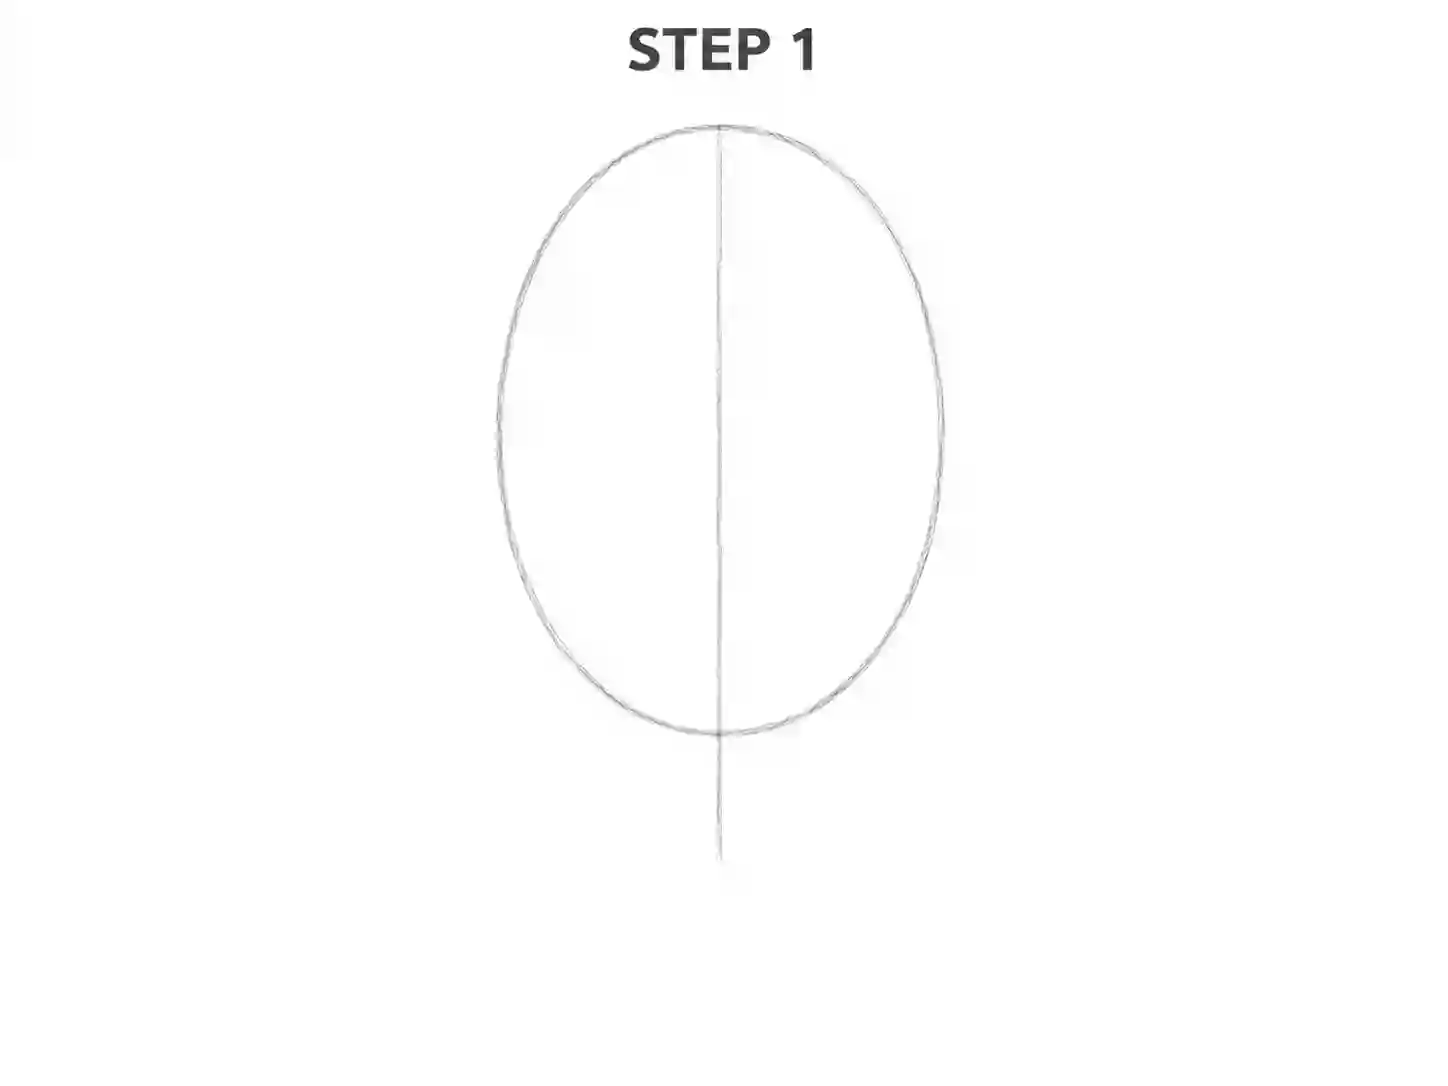
Step 1: Draw the Main Flower Guide

Begin with a light oval near the upper part of the page.

The oval should be slightly taller than it is wide. This shape will guide the outer boundary of the tulip bloom.

Draw a faint vertical guideline through the center. It will help keep the flower balanced and show the direction of the stem later.

At this stage, your drawing should contain only a simple oval and one guideline.
Shape the bottom of the tulip bloom
2

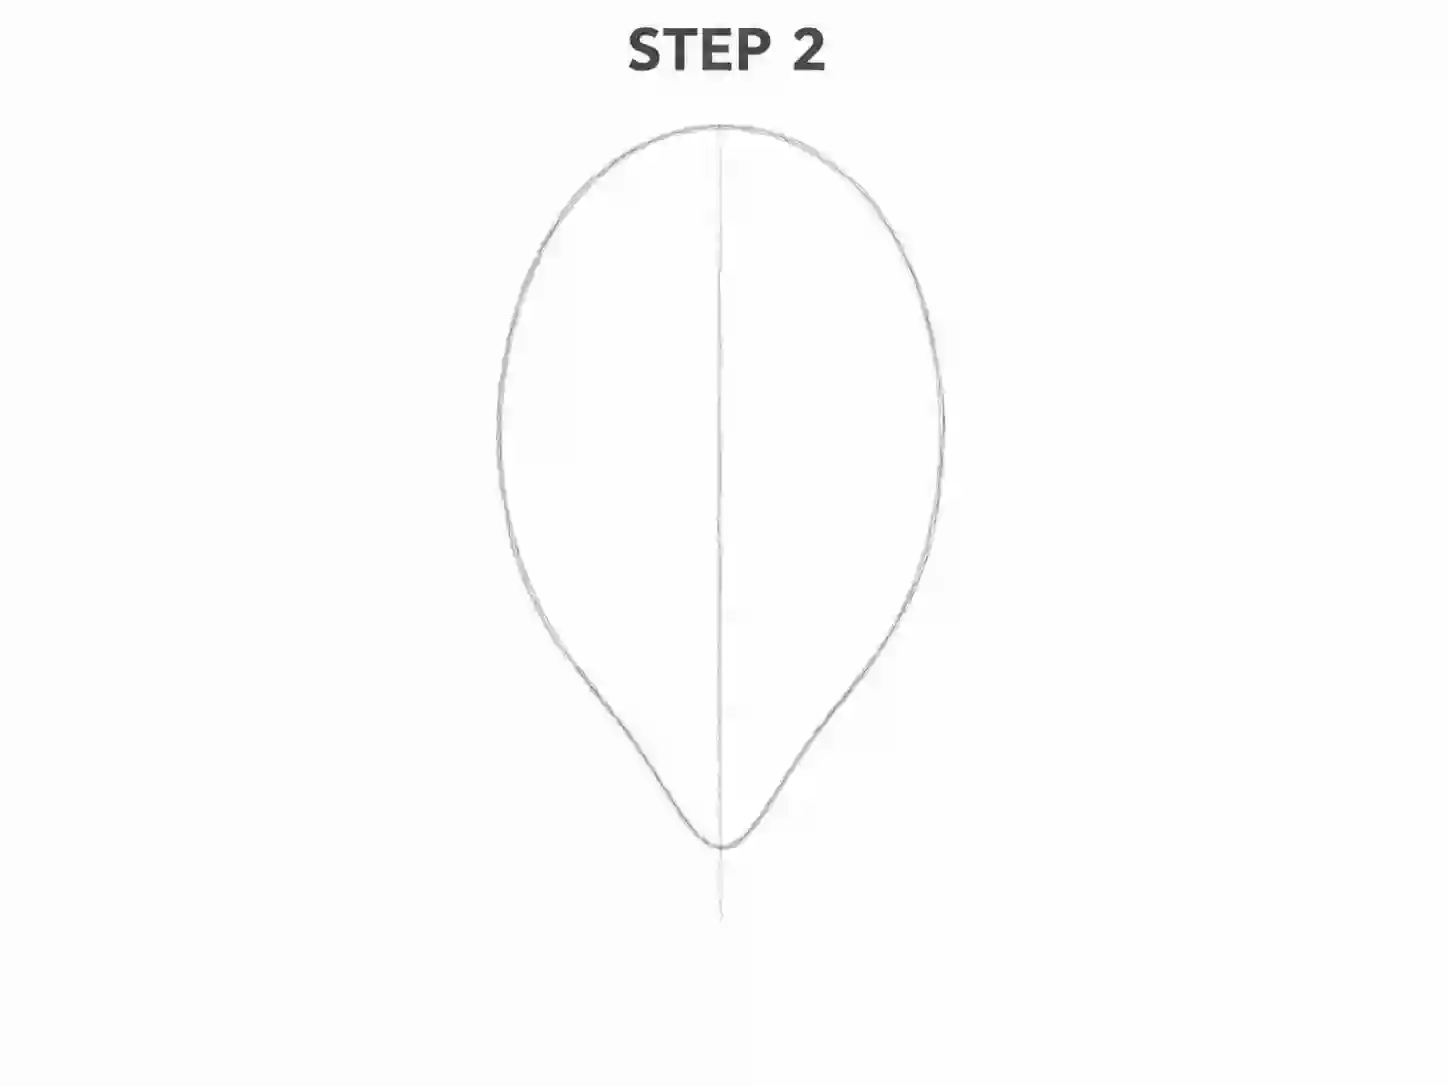
Step 2: Shape the Bottom of the Bloom

Refine the lower part of the oval into a soft rounded point.

Tulip blooms are often narrower at the base, where the petals connect to the stem. Draw two curved lines moving inward from the sides.

Do not make the lower point too sharp. A gentle transition will look more natural.

This basic cup shape will become the foundation of the simple tulip drawing.

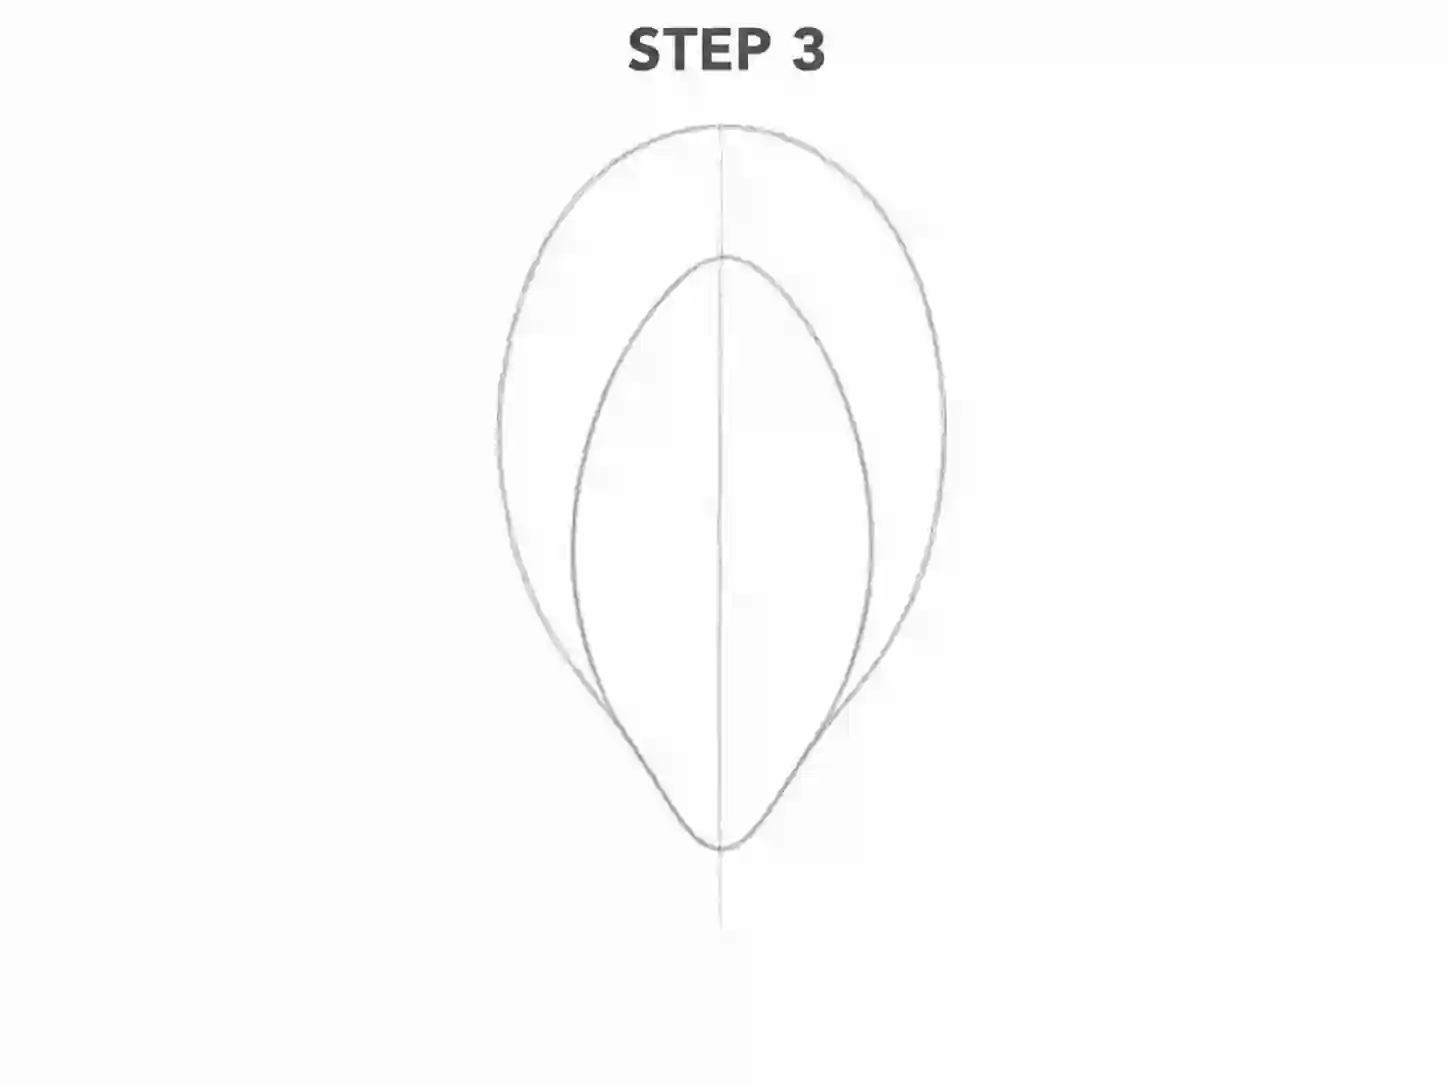
Draw the front tulip petal
3

Step 3: Draw the Front Petal

Inside the guide, draw one large central petal.

Begin near the lower middle of the bloom, curve upward, and create a rounded point near the top. Bring the second edge back toward the base.

The front petal should occupy a large part of the flower head without covering the entire guide.

Remember to keep petal edges soft instead of using stiff straight lines.

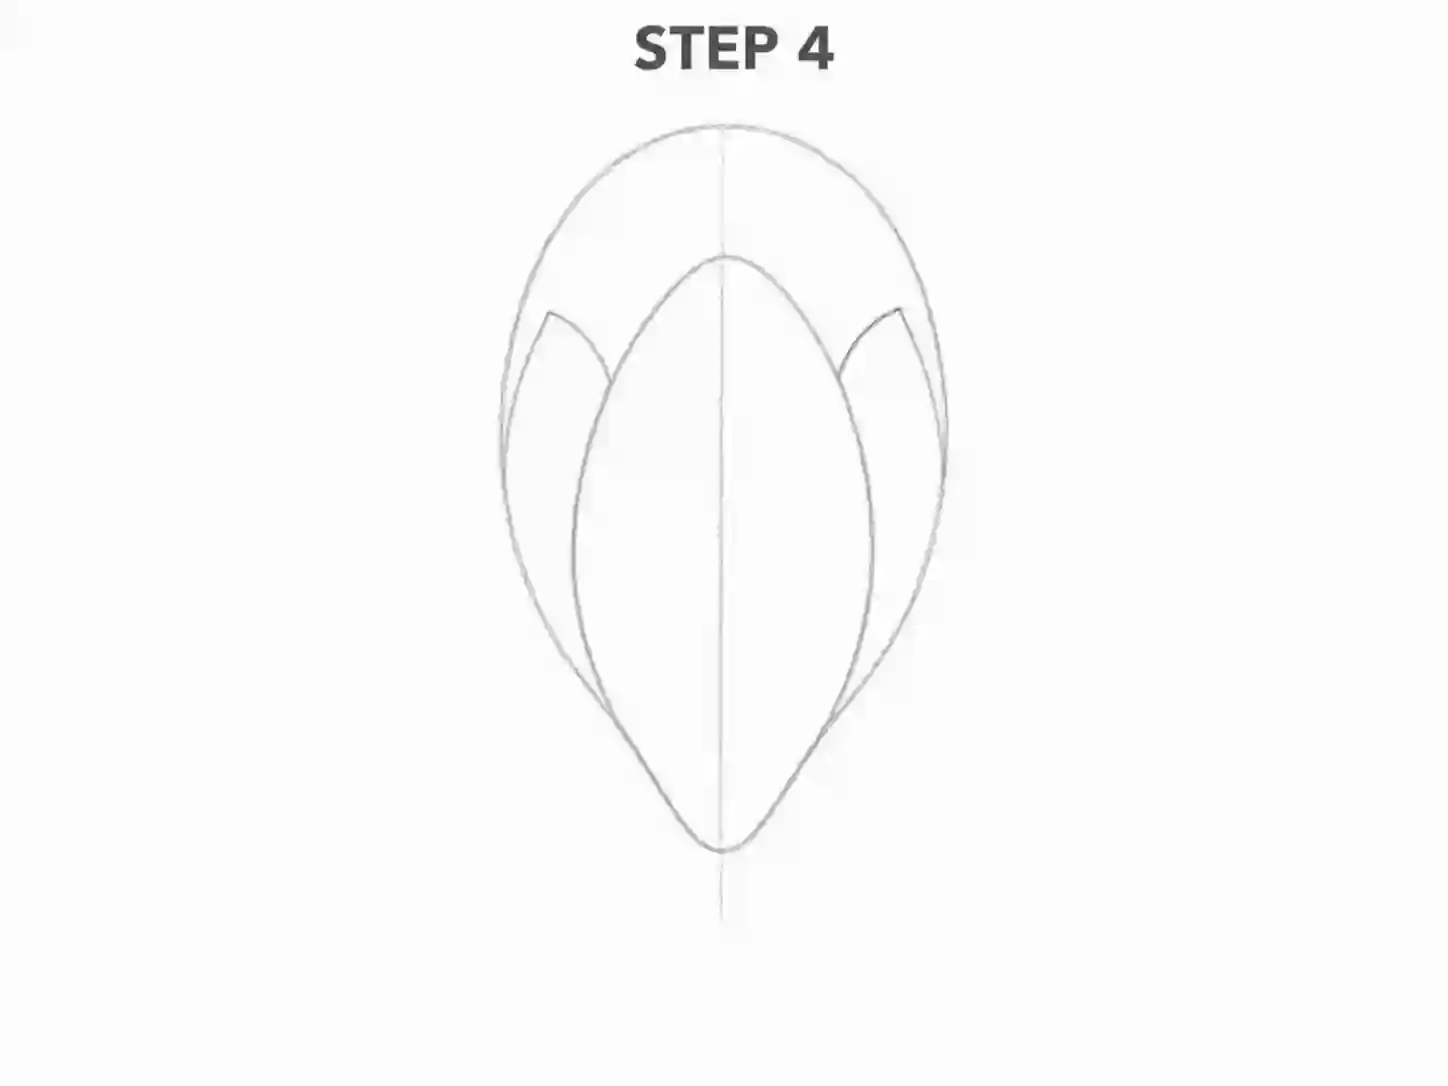
Add the side tulip petals
4

Step 4: Add the Side Petals

Draw one curved petal on the left and another on the right.

Allow part of each side petal to sit behind the central one. Their top edges can rise slightly above or below the front petal.

The petals do not need to be perfectly symmetrical. Slight differences in height and curve help a tulip drawing simple design feel more natural.

Erase any interior lines that make the overlaps confusing.

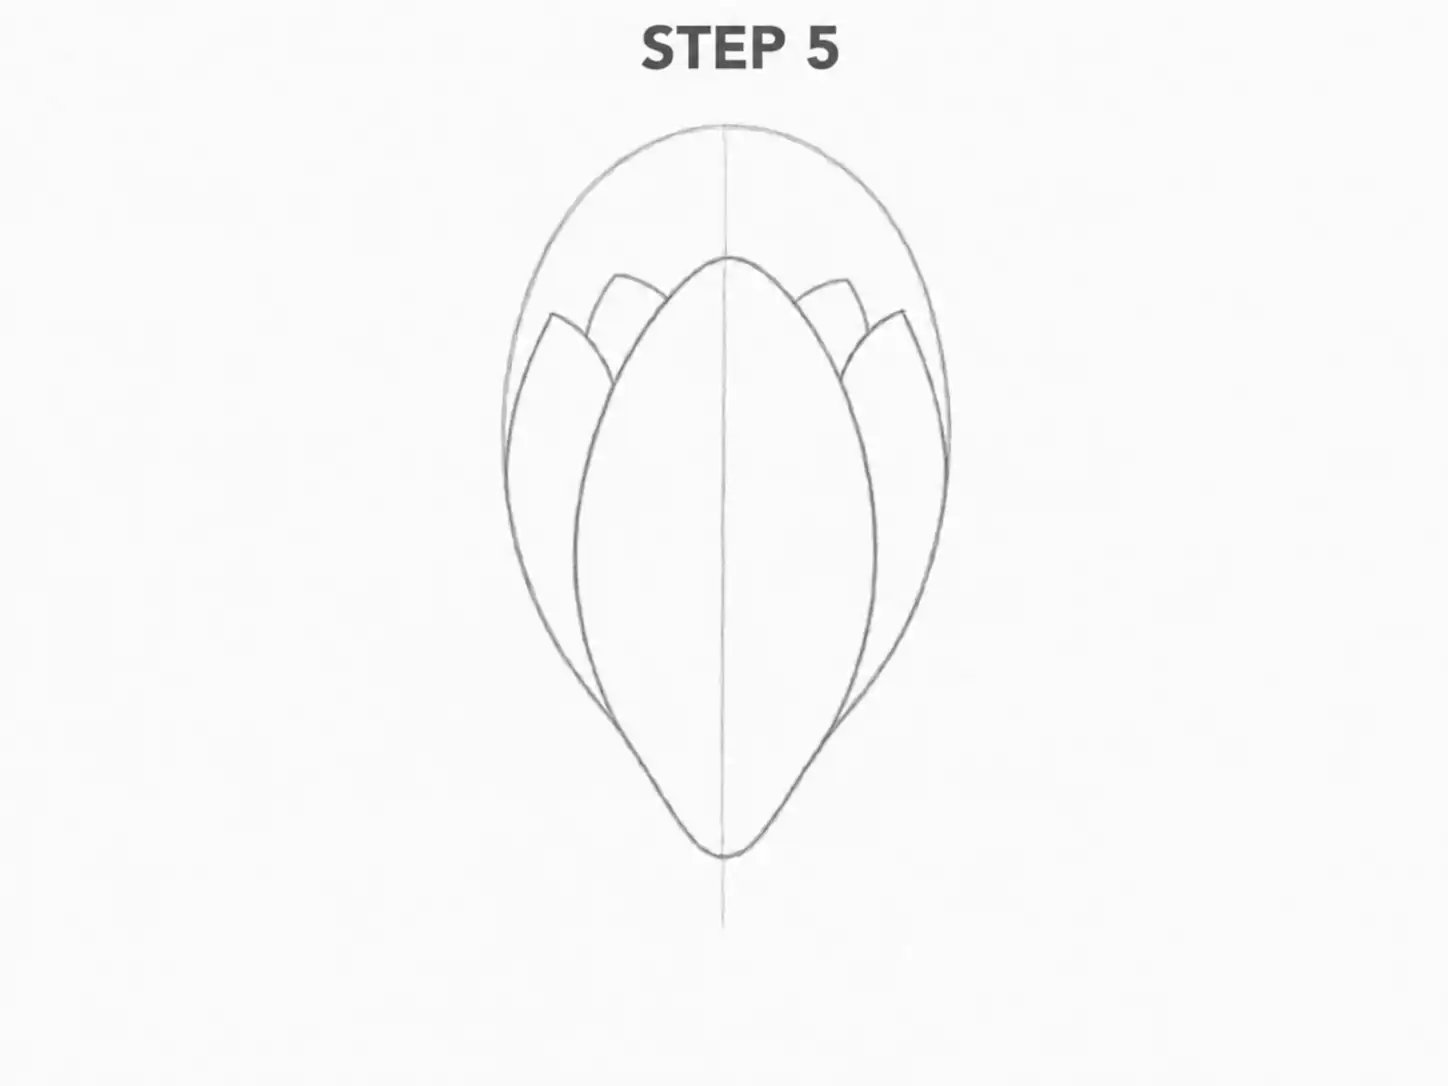
Add the back tulip petals
5

Step 5: Add the Back Petals

Add one or two smaller petal points behind the main three petals.

Only the upper portions need to remain visible. These shapes make the flower head look fuller without adding too much complexity.

Check the overall silhouette. The bloom should appear compact and cup-shaped rather than flat.

This stage changes the basic guide into a recognizable tulip flower drawing easy enough for beginners to follow.

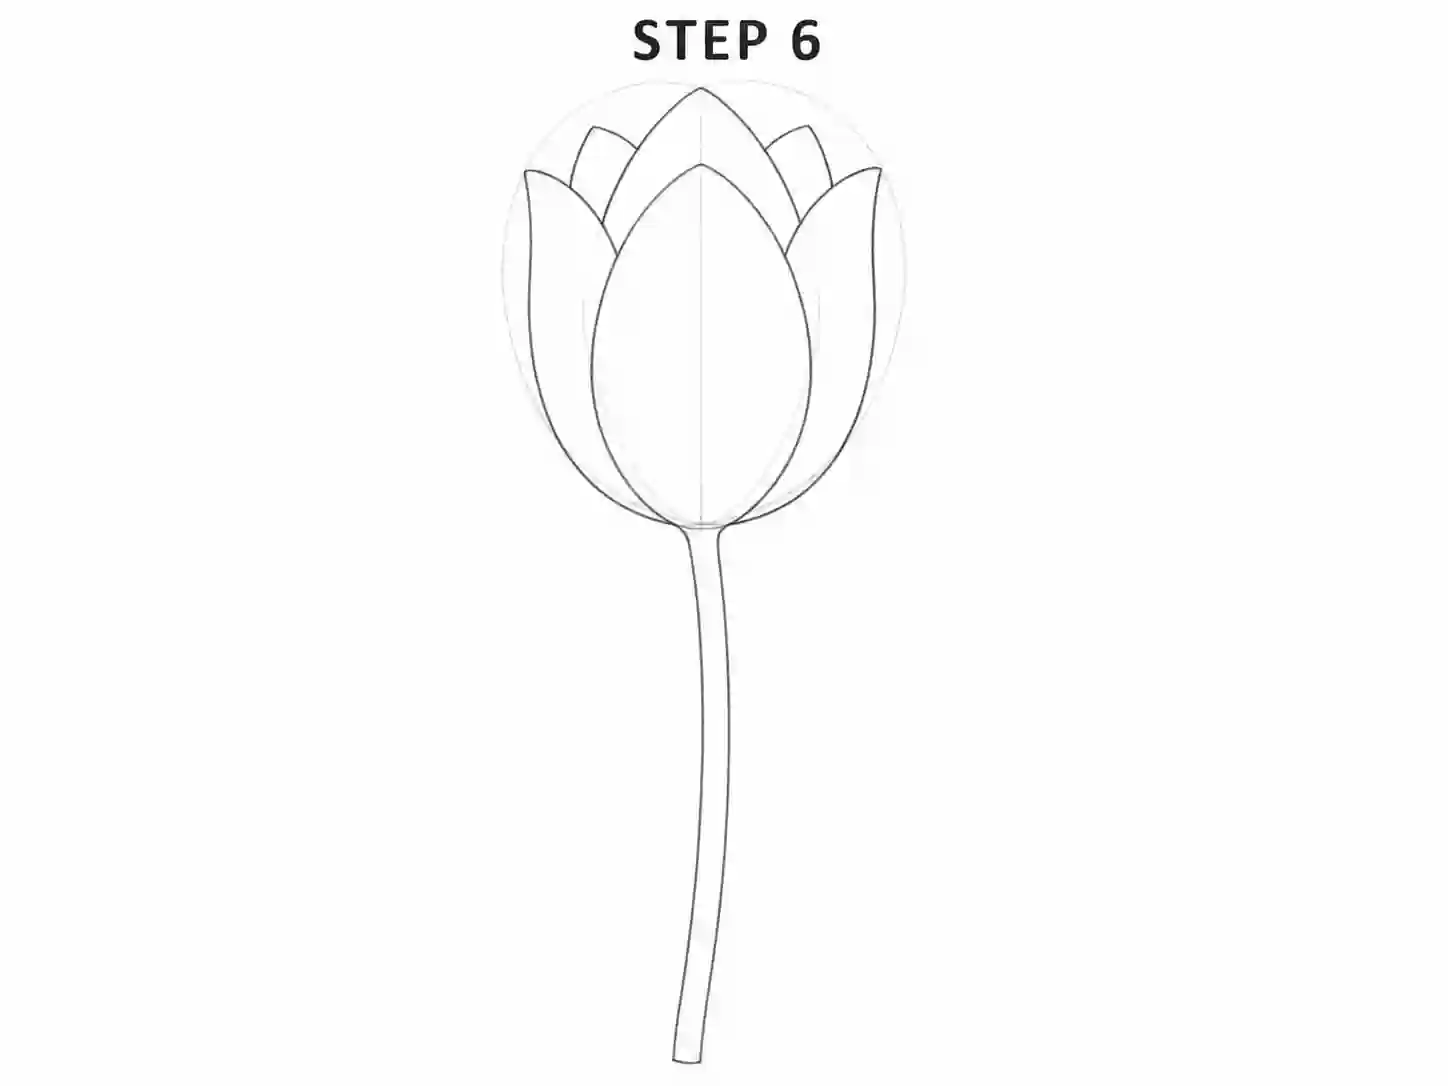
Draw the tulip stem
6

Step 6: Draw the Stem

From beneath the bloom, extend two close parallel lines downward.

Keep the stem long and slightly curved. A small bend gives the plant more movement than a completely straight vertical stem.

The stem should be narrow but strong enough to support the flower head.

If you are creating a flower tulip drawing, leave enough room beside the stem for two long leaves.

Add the tulip leaves
7

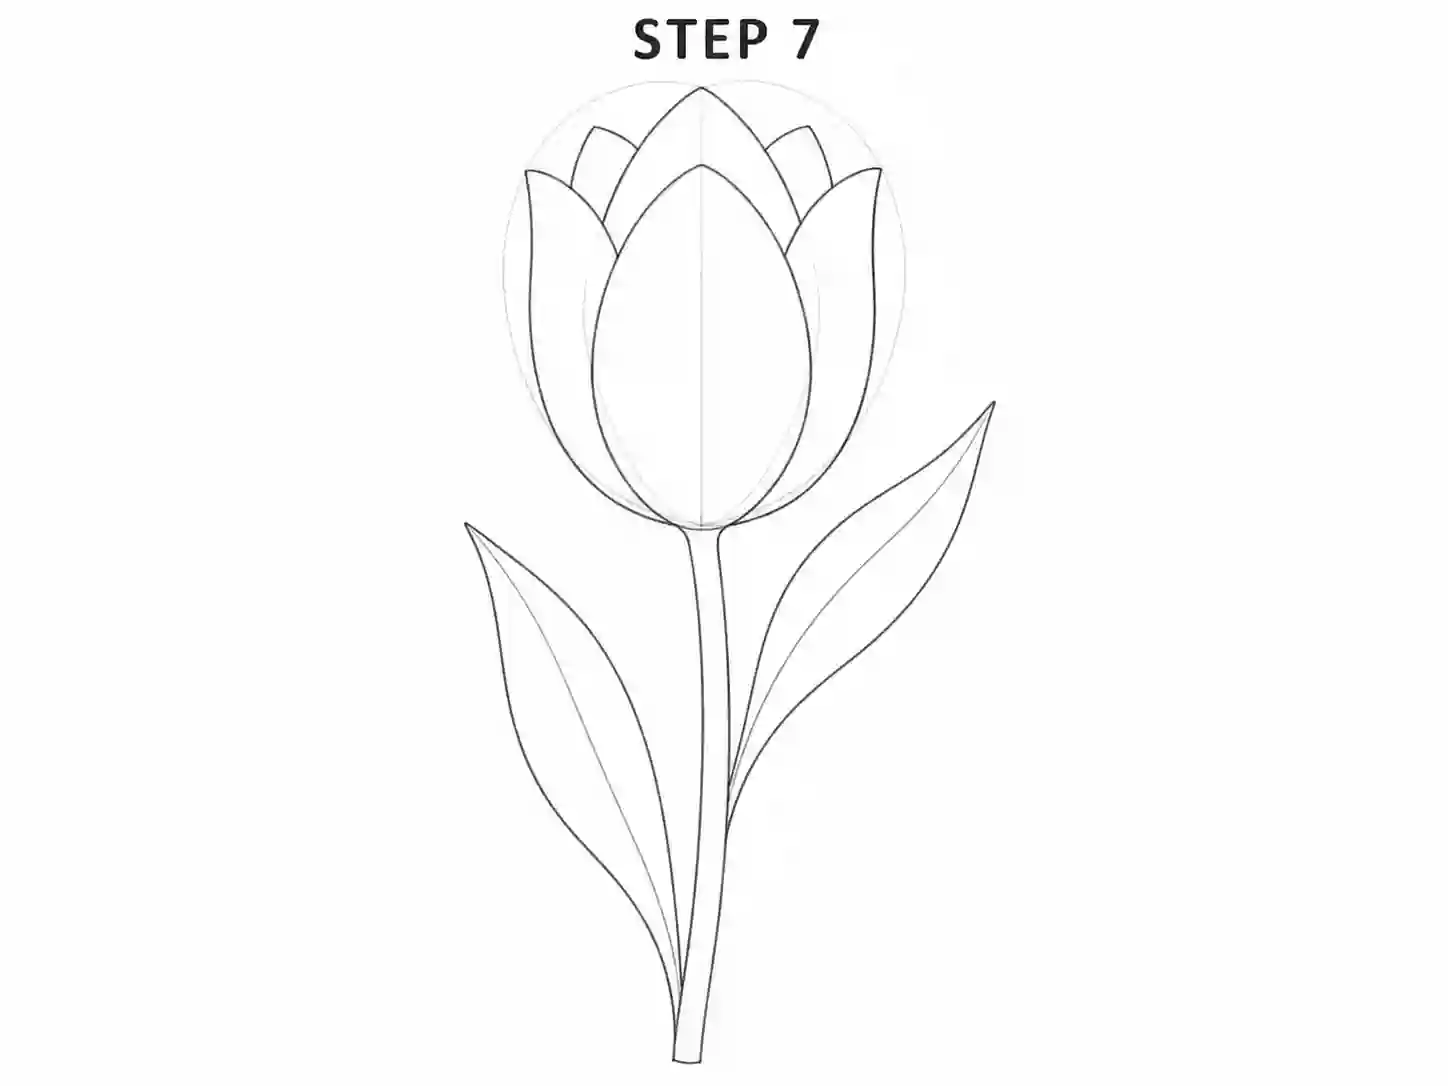
Step 7: Add the Tulip Leaves

Draw one leaf rising from the lower left side of the stem and another from the right at a different height.

Tulip leaves are usually:

  • Long
  • Smooth
  • Pointed
  • Slightly curved
  • Wider near the lower half

Add a central vein inside each leaf. Avoid drawing many side veins because tulip leaves usually look cleaner than rough or heavily textured leaves.

Tulip Drawing
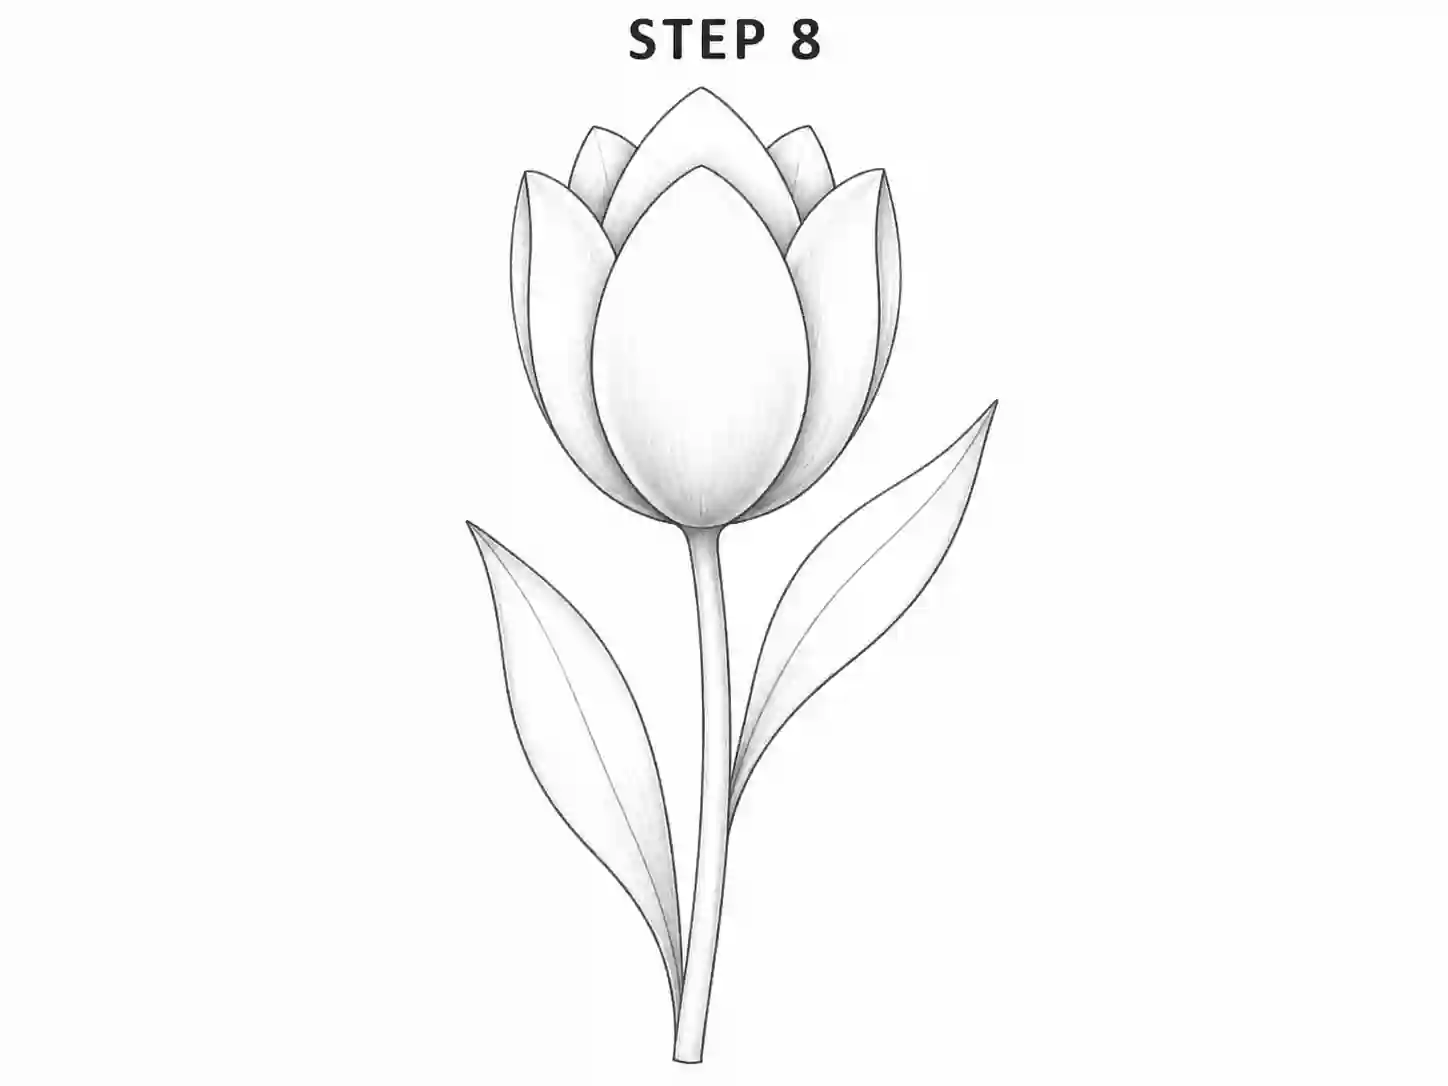
8

Step 8: Refine, Shade, or Color

Erase the oval guideline and remove unwanted overlapping marks.

Strengthen the important petal edges, stem, and leaf outlines. Keep interior petal folds lighter than the outer contour.

Add soft pencil shading:

  • Between overlapping petals
  • Near the base of the bloom
  • Along one side of the stem
  • Beside the main leaf veins
  • Under gently folded petal edges

Your final drawing should now have a clear bloom, smooth stem, and balanced leaves.

Create a Clean Tulip Outline Drawing

Outline tulip drawing is useful for worksheets, coloring pages, classroom activities, crafts, cards, and simple digital illustrations.

Begin by completing the pencil sketch. Remove the oval guide and any lines hidden behind the front petals.

Keep only:

  • The main bloom contour
  • Visible petal divisions
  • The stem outline
  • Leaf outlines
  • Simple central leaf veins

An outline drawing should remain easy to understand when printed in black and white.

For an outline tulip flower drawing, avoid filling the bloom with unnecessary folds. Two or three interior petal lines are usually enough.

A clear tulip drawing outline also works well as a tracing activity for beginners.

Tulip Line Drawing Tips

Line drawing depends on smooth curves and controlled line weight.

Use darker lines on the outer contour and lighter lines where petals fold inward. This creates depth without adding full pencil shading.

Try these techniques:

  • Use one continuous curve where possible.
  • Rotate the paper when drawing long petal edges.
  • Keep the stem lines close and parallel.
  • Use lighter pressure inside the bloom.
  • Avoid tracing the same edge repeatedly.
  • Keep the leaf points clean and narrow.

A line drawing looks strongest when every mark describes an important edge, fold, or overlap.

Tulip Pencil Drawing and Shading

Pencil drawing can look soft and realistic with only a few shades of graphite.

Use an HB pencil for the outline and a 2B pencil for darker areas.

Place shadows near:

  • The lower center of the bloom
  • The spaces between petals
  • Folded petal edges
  • The underside of the flower head
  • One side of the stem
  • The base and center of each leaf

Follow the direction of the petals with your pencil strokes. Vertical or gently curved strokes can suggest the natural surface of the bloom.

A sketch tulip drawing can remain loose, with some light construction marks still visible. For a clean finished version, erase the guidelines and blend only the darkest shadows.

How to Make a Realistic Tulip Drawing

A realistic drawing requires more than adding extra lines. The important elements are proportion, overlap, light, and petal direction.

Vary the Petal Heights

Some petals should sit slightly higher than others. Equal petal points can make the flower look artificial.

Show Clear Overlap

Use small shadows where one petal sits in front of another. These narrow dark areas create depth.

Keep the Bloom Rounded

Tulips have a cup-like form. Add light shading near the outer sides and keep selected central areas brighter.

Use Gentle Petal Texture

Add a few long, faint strokes following the petal direction. Avoid short random marks.

Shape the Leaves Naturally

Allow one leaf to curve outward while another rises closer to the stem.

A tulip drawing realistic in appearance should still have clean edges and visible highlights.

For a realistic tulip flower drawing, use a reference photo to study where the petals fold and how the bloom narrows near the base.

Pink Tulip Drawing

Pink tulip can be colored with pale pink, rose, magenta, or soft purple tones.

Begin with a light pink layer across the petals. Add darker pink:

  • Near the base
  • Between overlapping petals
  • Along selected folded edges
  • On the side facing away from the light

Leave the center and upper petal surfaces lighter.

Use medium green on the stem and leaves. Add dark green along one side and yellow-green on the areas facing the light.

Build the colors slowly instead of applying heavy pressure immediately.

Easy Tulip Drawing for Kids

Drawing for kids should use fewer petals and simple rounded shapes.

Use this short method:

  • Draw a large U-shape.
  • Add three rounded points at the top.
  • Draw a long straight or curved stem.
  • Add two pointed leaves.
  • Color the flower and leaves.

For a cute tulip drawing, make the bloom slightly wider and use rounded petal points.

A cute tulip easy drawing can also include a smiling face inside the flower head, short cartoon leaves, or a small flower pot.

A tulip cartoon drawing works well for school projects, greeting cards, stickers, and coloring activities.

Drawing a Tulip Bouquet

A tulip bouquet drawing combines several flowers at different heights and angles.

Begin with one main tulip near the center. Add two smaller flowers on either side.

Vary the blooms:

  • One facing forward
  • One leaning left
  • One shown from the side
  • One partly closed

Bring the stems together near the lower part of the composition. Add long leaves between them to fill empty spaces.

For your first bouquet, use three flowers. A larger group may become difficult to organize before you understand the individual shape.

A tulip flowers drawing looks more natural when the blooms are not all the same size or direction.

Common Mistakes

Making the Bloom Completely Round

Tulip flowers are often narrower near the base. A perfect circle can make the bloom look flat.

Drawing Too Many Visible Petals

A beginner front-facing version usually needs only three to five clear petals.

Making Every Petal the Same Height

Vary the top points slightly to create a natural silhouette.

Using a Very Thin Stem

The stem should remain narrow, but it must look strong enough to support the bloom.

Drawing Short, Round Leaves

Tulip leaves are usually long, pointed, and smooth.

Adding Heavy Shading Too Early

Complete the shape and overlaps first. Dark graphite can hide proportion problems.

Leaving Construction Lines Visible

Erase the oval guide before strengthening the final outline.

Tulip Drawing worksheet

Downloadable Worksheet

The printable worksheet provides guided practice for the bloom, petals, stem, and leaves.

It may include:

  • A completed tulip reference
  • Eight visual drawing steps
  • A light tracing outline
  • Basic petal exercises
  • A stem and leaf practice section
  • A blank drawing box
  • A proportion grid
  • Suggested drawing time
  • Difficulty level

The worksheet is useful for anyone following tutorial at home, in class, or during independent practice.

Begin by tracing the faint version. Next, recreate the flower while looking at the reference. Finally, cover the examples and create a drawing of a tulip from memory.

Frequently Asked Questions

Begin with a light oval for the bloom. Narrow the lower portion, add one central petal, and place the side petals behind it.

A beginner drawing may show three main petals and one or two smaller back petals. More petals can be added in a detailed version.

A tulip is beginner-friendly because the flower has a compact bloom, smooth stem, and long simple leaves.

Use overlapping petals, keep the outer sides slightly darker, and add narrow shadows between the petal layers.

Yes. An easy drawing can use only clean outlines. The flower will remain recognizable through its petal shape, stem, and pointed leaves.

Pink, red, yellow, orange, purple, and white are common choices. You can also use two colors to create a decorative variety.

A detailed drawing improves when you study petal folds, vary the petal heights, and use light directional shading instead of random pencil marks.

Yes. A step by step drawing can be simplified into a U-shaped bloom, three top points, one stem, and two leaves.

Round the petal points, simplify the leaves, use a thicker outline, and optionally add a small face inside the bloom.

Complete Your Tulip Drawing

Start with the light oval, build the petals one at a time, and complete the bloom before adding the stem and leaves.

A tulip simple drawing can look attractive without many details. Smooth curves, clear overlaps, and balanced proportions are more important than complex shading.

Use the worksheet for tracing and independent practice. Repeat the same flower from different angles, then try combining several blooms into a bouquet.

With regular practice, your drawing will become cleaner, more confident, and easier to adapt into pencil, outline, realistic, cartoon, or colored styles.