Skip to content
FlowerDrawings.orgFlowerDrawings.org

Easy Sunflower Drawing Step-by-Step Guide for Beginners

A sunflower is an enjoyable subject for beginners because its main structure is built from clear shapes: a round center, long petals, a sturdy stem, and broad leaves. Once these parts are placed correctly, a sunflower drawing can be developed with texture, shading, and color.

This tutorial explains the full process from the first circle to the finished flower. You will learn how to arrange the petals, create a believable seed pattern, draw the stem and leaves, clean the outline, and add simple pencil shading.

The lesson is suitable for students, kids, beginners, and anyone looking for an approachable floral sketch. You can follow the complete tutorial or use the downloadable worksheet for tracing and independent practice.

Sunflower drawing

Sunflower Anatomy at a Glance

Before drawing, take a moment to observe the main parts of the flower.

A sunflower usually includes:

  • A large circular flower head
  • A dark central disk
  • Many small seeds arranged in curved rows
  • A ring of long outer petals
  • Smaller petals behind the first layer
  • A thick and slightly curved stem
  • Broad leaves with pointed ends
  • Visible veins inside the leaves

A drawing of a sunflower becomes easier when these parts are treated as separate shapes instead of one complicated object.

The center controls the overall size of the flower. The petals radiate outward from it, while the stem and leaves support the composition below.

Tutorial Overview

Difficulty

Beginner to intermediate

Estimated time

8 minutes

Number of steps

9

Main tools

Pencil, eraser, paper and sharpener

Optional tools

Fineliner, colored pencils, markers or blending stump

Drawing style

Front-facing sunflower with stem and leaves

Materials for Your Sunflower Sketch

Prepare these basic supplies:

  • HB pencil for the first outline
  • 2B pencil for darker values
  • Soft eraser
  • Pencil sharpener
  • Smooth drawing paper
  • Black fineliner for optional line art
  • Yellow, orange, brown, and green coloring tools
  • Blending stump or tissue for soft shading

Use gentle pencil pressure during the early stages. Light guidelines are easier to erase and allow you to correct the proportions before adding detail.

Build the Flower with Basic Shapes

The main flower head can be planned with two circles.

The first circle creates the outer boundary of the seed area. A smaller circle inside it helps separate the darkest center from the outer seed ring.

The petals can be simplified into long teardrop shapes. Each petal begins near the center disk, widens through the middle, and narrows toward the tip.

The stem can be drawn with two parallel lines, while the leaves begin as pointed oval shapes.

This shape-based method makes sunflower drawing easy for anyone who finds the finished flower too detailed at first glance.

Sunflower Drawing Step by Step

Keep the construction lines light and follow each stage in order.

Draw the main sunflower center circle
1

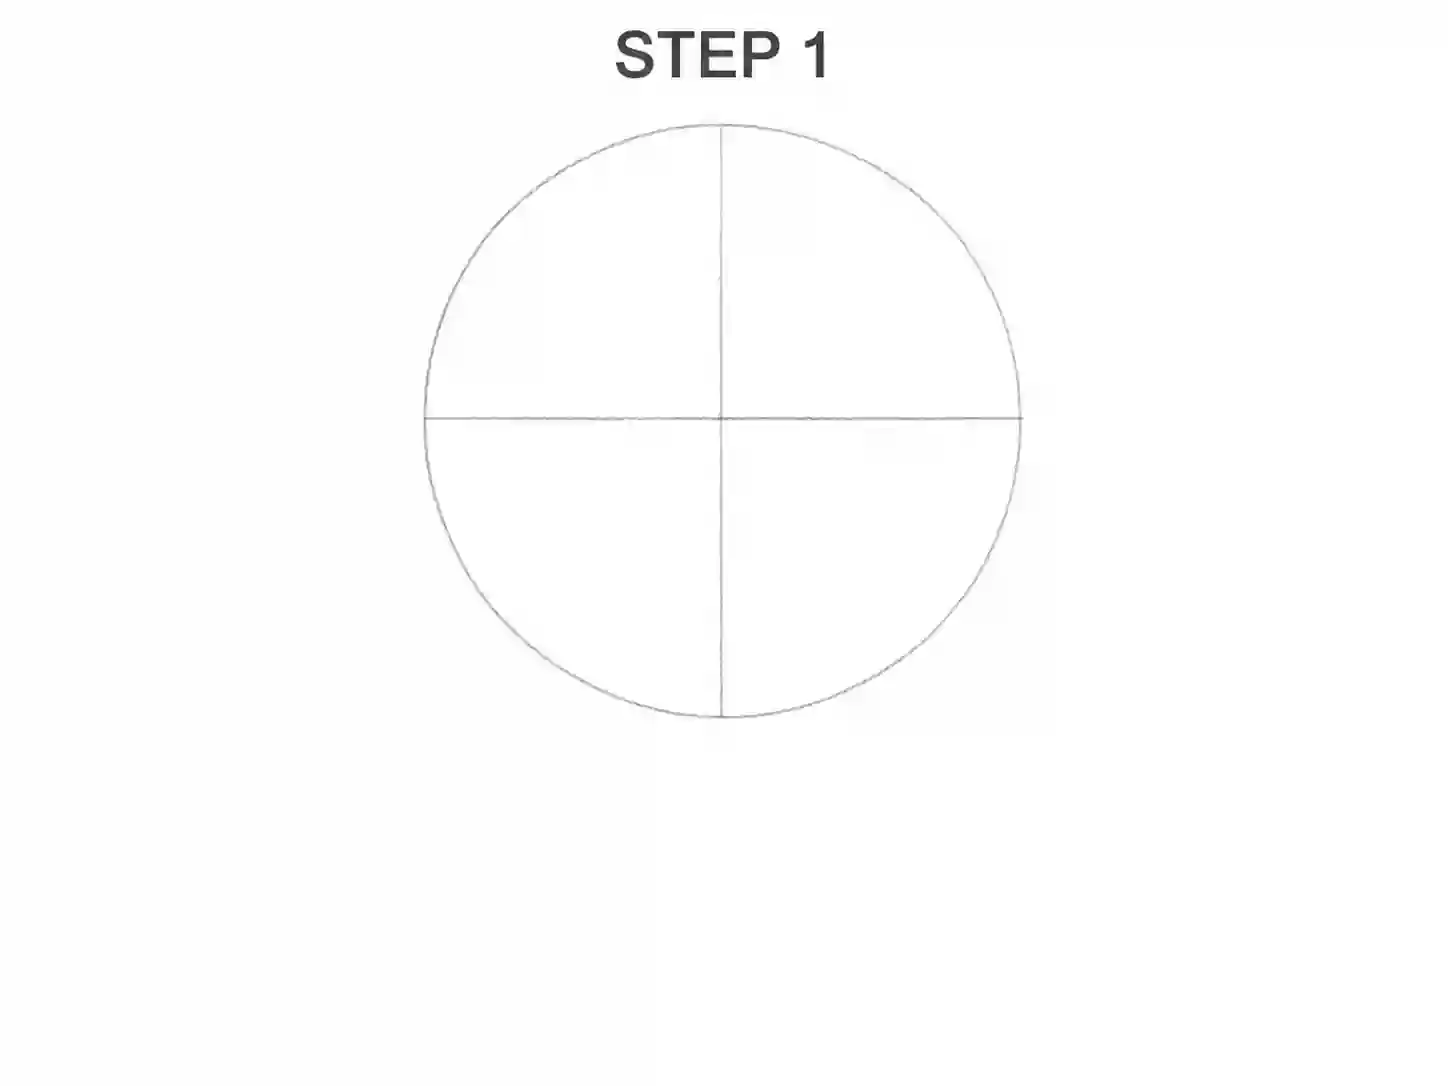
Step 1: Draw the Main Center Circle

Begin with a medium-sized circle near the upper half of the page.

This circle will contain the seeds and determine the width of the flower. Leave enough room around it for long petals.

The circle does not need to be mathematically perfect. A slightly uneven shape can make the flower feel more natural.

When drawing sunflower proportions, keep the center large enough to remain visually important after the petals are added.
Add a second sunflower center ring
2

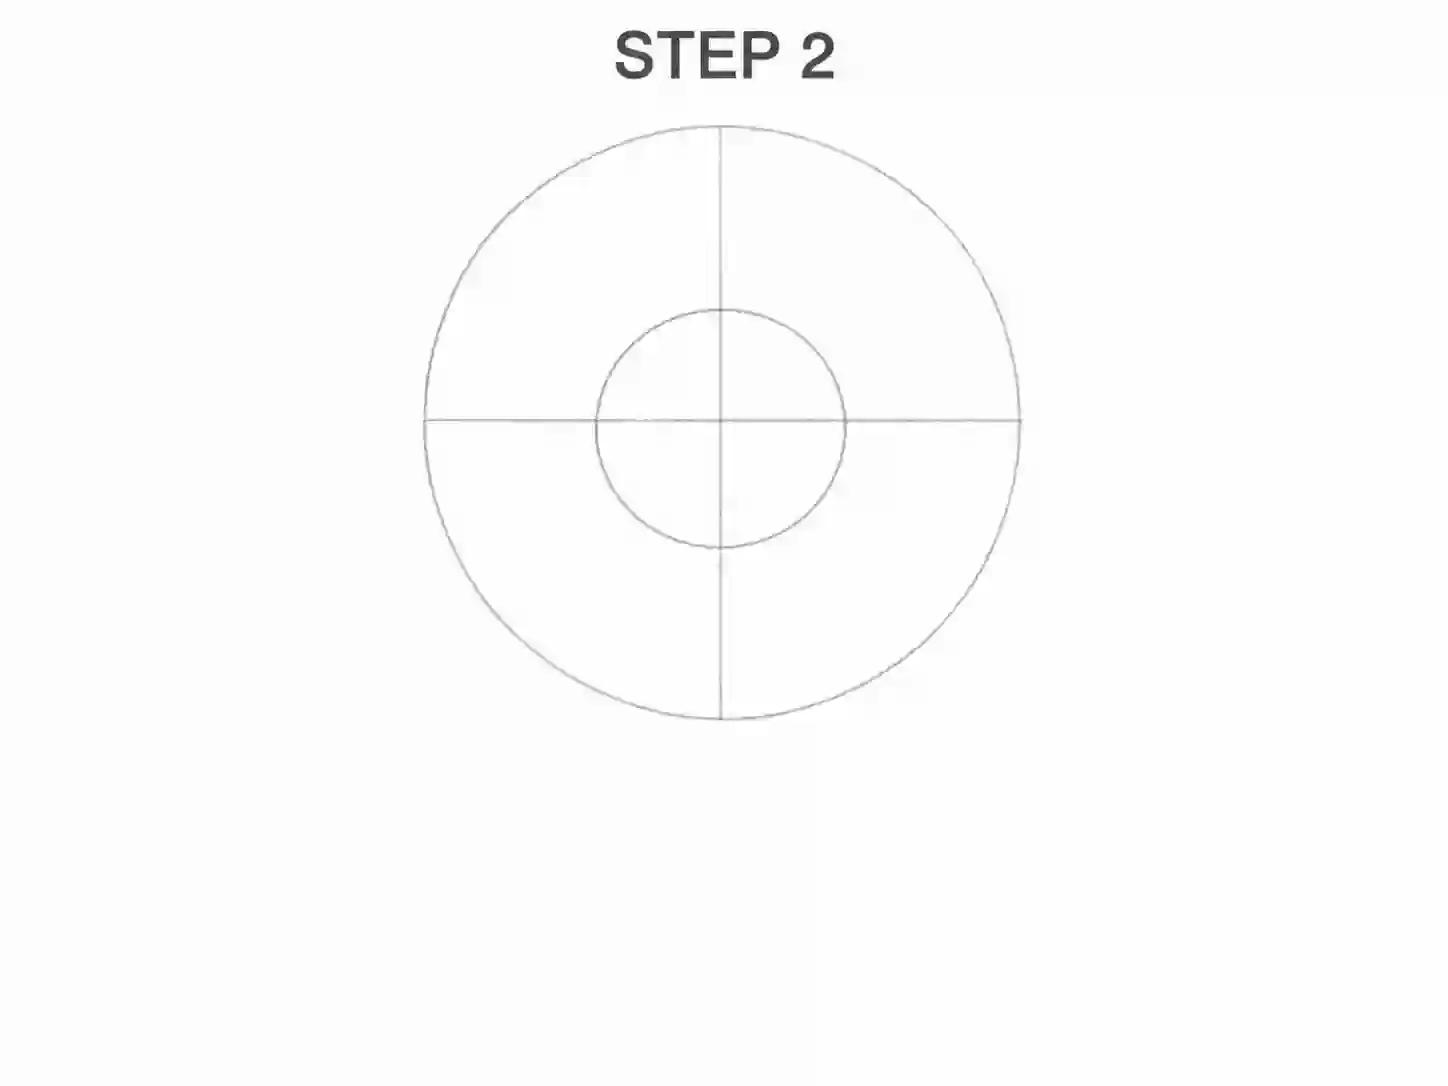
Step 2: Add a Second Center Ring

Draw a smaller circle inside the first one.

The inner circle will become the darkest part of the seed head. The space between the two circles will hold additional seed patterns and texture.

Keep the rings centered, but avoid pressing too hard with the pencil.

At this stage, your sunflower easy drawing should look like two simple circles.

Place the first sunflower petals
3

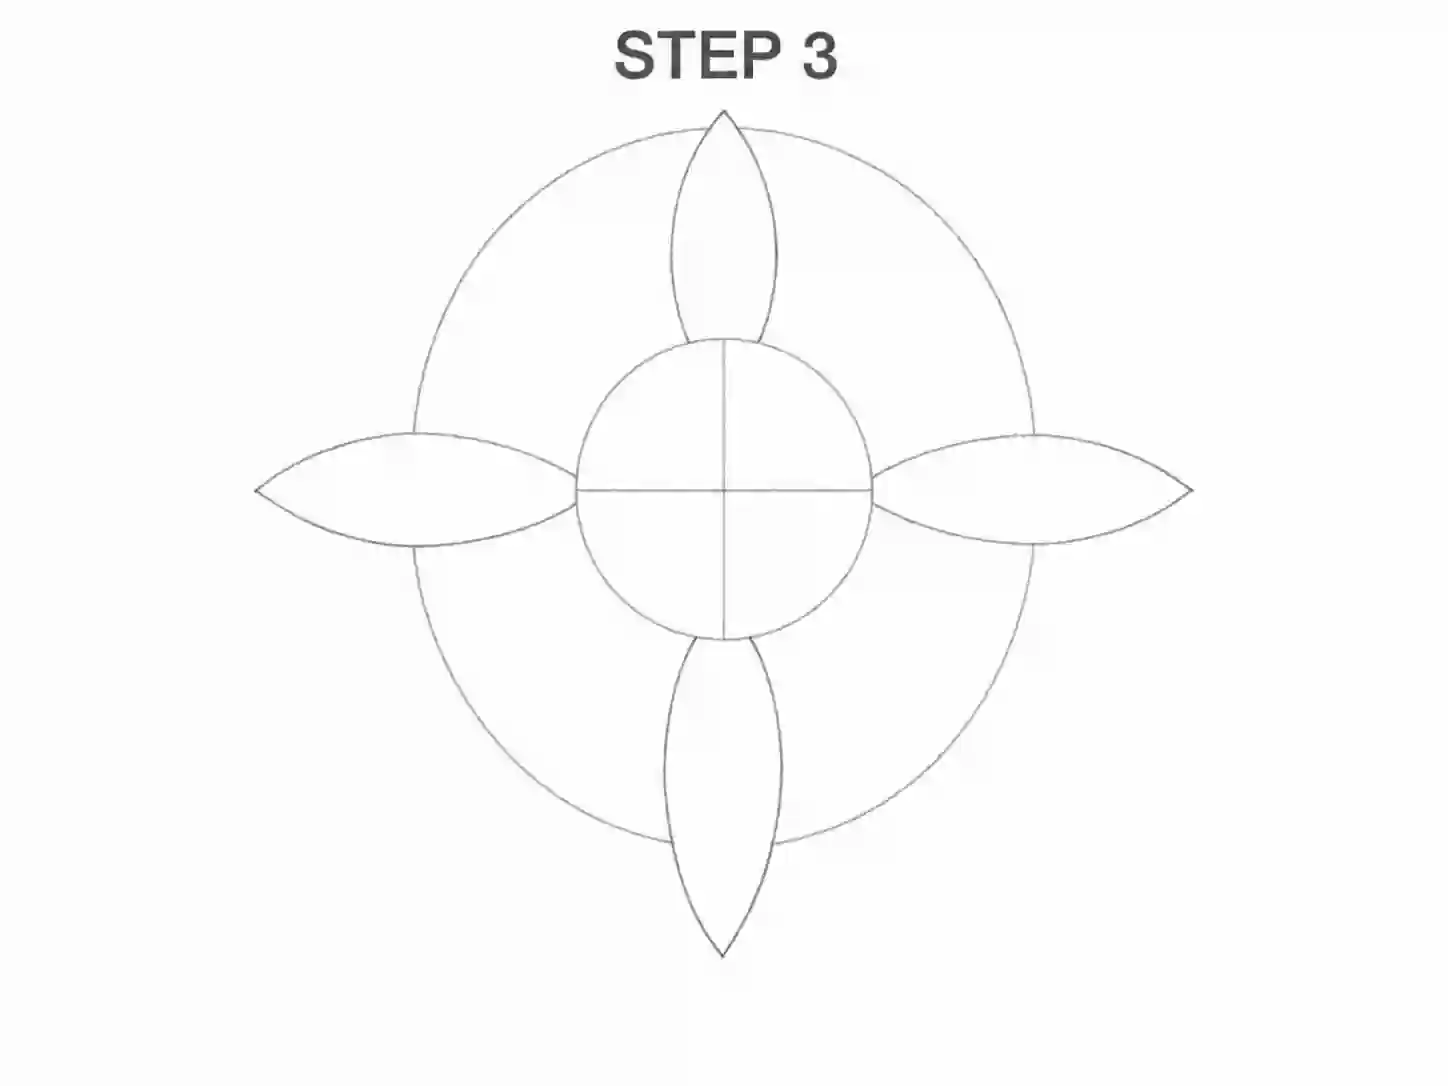
Step 3: Place the First Petals

Add four long petals at the top, bottom, left, and right of the center.

Each petal should begin at the outer edge of the large circle. Make the petals wider near the middle and pointed at the end.

These first petals act as guides for the rest of the flower.

Avoid making every petal perfectly straight. Slight bends and curves help the final sunflower flower drawing look more natural.

Complete the main sunflower petal layer
4

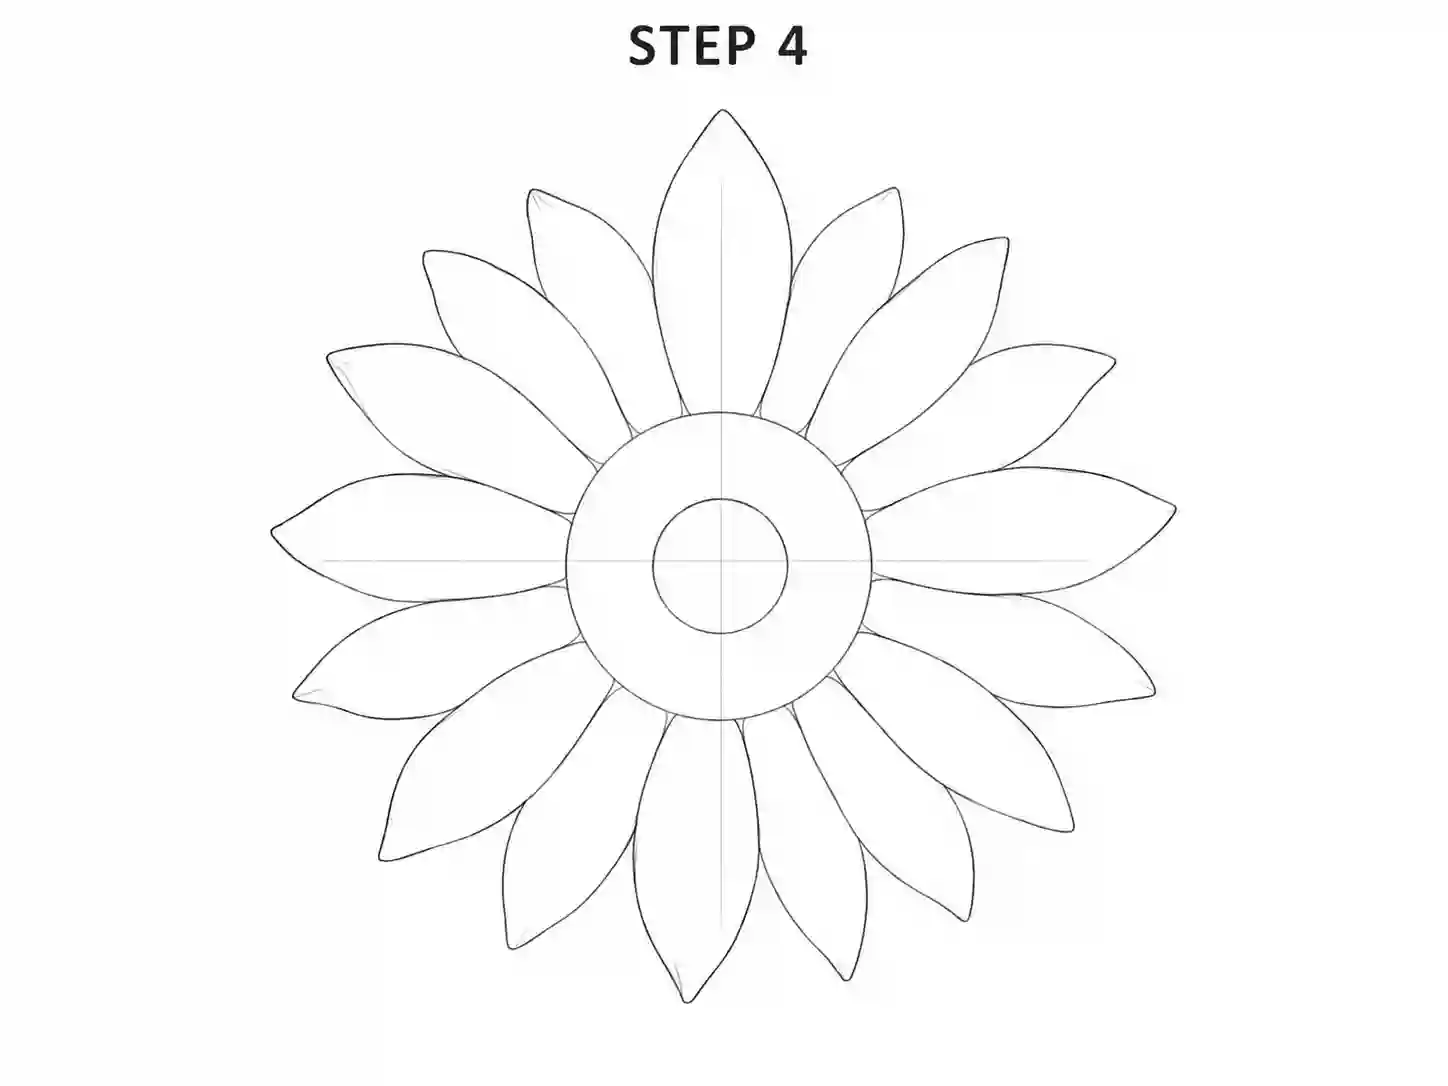
Step 4: Complete the Main Petal Layer

Fill the spaces between the first four petals.

Add more long petals around the center until the flower head feels complete. Vary their widths, lengths, and directions slightly.

Some petals can curve to the left or right. Others may tilt forward or appear partly hidden behind nearby shapes.

A simple sunflower drawing becomes more interesting when the petals are balanced without looking mechanically repeated.

Add smaller overlapping sunflower petals
5

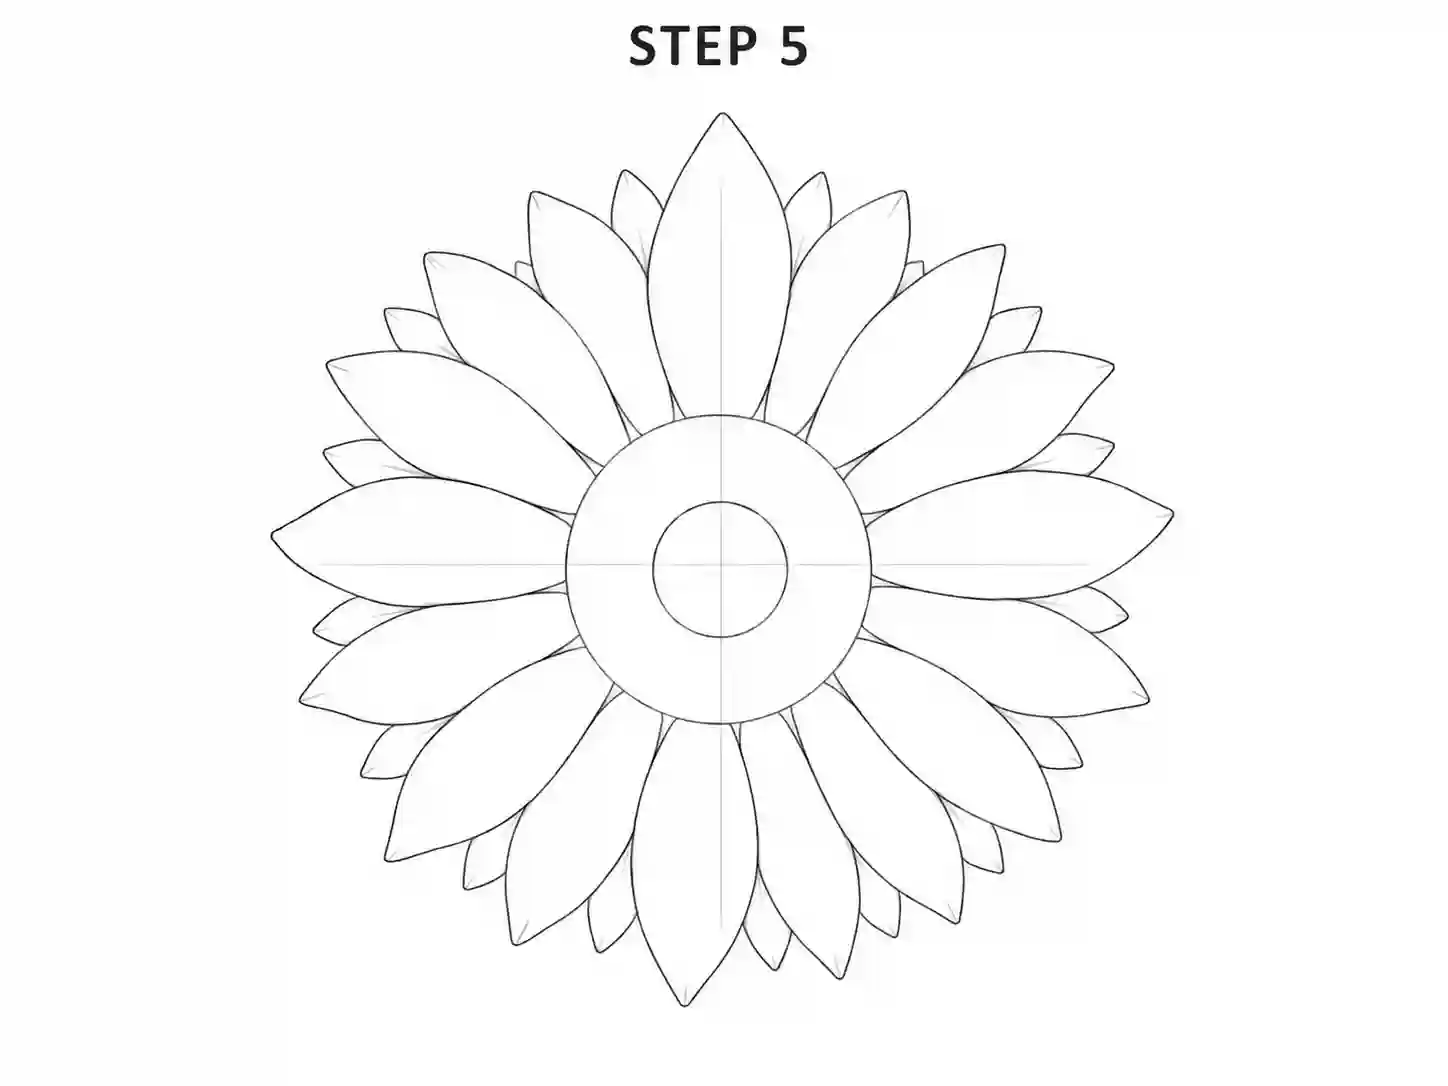
Step 5: Add Smaller Overlapping Petals

Draw a second layer of shorter petals behind the main row.

These petals should appear between the gaps of the first layer. Only part of each shape needs to remain visible.

Overlapping petals create fullness and help the flower look less flat.

Is sunflower drawing simple enough for beginners?

Yes it is simple if you add only few second-layer petals instead of filling every gap.

Create the sunflower seed pattern
6

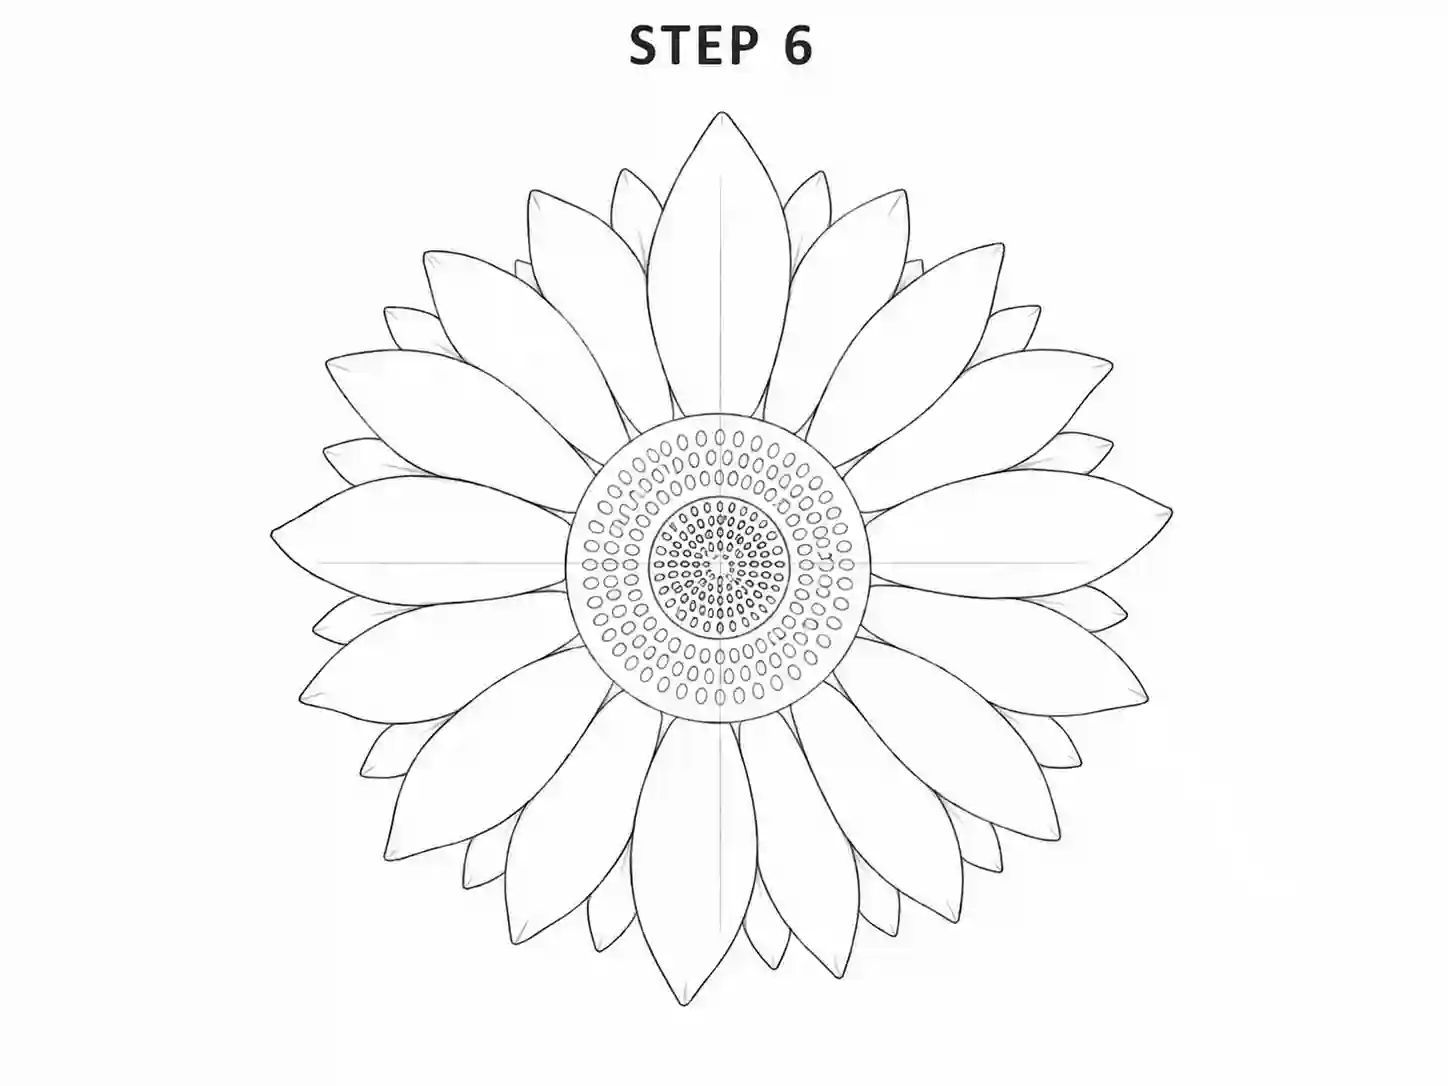
Step 6: Create the Seed Pattern

Return to the center circles.

Begin with small dots, ovals, or short curved marks inside the inner circle. Arrange them in loose curved rows rather than placing them randomly.

Add another ring of small marks in the space between the two circles.

You do not need to draw every seed separately. A combination of dots, short strokes, and curved guides can suggest hundreds of seeds without making the center overly busy.

This is the most important stage for anyone practicing sunflower seeds drawing techniques.

Draw the sunflower stem and leaves
7

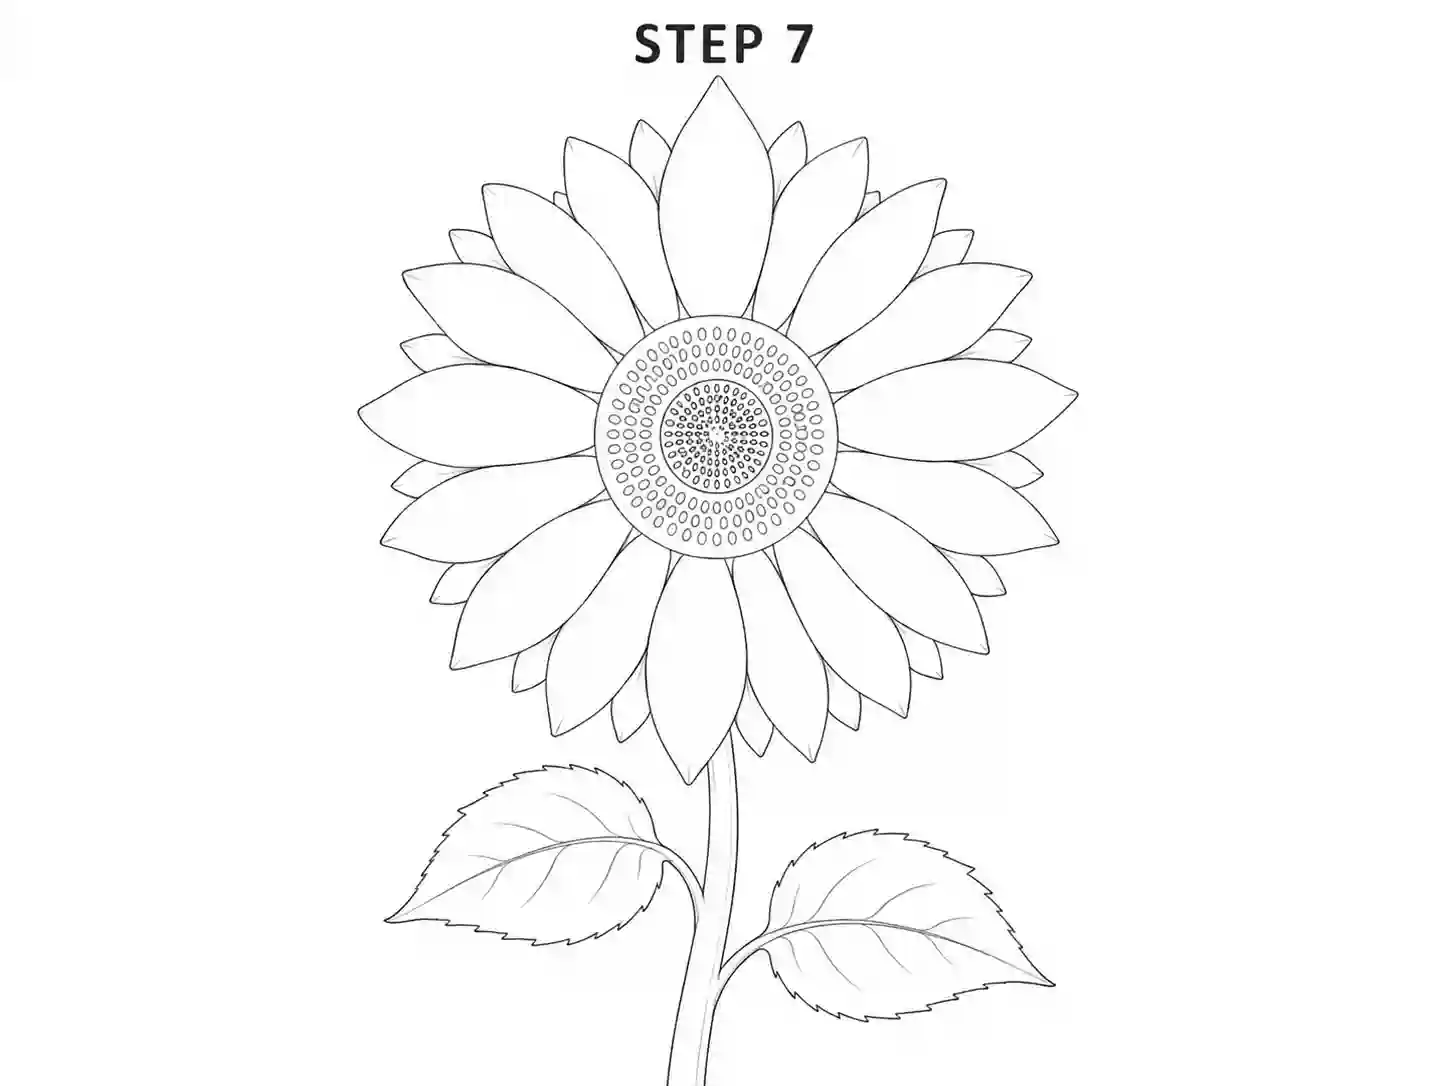
Step 7: Draw the Stem and Leaves

Extend two close lines downward from beneath the flower head to create a sturdy stem.

Give the stem a gentle curve rather than making it perfectly straight.

Add one broad leaf on each side at different heights. Each leaf should have:

  • A pointed tip
  • A wide middle
  • A clear central vein
  • Several side veins
  • Slightly uneven or jagged edges

A clear sunflower leaves drawing helps balance the large flower head and makes the full plant feel complete.

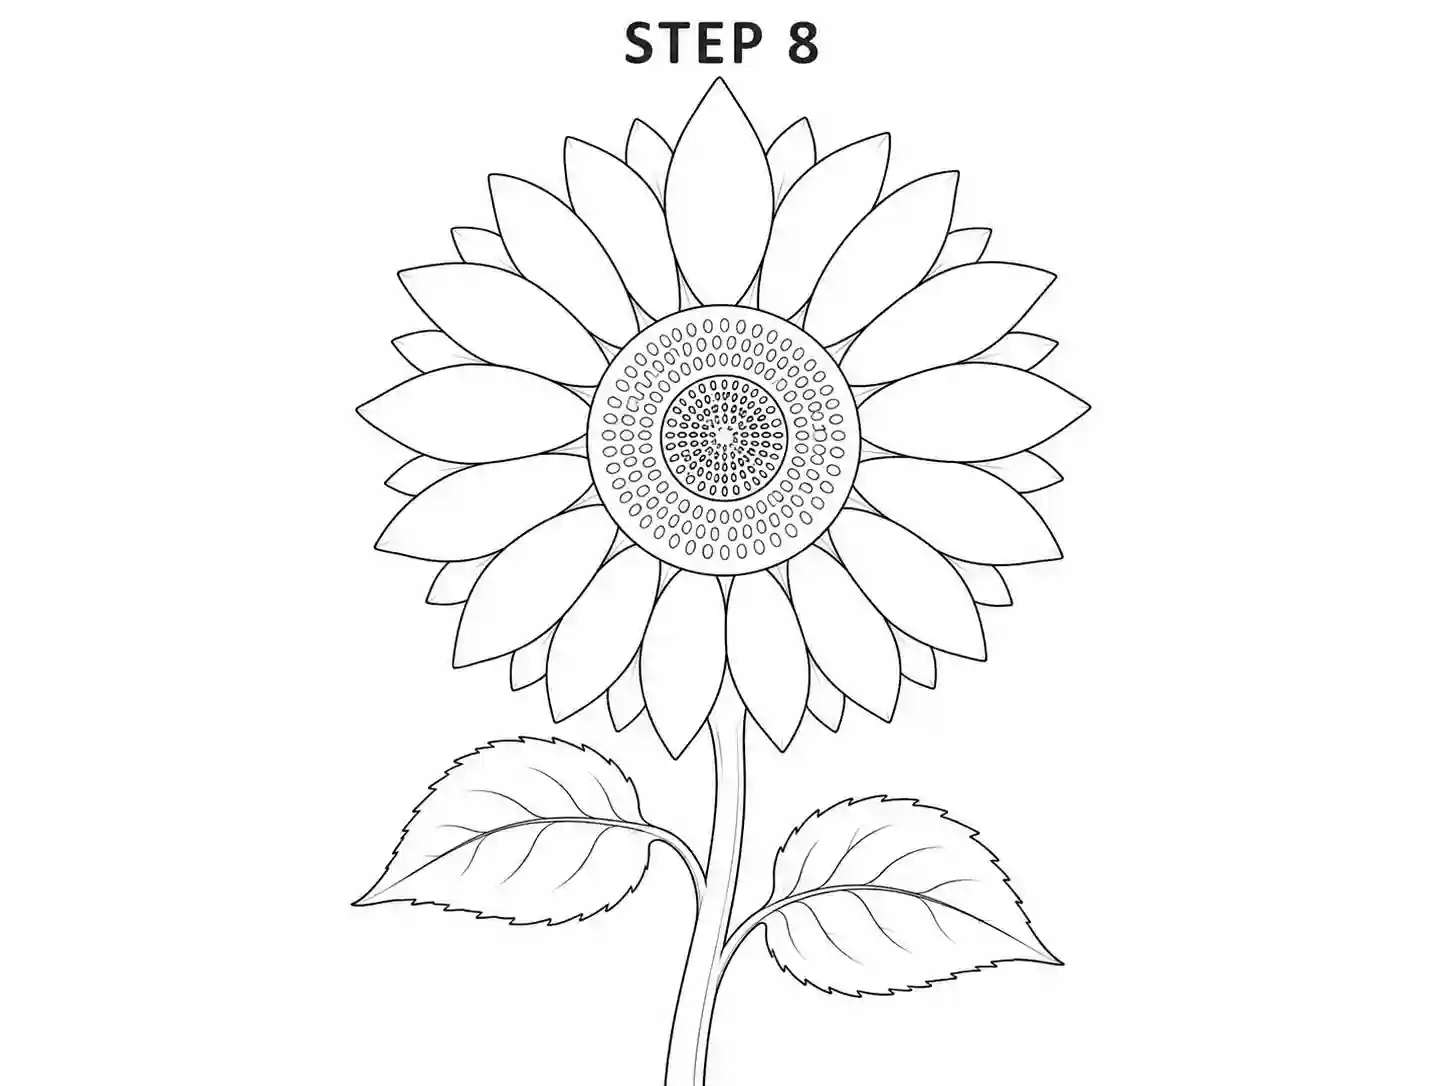
Refine the final sunflower outline
8

Step 8: Refine the Final Outline

Erase unnecessary guidelines and clean the shapes.

Strengthen the outer petal edges, center rings, stem, and leaf contours. Keep interior details slightly lighter.

Remove any lines that pass through overlapping petals. Clarifying which petal sits in front will improve depth.

The cleaned sunflower drawing outline should remain easy to understand even without shading or color.

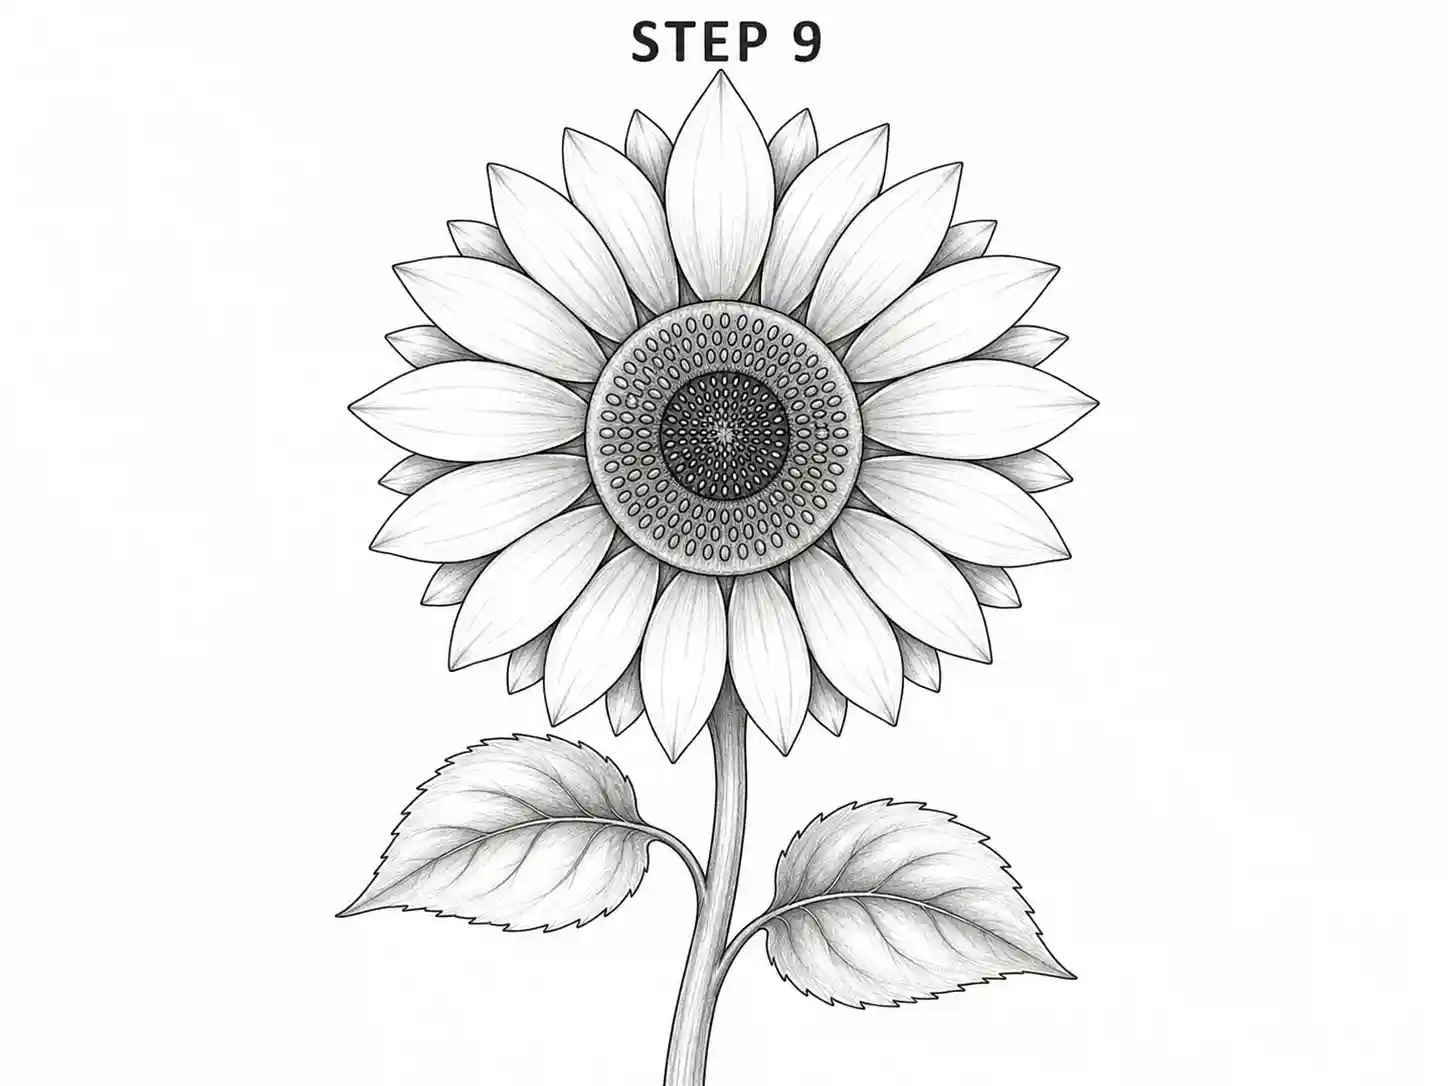
Sunflower drawing
9

Step 9: Add Shading and Texture

Choose a light direction before shading.

Add darker values:

  • In the inner seed circle
  • Between the seed rows
  • At the base of the petals
  • Beneath overlapping petals
  • Along one side of the stem
  • Near the main veins of the leaves

Leave the petal tips lighter to create contrast. This final stage turns the outline into a finished drawing with greater depth and texture.

How to Draw Sunflower Seeds

The seed head is often the most intimidating part of the flower, but it can be simplified.

Sunflower seeds commonly appear in spiral patterns. Instead of drawing exact mathematical spirals, use a few curved guidelines moving outward from the center.

Place small oval marks or dots along those curves.

For an easy sunflower seed drawing, use three levels of detail:

Basic Seed Texture

Fill the center with small dots and short strokes.

Intermediate Seed Pattern

Add loose curved rows and vary the size of the marks.

Detailed Seed Pattern

Create intersecting spiral directions and use darker values between the seed shapes.

Keep the darkest area near the middle. Allow the marks to become slightly larger and lighter toward the outer edge.

Sunflower Pencil Drawing Techniques

An easy sunflower pencil drawing can look attractive with only a few graphite values.

Use an HB pencil for construction and switch to a softer pencil for shading.

Try these techniques:

  • Short curved strokes inside the center
  • Light hatching at the base of each petal
  • Soft shadows under overlapping petals
  • Parallel strokes following the stem
  • Vein-guided shading inside the leaves
  • Gentle blending in the darkest seed areas

A sunflower pencil drawing should retain clear white areas. Covering every part with graphite can make the flower look dull.

For a loose sunflower sketch drawing, keep some construction marks visible and use varied line weight rather than polished shading.

Create a Clean Sunflower Outline Drawing

An outline sunflower drawing is suitable for worksheets, classroom projects, coloring pages, crafts, and simple illustrations.

After completing the pencil sketch, remove the construction circles that are no longer needed.

Keep these essential lines:

  • The outer seed circle
  • The main seed texture
  • All visible petal edges
  • The stem outline
  • Leaf outlines and central veins

Reduce the number of seed marks and use one clear row of petals, If it looks tough.

A detailed sunflower outline drawing can include overlapping petals, jagged leaves, and more texture in the center.

A simple sunflower line drawing should remain clear when printed in black and white.

How to Make a Realistic Sunflower Drawing

A realistic drawing depends on observation, proportion, and controlled texture.

Vary the Petals

Real sunflower petals are not equal in length or direction. Bend some petals slightly and allow others to overlap.

Build the Center Gradually

Use layers of dots, ovals, and curved marks. Darken the central area and soften the texture as it moves outward.

Show the Flower’s Weight

A large sunflower head may cause the upper stem to bend slightly. This small curve makes the plant look more believable.

Add Leaf Texture

Sunflower leaves often have visible veins and slightly rough edges. Use short directional strokes rather than smooth flat shading.

Control the Shadows

Place darker values beneath the flower head, between petals, and beside the leaf veins.

To make your sunflower drawing realistic, avoid outlining every form with the same dark line. Let some edges remain lighter where they face the light.

A realistic sketch sunflower drawing can combine confident outlines with soft, unfinished graphite texture.

Easy Sunflower Drawing for Kids

If you want drawing for kids, You should use fewer shapes and clearer lines.

Use this simplified method:

  • Draw one large circle.
  • Add a smaller circle inside it.
  • Draw twelve to sixteen long petals.
  • Fill the center with dots.
  • Add a straight or gently curved stem.
  • Draw two large leaves.
  • Color the petals yellow and the center brown.

For a cartoon style, add a smiling face inside the center and keep the petals rounded.

A sunflower cartoon drawing works well for school activities, greeting cards, posters, and coloring pages.

Small Sunflower Drawing Practice

A small sunflower drawing is useful for journals, bookmarks, borders, cards, and quick sketchbook exercises.

When working at a smaller size:

  • Use one petal layer.
  • Replace individual seeds with dots.
  • Draw one leaf instead of two.
  • Keep the stem short.
  • Avoid detailed shading.
  • Use a slightly darker outer outline.

Try drawing several small sunflowers at different angles. Repeating the same basic shape improves confidence and line control.

Coloring a Beautiful Sunflower Drawing

A beautiful drawing usually combines warm petals with a darker center and fresh green leaves.

Start the petals with pale yellow. Add golden yellow or orange near their bases.

Use brown in the center and add darker brown or black between selected seed marks. A small amount of yellow-green near the outer seed ring can create a natural transition.

For the leaves:

  • Start with medium green.
  • Add dark green beside the central vein.
  • Use yellow-green on the light-facing areas.
  • Leave a few small highlights.

Build the colors gradually. Heavy pressure during the first layer can make blending difficult.

Common Mistakes

Making the Center Too Small

The seed head is a major feature. A very small center can make the flower resemble a daisy.

Drawing Identical Petals

Vary the petal sizes and directions to avoid a stiff appearance.

Placing Seeds Randomly

Use curved rows or grouped textures. Completely random dots can make the center look flat.

Making the Stem Too Thin

A sunflower has a strong stem that supports a large flower head.

Forgetting Overlapping Petals

A second partial layer makes the bloom appear fuller.

Shading Every Petal Equally

Keep some petals lighter and place shadows mainly near their bases or underneath overlaps.

Using Smooth Leaf Edges

Sunflower leaves often appear slightly rough or jagged. A little edge variation improves the result.

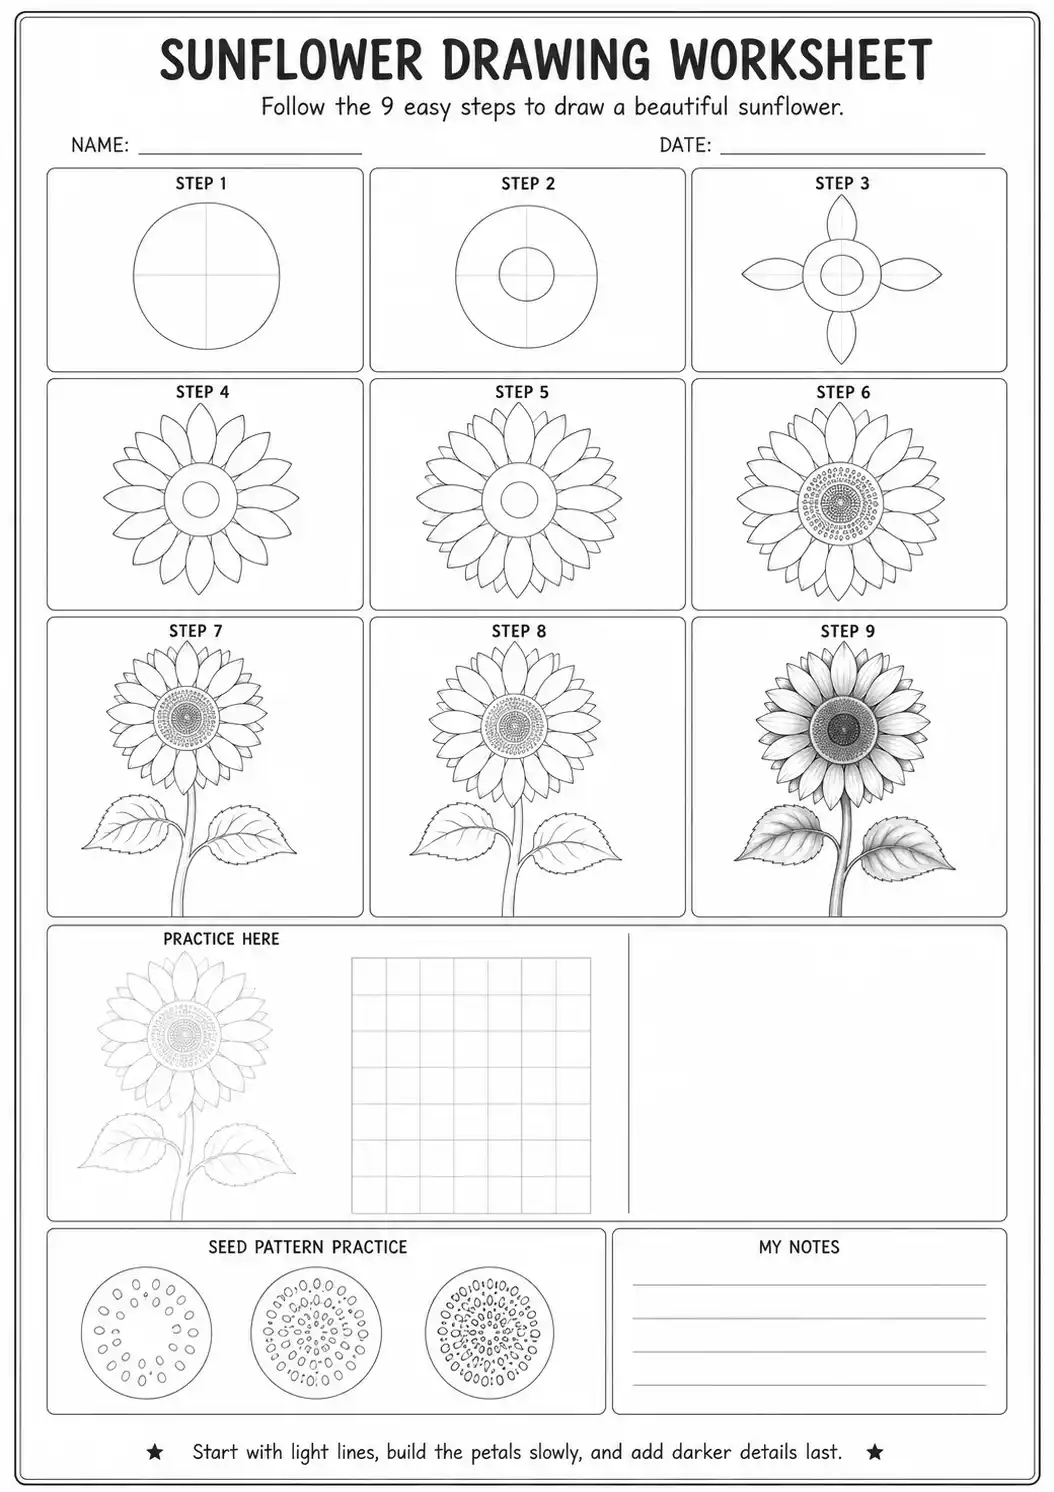
Sunflower drawing worksheet

Downloadable Worksheet

The printable worksheet provides guided practice for every major part of the flower.

It may include:

  • A completed sunflower reference
  • Nine drawing stages
  • Light construction circles
  • Petal-shape practice
  • A sunflower seed pattern exercise
  • A tracing outline
  • A blank drawing area
  • A proportion grid
  • Suggested completion time
  • Difficulty level

The worksheet is useful for anyone following a sunflower drawing step by step lesson at home or in the classroom.

Begin with the tracing activity. Next, copy the reference into the practice space. Finally, draw the flower again without looking at the earlier stages.

Frequently Asked Questions

Start with a large circle for the seed head and a smaller circle inside it. Add four guide petals, fill the spaces with more petals, and then draw the stem and leaves.

Drawing sunflower becomes manageable when it is divided into the center, petals, seed pattern, stem, and leaves. Beginners should complete one part before moving to the next.

There is no fixed number. A beginner version may have twelve to twenty visible petals, while a detailed drawing can include many overlapping shapes.

Use small dots, ovals, and short strokes arranged in curved rows. Darken the middle and gradually lighten the texture toward the outer edge.

Yes. Complete the sketch, erase the guidelines, and keep only the main contours and selected seed details. Leave the petals and leaves mostly blank for coloring.

An HB pencil works well for the first outline. A 2B or 4B pencil can be used for darker seeds, shadows, and leaf details.

Pencil drawing improves when the shading follows the direction of the petals and leaves. Keep the petal tips light and add darker values near the center.

A drawing sunflower can be simplified by using one seed circle, a single row of petals, a short stem, and two broad leaves.

A sunflower usually has a much larger and darker center, longer petals, a thicker stem, and broader leaves.

Complete Your Drawing

Start with the two center circles and use them to guide the petal placement. Add the seed pattern gradually, then complete the stem and leaves before refining the final outline.

A sunflower simple drawing can still look attractive when the proportions are clear and the petal directions are varied. Detailed seeds and realistic shading can be added after you become comfortable with the basic structure.

Use the printable worksheet to practice each stage. With repetition, drawing will become easier to plan, outline, shade, and color.